
6 Best DVD Menu Creators and How to Design Custom Disc Menus in 2026
Summary: A DVD menu creator is designed to build interactive navigation for your video discs. The top tools including DVDneXtCOPY, DVDStyler, and DVDFab that allow you to make professional DVDs without any technical skills. Simply choose a tool and load your video file, select a template, customize the menu, and start to burn a DVD with stylish menu.
Table of Contents
When you put a DVD into a player, the first thing you see is the DVD menu, which is an interactive screen. It is saved on the CD in specific VOB and IFO files. These files commonly have backdrop video or graphics, text titles, and buttons for controlling playback. Making a DVD menu makes it easy to control playback and helps the whole disc look more professional and finished.
In this article, I will show you 6 best DVD menu makers which fall into two categories. One group has a lot of templates for beginners who want rapid results, and the other group has a lot of customization choices for advanced users who like to make their own menus from scratch.
Quick Guide: Top 6 DVD Menu Creators at a Glance
We tested many software options to find the best tools for creating DVD menus. This review looks at 6 important areas to help you choose the right program. We check the quality of menu templates and how much you can edit the design. We also look for a built-in video editor, hardware acceleration, video formats and operating systems that each tool supports. Check the table below to compare the top 6 DVD menu creators.
| Software | OS | Input Formats | Custom Menu Template | Customization Depth | Video Editor | Hardware Acceleration |
| DVDneXtCOPY DVD Creator | Windows | 200+ | Stylish | Deep | No | Yes |
| Freemake DVD Menu Creator | Windows | 250+ | Stylish (full set requires subscription) | Basic | Yes | No |
| DVD Flick | Windows | 20+ | Basic | None | No | No |
| DVDFab DVD Creator | Windows & Mac | 200+ | Stylish | Deep | Yes | Yes |
| DVDStyler | Windows, Mac, and Linux | Most common video formats | Basic | Pro-level | No | No |
| ConvertXtoDVD | Windows | Most common video formats | Basic | Deep | Yes | No |
How We Choose and Test These DVD Menu Creators
To select the right DVD menu creator, we focus on several core factors that change how a disc looks and works. We look for more than just a simple interface. Our review checks how well each tool creates navigation data, the variety of templates it provides, how much you can change the design, and if the burning features are reliable.
1. IFO integrity of the created DVD menu
The integrity of the IFO file is very important. This file stores navigation information like button positions and where a link goes. If the software creates incorrect data, the menu might not show up or buttons might lead to the wrong video title. We test each program to ensure the navigation logic is accurate so your disc plays correctly on any standard player.
2. Template availability
Using built in templates helps you save time. This is helpful if you are new to making DVDs. Good software provides themed layouts and button styles along with background music options. This allows you to make a professional looking disc without doing all the design work yourself.
3. Customization level
If you want a unique look, the level of customization is a key factor. Advanced tools let you import your own images and change button shapes or fonts. You can move items around the screen and create motion menus that fit your specific vision. We test how much freedom each tool gives you during the design process.
4. Burning capability
The main goal is to make a disc that actually plays. We check if the software supports many video formats and if it can verify data after burning. We also look for the ability to control burning speed and handle dual layer discs which hold more data. Reliable burning ensures your media lasts a long time without errors.
The next sections introduce six DVD menu makers our team selected as the best. We used IFOEdit to verify the menu IFO command logic, then reviewed each tool's pros, cons, and basic usage. The lineup includes three template-based, quick-start tools: DVDneXtCOPY DVD Creator, Freemake DVD Menu Creator, and DVD Flick, plus three advanced, highly customizable options for power users: DVDFab DVD Creator, DVDStyler, and AVStoDVD.
3 Template-First DVD Menu Makers: Best for Quick Menu Creation
DVDneXtCOPY DVD Creator
DVDneXtCOPY DVD Creator is a reliable tool for making DVD menus and authoring discs. It helps you turn various video formats into high quality DVDs. You can use it to save home videos or convert digital movies to physical media.
The software creates professional menus in very few steps. It includes many templates with different themes for beginners. You can customize these by changing the background image and fonts or moving the buttons.
We tested the menu data by burning an MKV file to a disc. We opened the IFO files in IFOEdit to check the navigation logic. Every command in the menu jumped to the correct video title. We also tested the disc on a standard DVD player. The menu was clear and the buttons worked fast with no lag. DVDneXtCOPY DVD Creator is a great choice for users who want professional DVD menus with little effort.
Compatible OS: Windows
- Easy DVD Creation: Convert and burn videos from formats like AVI, MP4, MKV, and more to standard DVD discs.
- Customizable Menus: Create professional-looking DVD menus with templates and personalized options.
- High-Quality Output: Maintains video quality during conversion and burning.
- Fast Processing: Optimized for quick DVD authoring without long waiting times.
- User-Friendly Interface: Simple workflow for beginners while offering advanced settings for experienced users.
How to Make a DVD Menu with DVDneXtCOPY DVD Creator
Step 1: Launch DVDneXtCOPY DVD Creator and Import your video files
Open DVDneXtCOPY DVD Creator and select "DVD Creator" mode. Click "+" or drag and drop your video files (MP4, AVI, MKV, etc.) into the program.

Step 2: Choose a Menu Template
Click the menu tab to browse the available layouts for weddings or holidays or family events. Each template includes a background image and buttons that are already set up for you. You can select a style that matches the mood of your video content to give the disc a professional look.
Step 3: Personalize Your Menu Settings
Then, customize the menu elements to make the design unique. You can change the text on every button and pick new fonts or colors. You can upload your own photo to replace the default background image for a more personal touch. You can also move buttons around to ensure they do not cover important parts of your background photo.

Step 4: Burn the DVD with the New Menu
Finally, click the Start button after you finish the design work. The software creates the necessary IFO and VOB files to ensure the menu works on any home player. You receive a notification once the process is complete and the disc is ready for use.

Freemake DVD Menu Creator
Freemake DVD Menu Creator is actually a built-in feature of Freemake Video Converter. When you use Freemake to burn digital video files to DVD, you can choose to add a DVD menu. It also offers several differently styled DVD menu templates, but in the free version only two templates are available. To unlock all templates, you need to upgrade to the Freemake Mega Pack. Compared with DVDneXtCOPY, which also provides multiple templates, Freemake offers much less customization: you can only change the background and edit the text.
Compatible OS: Windows
How to Make a DVD Menu with Freemake Video Converter
Step 1: Download and Install
- On your Windows PC, download and install Freemake Video Converter.
Step 2: Import Videos
- Following installation, launch the software.
- Click the + Video button to add videos you want to burn to a DVD.

Step 3: Choose a DVD Menu Template
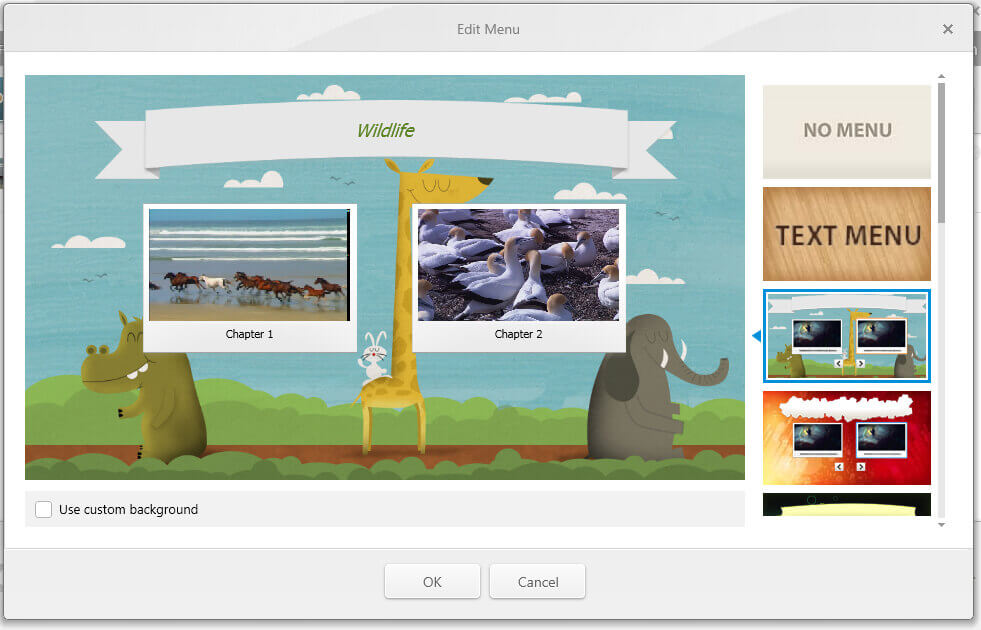
- To open the Edit Menu window, select DVD from the format bar..
- On the right side of the window, browse and select one of the free DVD menu templates.
- To use a custom background, check the Use custom background option and upload an image.
- Click OK to save changes and exit the Edit Menu window.
Step 4: Burn the DVD
- Insert a blank DVD into the computer's DVD drive.
- Click the "Burn" button to start creating your DVD with the custom menu.

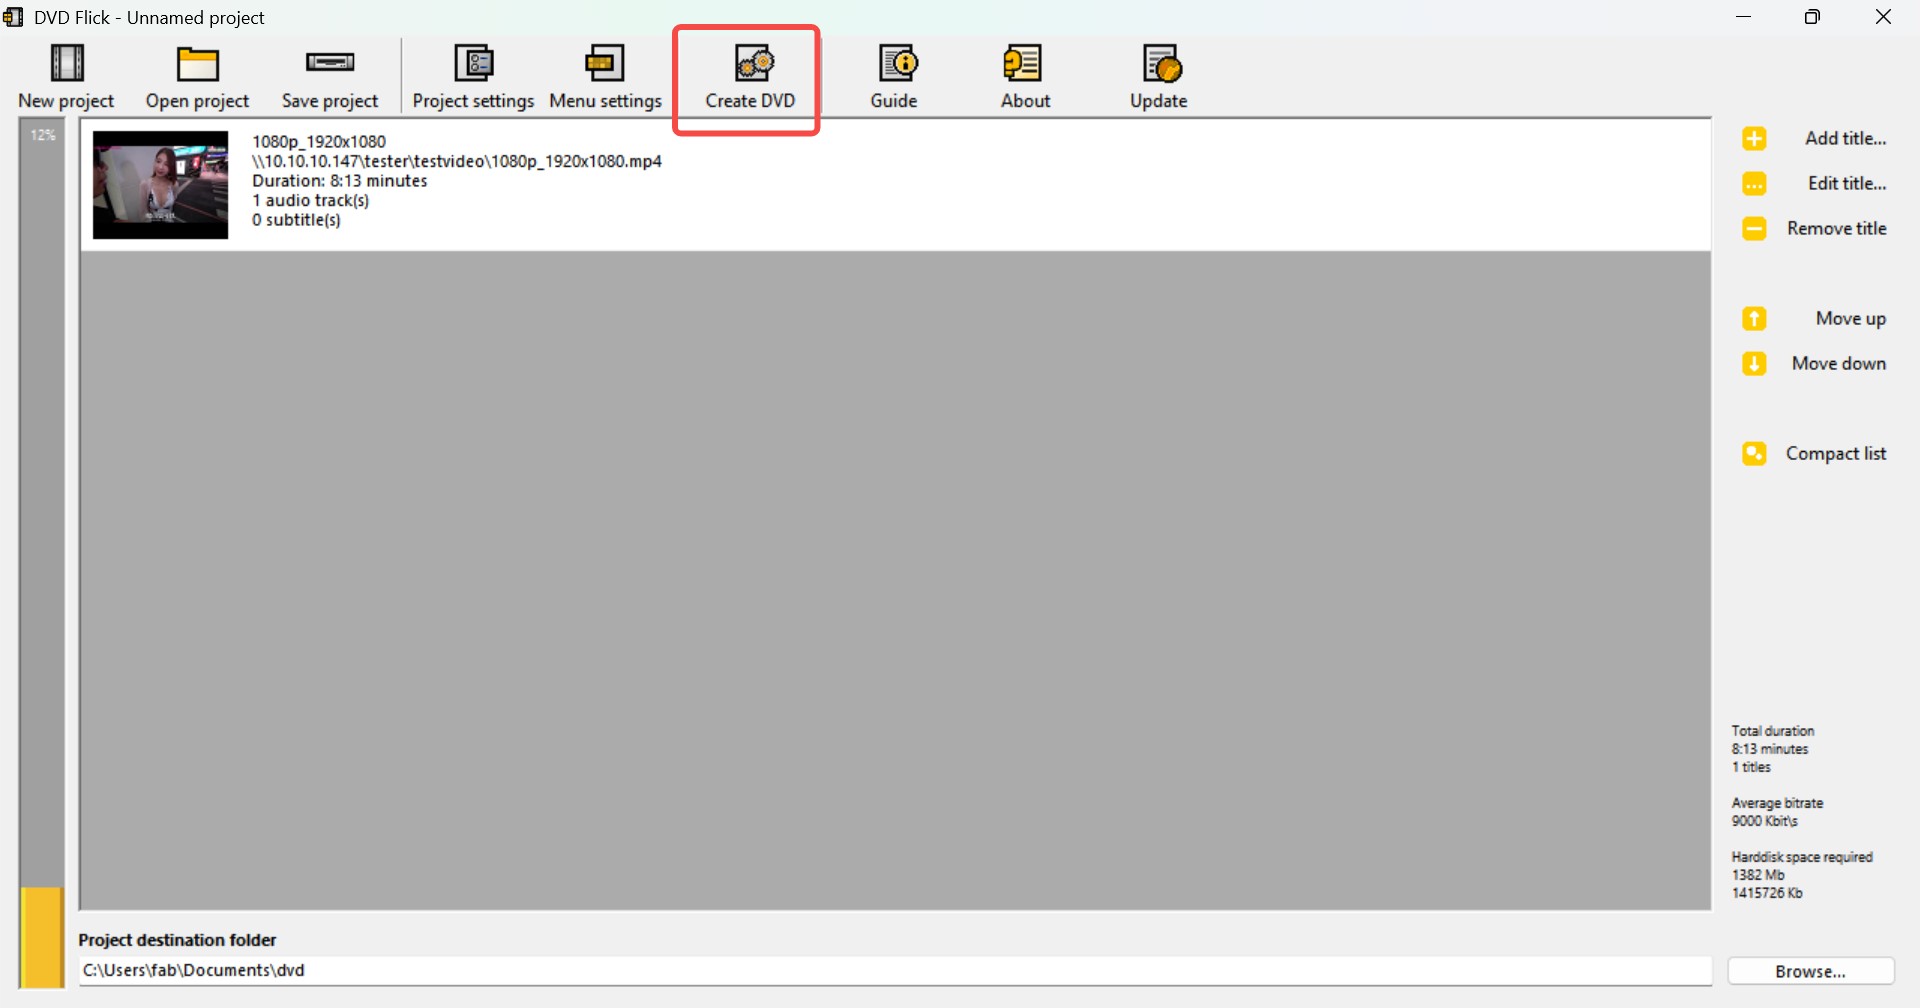
DVD Flick
DVD Flick is also a free DVD menu maker that offers several built-in menu templates. It can turn video files into a DVD while creating a menu with navigation features. In the Menu settings, DVD Flick provides six classic menu styles: Mosaic, Orange LED, Plasma Sphere, Simple Black, Simple White, and The Party.
These menus handle navigation well. You can use them to control playback and select subtitles or audio tracks. We also verified the IFO jump logic with IFOEdit, and the commands in the generated IFO files worked correctly. The downside is that these templates look somewhat dated and offer virtually no room for customization.
Compatible OS: Windows
How to Make a DVD Menu with DVD Flick
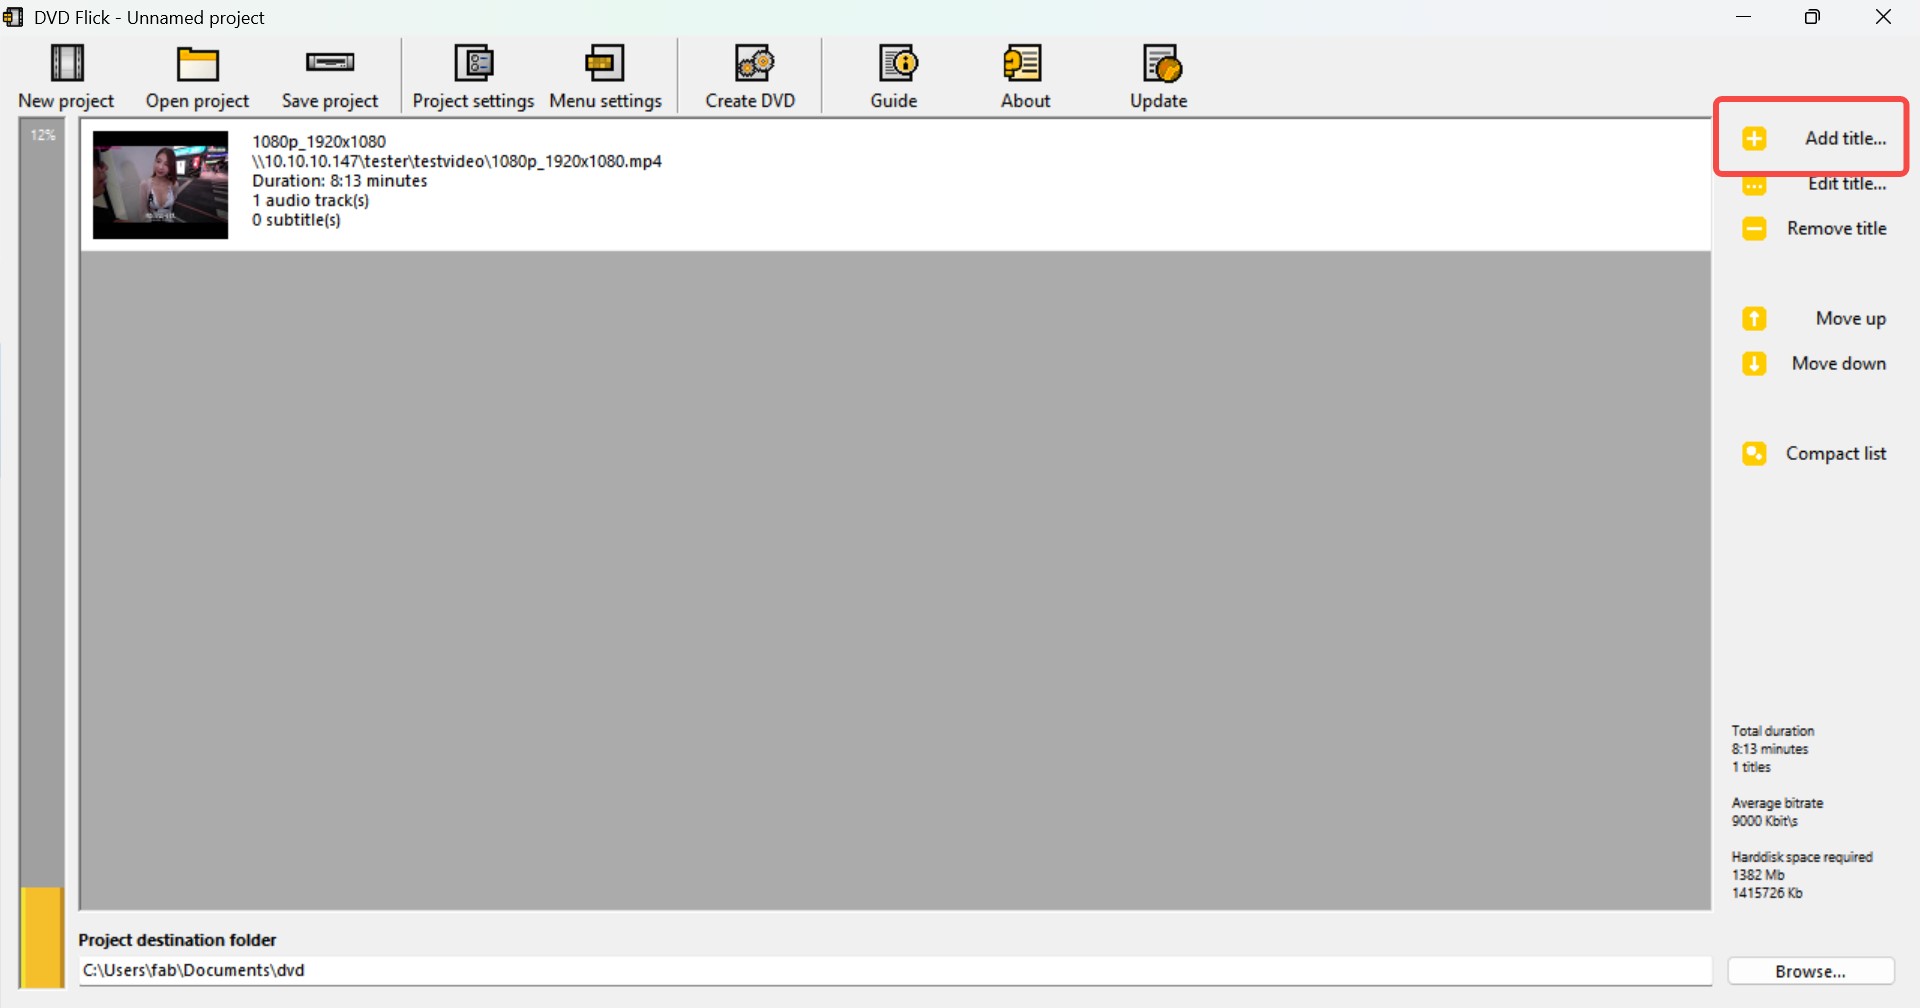
Step 1: Add your video files
- Launch DVD Flick.
- Click Add title and choose the video files you want on the DVD (AVI, MP4, MKV, MOV, etc.). Each file becomes a separate title in the project.
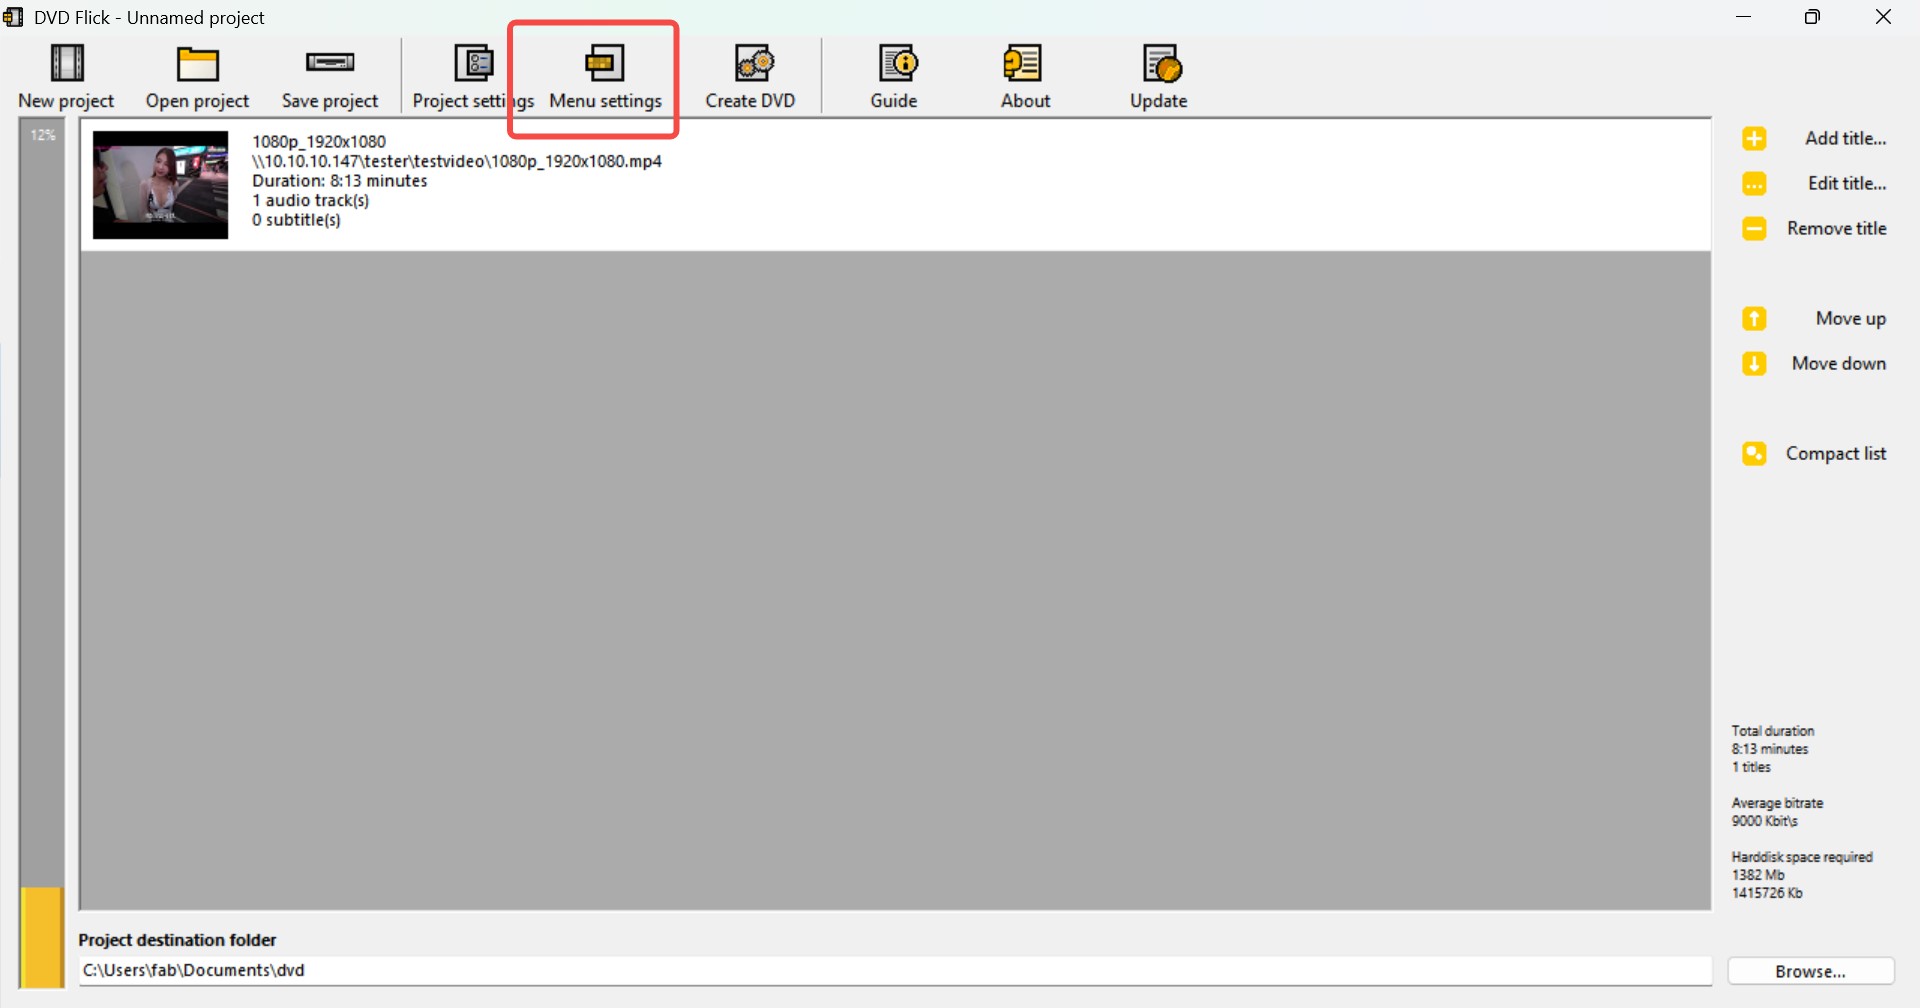
Step 2: Open the Menu settings
- On the right side or top toolbar, click Menu settings.
- This opens the DVD menu configuration window for your project.
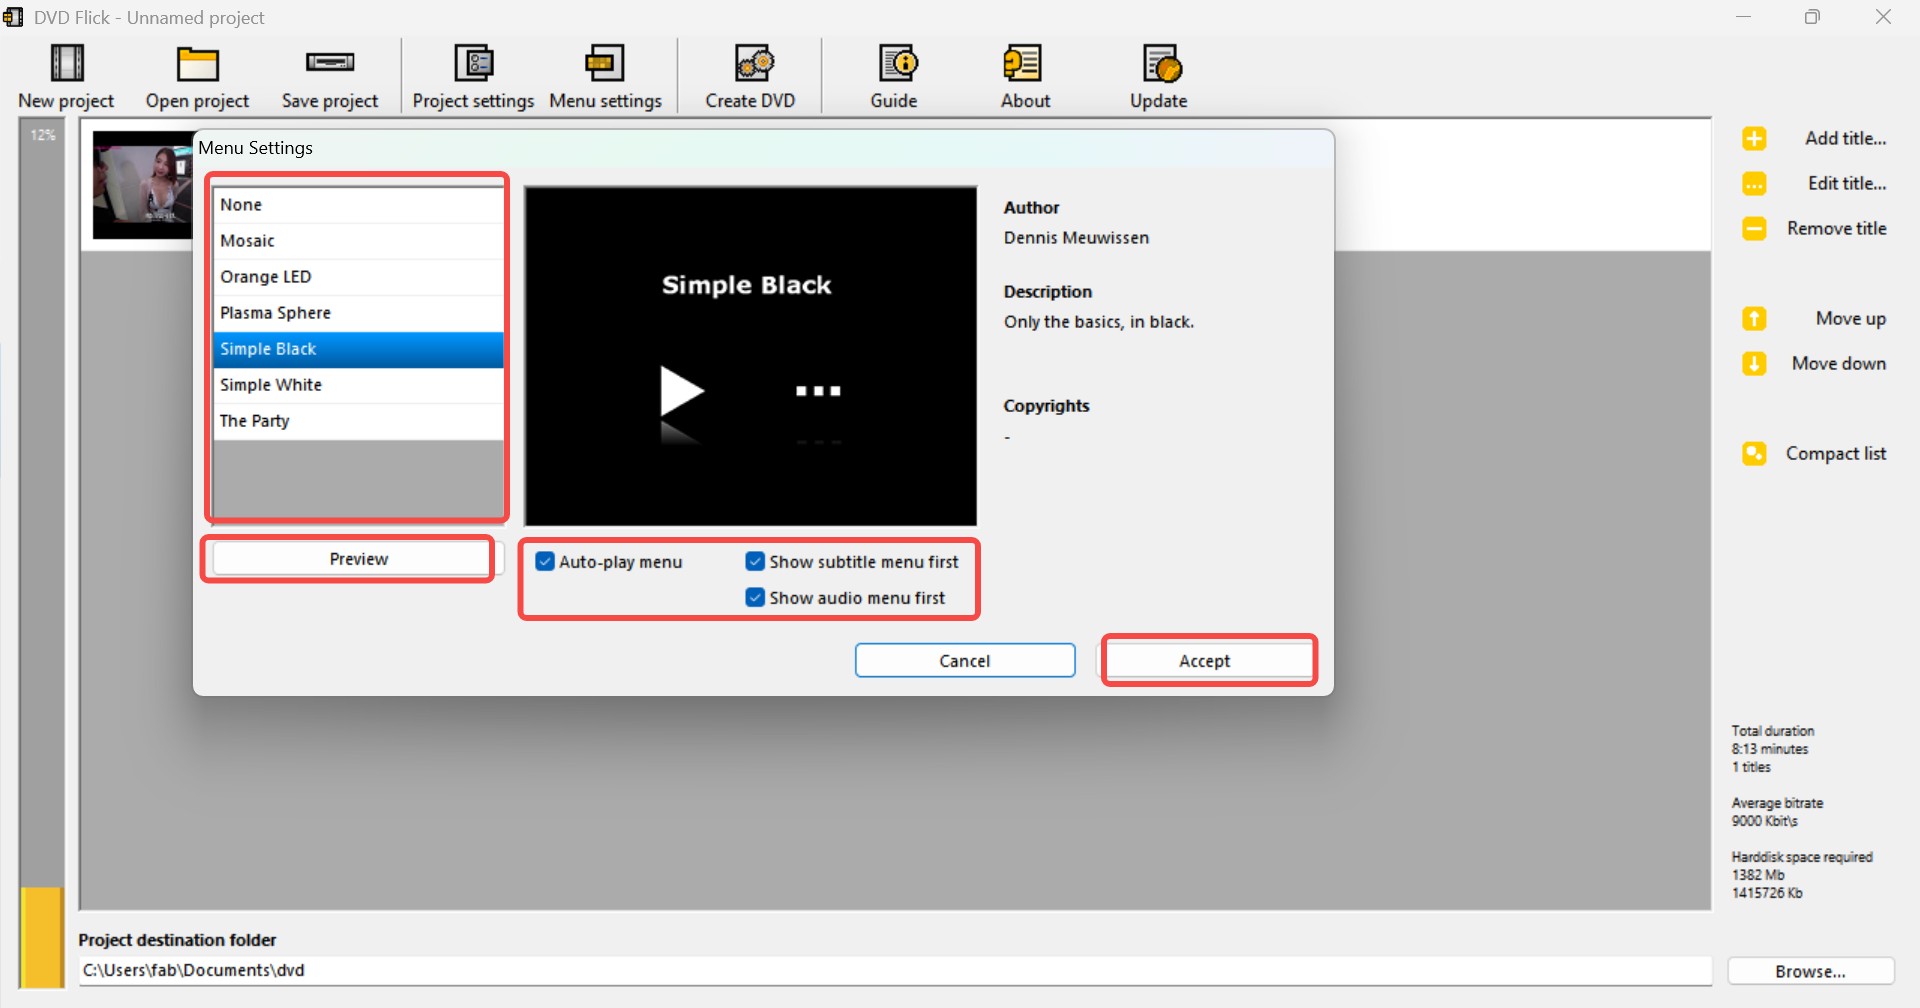
Step 3: Choose a menu template
- In Menu settings, select one of the six built-in templates: Mosaic, Orange LED, Plasma Sphere, Simple Black, Simple White, The Party. If you don't want any menu, choose None.
- Still in Menu settings, you can:
- Enable Auto-play menu, so the menu shows first when the disc is inserted.
- Optionally choose Show subtitle menu first or Show audio menu first if you have multiple subtitles / audio tracks.
- Click Preview (if available) to see the menu in action, then Accept to save the settings.
Step 4: Create the DVD
- When your titles and menu are ready, click Create DVD.
- DVD Flick will encode the videos, generate the VIDEO_TS structure with your chosen menu.
3 Flexible-Design DVD Menu Makers: Best for Customization
DVDFab DVD Creator
DVDFab DVD Creator makes it simple to create DVDs and build professional-looking custom DVD menus. It supports converting many popular video formats to DVD, such as MP4, MKV, and MOV. During authoring, you can add a DVD menu and choose from a wide range of ready-to-use menu templates that are regularly updated.
More importantly, it also offers strong customization options. You can pick a template and replace its background, and there are multiple built-in font styles, so you can adjust the navigation text, style, and color. Button positions and button styles can also be modified. With these tweaks, your DVD menu can look more polished, personalized, and better aligned with the theme of your video.
Compatible OS: Windows & Mac
- Customizable Menus: Choose from static/dynamic templates; edit backgrounds, fonts, colors, and buttons.
- 200+ Input Formats: Supports AVI, MKV, MP4, FLV, MOV, VOB, and more.
- Flexible Output: Burn to DVD (DVD-9/DVD-5, ±R/RW/DL) or save as ISO/folder.
- High-Quality Playback: Optimized for DVD players, PS5, Xbox, and more.
- 50x Faster Burning: GPU acceleration for rapid disc creation.
- Metadata Support: Auto-fetches movie info (title, cast, cover) and generates .nfo files.
How to Make a DVD Menu with DVDFab DVD Creator
Step 1: Launch DVDFab DVD Menu Creator and Load Video Sources
- Download and launch DVDFab DVD Creator.

- Import your video files (batch DVD burning is supported by the software).
- Once your videos have been loaded, the interface will display input-output information as well as customization choices.

Step 2: Customize Your DVD Menu Using Free Templates
- Click the "Menu Settings" button to choose from a number of templates.
- The default background is a "starry sky" template, but you can also choose from various themes like kid-friendly, school, or movie menus.
- Customize the menu by changing the font, size, and color for the navigation text.
- If you want a blank template, simply remove the text and shapes. You can also upload a custom background image for personalization.

- Go back to the main interface to choose subtitles and audio tracks. If needed, add external subtitles and click the "Play" button to preview your video.
- In "Advanced Settings," you can change the output size, quality, menu properties, and playback mode.

Step 3: Start Creating the DVD Menu
- Place a blank DVD in your computer's optical drive or save it as an ISO file or folder to your hard drive.

- Click the "Start" button to start to make a DVD and create your DVD menuthe DVD menu. DVDFab will complete the task 30X faster than other software.
DVDStyler
DVDStyler is an open-source DVD burner that lets you make professional-looking DVDs with personalized menus. It has an intuitive UI and supports multi-core processors for improved performance. This free DVD menu creator supports a range of video formats, including AVI, MPEG, MOV, WMV, MP4, and OGG. Once you've designed your menu, you can easily import and burn unprotected videos with a simple drag-and-drop process.
This tool offers more customization options than most other free programs. You can import background images and move text or buttons to any position on the screen. It also supports DVD scripting for custom navigation, which means you can write low level commands to create complex navigation paths for your menu.
Compatible OS: Windows, Mac, and Linux
How to Make a DVD Menu with DVDStyler
Step 1: Create a New Project
- Select Create a new project from the welcome dialog or click the New button.
- Enter a disc label.
- Choose the DVD capacity: 4.7 GB (Single Layer) or 8.5 GB (Double Layer).
- Choose a video format: NTSC (North America and Japan) or PAL (other areas).
- Click OK.
- Enter the DVD menu's title and select a template.

Step 2: Add Movie Clips
- Click the File browser tab on the left panel.
- Navigate to the folder containing your movie clips; icons will appear on the right.
- Drag and drop the clips you want onto the Titleset Manager at the bottom.
- Alternatively, use the file dialog or drag files from a file manager such as Windows Explorer.

Step 3: Design a DVD Menu

- To change the menu background, select the Backgrounds tab and double-click a picture.
- Add a menu title:
- In the Menu Editor, right-click and choose Add > Text. Then add the title.
- Adjust its position using handles, then change the font or size in the text properties dialog
- Add buttons:
- Select the Buttons tab and drag a button into the Menu Editor.
- Double-click the button to edit properties (e.g., action, title, color, font).
- To apply the changes, click OK and return to the Menu Editor.
- Edit button properties (action, title, color, and font):
- Double-click the button in the Menu Editor.
- Change the settings you want in the properties window.
- Click OK to apply the changes and return to the Menu Editor.

Step 4: Save the Project
- To save your project, simply click the Save button.
Step 5: Burn the DVD
- Click the Burn button.
- Check the preview box before burning the DVD.
- Insert a blank disc, select a drive, then click the Start button.
- If Preview is enabled, it will play before the burning process begins.
ConvertXtoDVD
ConvertXtoDVD is an all-in-one DVD authoring and burning tool for Windows. It can handle almost all mainstream video formats, convert them into DVD-compliant structures, and then either burn directly to DVD media or output a VIDEO_TS folder and ISO image. On the menu side, the software provides multiple themed menu templates, and you can further expand the styles with official template packs.
You can also change the menu background image, add background music, adjust title layout, modify buttons, and insert custom text. It also supports dynamic menus by importing an MPEG-2 video as an animated background. However, we do not recommend using this option in most cases: although motion menus look more impressive, they are essentially looping low-resolution MPEG-2 clips, which increase encoding load and authoring time, and can sometimes lead to unstable burns or higher CPU usage during playback. For most projects, we suggest prioritizing stable static menus instead.
Compatible OS: Windows
How to Make a DVD Menu with ConvertXtoDVD
Step 1: Add your video files
- Open ConvertXtoDVD and drag your video files into the main window (or click the File > Add video file). Each file will appear as a separate title on the DVD.
Step 2: Enable and open the menu editor
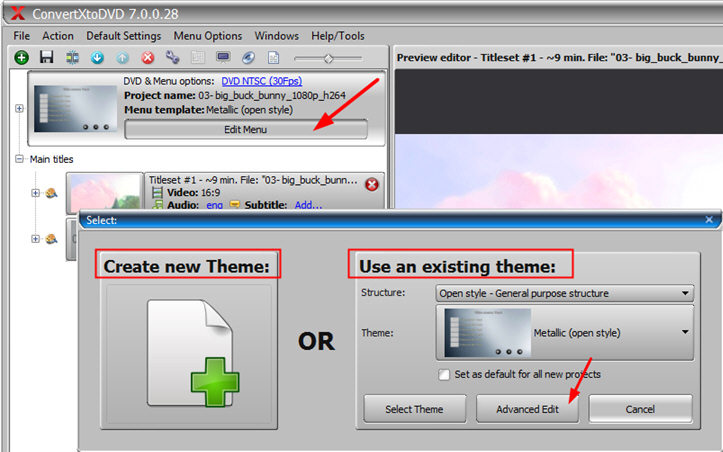
- Select the DVD project in the left panel, then click Edit menu to open the Menu Editor.
- To customize a menu for your current project, you should use an existing theme. Select the structure and theme you want to employ, then click Advanced Edit.
Step 3: Edit the background
- If you want to change the background, click Edit Background, then click folder icon to upload your own image (or video, if you really want a motion menu) and optionally add background music.

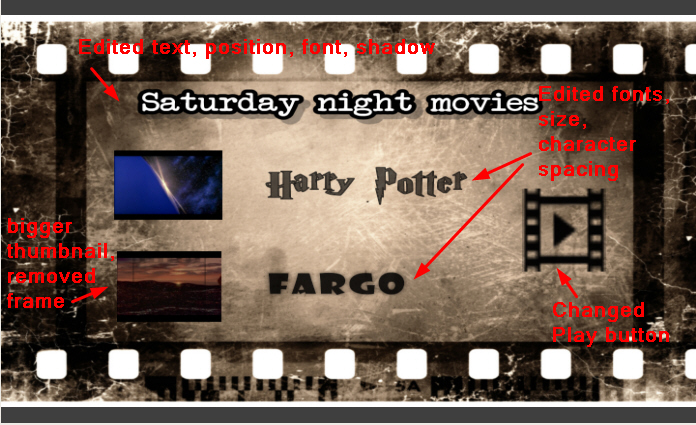
Step 4: Edit text and buttons
- Click on the title text and buttons to change their labels, fonts, colors, and positions.
- Adjust or add buttons for Play, Chapters, or individual titles so viewers can easily navigate your DVD.
Step 5: Preview and burn
- Use the built-in Preview to test the menu navigation.
- If everything looks good, click Convert / Burn to create your DVD, or output an ISO or VIDEO_TS folder for further testing.
Pro Tips to Ensure Your DVD Menu Works on Any Player
Follow these technical tips to make sure your custom disc works on every hardware player.
Tip 1: Avoid dead end navigation
Every submenu must include a button that leads back to the main menu. This design prevents a dead end where a viewer cannot exit a specific page. If you forget to add a return link the viewer might have to stop the disc and restart it just to choose a different video title.
Tip 2: Use safe zones for TV screens
Keep all text and buttons within the inner 80 percent of the video frame. Many television sets cut off the outer edges of the image during a process called overscan. Placing your menu items too close to the border can make them invisible or impossible to click on some screens.
Tip 3: Optimize audio for menu loops
Menu background music should use AC3 or LPCM formats to ensure compatibility with all players. These formats are the standard for physical discs and prevent playback errors when the menu repeats. You should also use a short audio clip to keep the file size small and ensure the loop starts quickly without a delay.
Conclusion
Creating a custom DVD menu enhances the viewer's experience and gives your DVD a professional touch. We've introduced six DVD menu makers: some focus on offering rich template libraries, while others provide advanced customization features. If you care mainly about efficiency, we recommend DVDneXtCOPY DVD Creator, which makes it easy to build menus while burning your DVDs. If you want highly personalized menus, we recommend DVDStyler or DVDFab, which let you start from templates and then customize them in depth. Now it's time to bring your creativity to life and create stunning custom menus that elevate your DVDs!
FAQs
Yes, most DVD menu makers let you personalise your menu by adding your own music or videos. You can also customise further by uploading images, changing the background and adding motion effects to the menus.
Yes, DVD Menu Creators allow you to create multiple menus for organizing different sections or chapters of your DVD. These tools enable you to structure your content hierarchically, making it easier for viewers to navigate through various parts of the DVD.
Yes, most DVD Menu Creators are designed to support a wide range of DVD formats. They allow you to create menus compatible with both standard-definition and high-definition DVDs. So that your menus work seamlessly across various playback devices.
Yes, many DVD Menu Creators allow you to incorporate animation or dynamic effects into your menus. Some tools enable you to create both static and animated menus, with the ability to set chapter marks with frame-by-frame precision. Others offer a wide range of pre-designed static and dynamic templates that you can customize to fit your content and style preferences, adding a professional and engaging touch to your DVD menus.
![Best Places to Sell DVDs Online Instantly for Cash [2026]](https://c.dvdnextcopy.com/uploads/images/17722815272834040-a24fb8543d5f37992770a59dd8463c6c.jpg) Luna MillerFeb 28, 2026
Luna MillerFeb 28, 2026Best Places to Sell DVDs Online Instantly for Cash [2026]
![Top 8 Best MP4 to DVD Converters on Windows/Mac [2026 Tested]](https://c.dvdnextcopy.com/uploads/images/17295028954969077-b45a7ed59745a2ea5ed1f1fea1ce3d98.jpg) Luna MillerFeb 22, 2026
Luna MillerFeb 22, 2026Top 8 Best MP4 to DVD Converters on Windows/Mac [2026 Tested]
 Luna MillerNov 19, 2025
Convert ISO to MP4 in 2026: The "One-Step" vs. "Two-Step" Workflow
 Luna MillerNov 19, 2025
The Ultimate Guide to Convert DVD to ISO on Windows, Mac and Linux
 Luna MillerNov 11, 2025
How to Copy DVD to Computer in 2026: Top Five Solutions for You
 Luna MillerAug 21, 2025
How to Use MakeMKV to Rip DVD and Blu-ray: A Detailed Guide in 2026