 DVDneXtCOPY Blu-ray Creator
Burn MKV to Blu-ray on Mac and Win: Playable Disc & Data Disc [2026]

Summary: To burn MKV to Blu-ray, first decide whether you need a standard playable Blu-ray Video disc or a data disc containing the original MKV. Use DVDneXtCOPY for Windows authoring, DVDFab for Mac or Windows, and ImgBurn only after Blu-ray structure already exists or when you intentionally want a data disc.
Table of Contents
![Burn MKV to Blu-ray on Mac and Win: Playable Disc & Data Disc [2026]](https://c.dvdnextcopy.com/uploads/images/17864369222994454-9dc63363cb9b1eb42ca407bbc93353fa.jpg)
An MKV file can go onto Blu-ray in two very different forms. If the disc needs to behave like a normal Blu-ray movie in a standalone player, the video has to be authored into Blu-ray Video structure first. If the goal is only to store the original .mkv file on BD-R, it can be burned as data, but playback then depends on whether the target player supports the MKV container and the codecs inside it.
That distinction should come before the software choice. Blu-ray authoring builds the structure, menus, title order, chapters, audio, and subtitle behavior expected from a movie disc. File-burning software can write prepared Blu-ray folders or ordinary MKV files to media, but writing an MKV to BD-R does not by itself turn the file into Blu-ray Video.
Playable Blu-ray or MKV Data Disc: Which Do You Need?
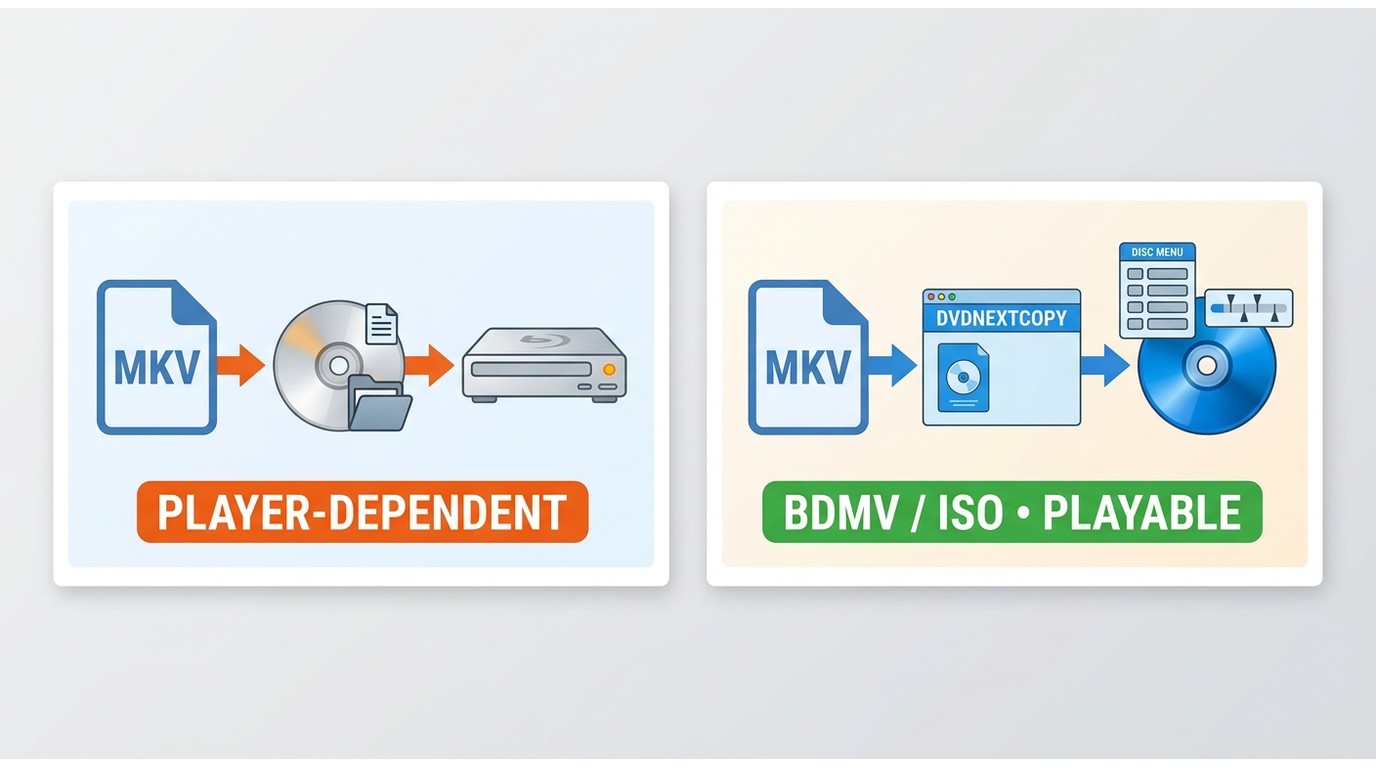
A regular Blu-ray movie disc and a Blu-ray data disc may use the same physical media, but the player sees them very differently. Decide which result you need before choosing the authoring or burning tool.
| Goal | What you need to do | Finished result |
|---|---|---|
| Play the movie in a regular Blu-ray player | Author the MKV into Blu-ray structure; re-encode streams when required | Blu-ray Video disc, ISO, or BDMV folder |
| Store the original MKV on a BD-R | Burn the .mkv as a data file |
Data disc containing the original MKV |
| Prepare Blu-ray without burning a disc yet | Author to an ISO or Blu-ray folder | Project that can be checked and burned later |
| Avoid video re-encoding when possible | Use compatible streams in a remux-oriented authoring process | Blu-ray structure without a new video encode when the streams allow it |
If the goal is living-room playback, use the playable Blu-ray route unless you have already confirmed that the standalone player supports MKV files and the video and audio codecs inside them. For a broader look at movie-disc authoring versus data archiving, see how to burn Blu-ray.
Can You Convert MKV to Blu-ray Without Re-encoding?
Sometimes, but not for every MKV. MKV is a container, so the video, audio, subtitles, resolution, frame rate, and other properties inside the file determine whether the authoring process can reuse the existing streams or needs to create new ones.
When those streams already suit the target Blu-ray structure, remuxing can avoid a new video encode. When they do not, the video or audio may need transcoding. Burning an unchanged MKV as data also leaves the file untouched, but that produces a data disc rather than a standard Blu-ray Video disc.
For that reason, “lossless MKV to Blu-ray” is not a result to promise before the source has been checked. The useful question is whether the project can reuse the existing streams for the Blu-ray structure and disc size you want.
Burn MKV to a Playable Blu-ray on Windows with DVDneXtCOPY
DVDneXtCOPY Blu-ray Creator is a Windows software that can burn MKV to Blu-ray as a playable movie disc. It brings the main authoring decisions into one project: arrange the videos, choose BD25 or BD50, build or skip a menu, keep the audio and subtitle tracks you need, and finish as a physical disc, ISO, or Blu-ray folder.
Its advantage is that authoring and final output stay in the same workflow. That makes it easier to check the title order, menu behavior, tracks, and project size before using a blank disc. The limitation is equally clear: it is the Windows-focused option here.
How to Burn MKV to Blu-ray with DVDneXtCOPY
Step 1: Add the MKV files. Open DVDneXtCOPY, enter the Creator module, and switch to Blu-ray Creator. Drag the MKV files into the interface or use the Add controls. Check the title order and remove files that do not belong in the project.

Step 2: Choose the Blu-ray size and output. Open Advanced Settings and select the target size and quality. Choose a blank disc for direct burning, or save an ISO or Blu-ray folder when you want to inspect or store the authored project before writing physical media.

Step 3: Build the menu and check the content. Open Menu Settings if the disc needs navigation. Choose a template and adjust the available menu elements, or select No Menu for a simpler project. Review the title order and any available audio, subtitle, and chapter settings before starting.

Step 4: Create and verify the Blu-ray. Select the destination and start authoring. For a physical disc, use a compatible Blu-ray writer and blank BD-R or BD-RE. Test the finished result in the standalone player that will actually be used, including the menu, important titles, audio tracks, and subtitles where applicable.
Burn MKV to Blu-ray on Mac and Windows
Mac users need an authoring tool that actually handles Blu-ray projects on macOS, while Windows users may simply want a cross-platform alternative to the Windows-only route above. DVDFab Blu-ray Creator covers full authoring on both platforms, while tsMuxer is better treated as a specialist remux tool for compatible streams.
Burn MKV to Blu-ray with DVDFab Blu-ray Creator
DVDFab Blu-ray Creator can burn MKV to Blu-ray discs on both Mac and Windows. It takes the MKV beyond simple file burning by turning the videos into an authored Blu-ray project where you can organize titles, choose BD25 or BD50, keep the audio and subtitle tracks you need, add a navigation menu, and finish as a disc, ISO, or Blu-ray folder.
Its strongest reason to be in this comparison is cross-platform authoring. It covers the Mac use case that DVDneXtCOPY does not, while giving users a much more complete menu and project-building environment than a manual remux tool.
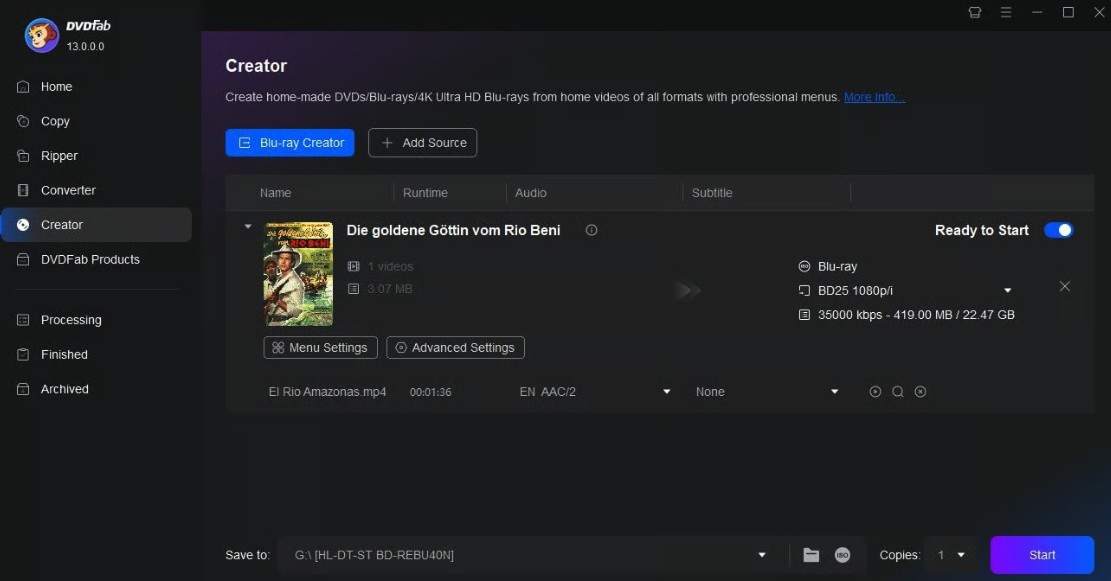
How to Burn MKV to Blu-ray with DVDFab Blu-ray Creator:
- Open DVDFab, select Creator, and choose Blu-ray Creator.
- Import the MKV files and set the target disc size and video options in Advanced Settings.
- Open Menu Settings if the project needs navigation, then review the title order, audio, subtitles, and chapters.
- Choose disc, ISO, or folder output and start the authoring process. Check the result before making additional physical copies.
A Technical Remux Option: tsMuxer
tsMuxer is the specialist option when you want to convert MKV to Blu-ray structure without putting a full menu-authoring application in the middle. It exposes the streams inside the MKV and can build Blu-ray Disc output, so it is most useful when the video and audio are already suitable and the goal is to remux them rather than create another video encode.
That focused design is also the limitation. tsMuxer gives you more direct control over the streams but far less of the menu design, project organization, and guided output you get from a commercial Creator. The project is archived and no longer under active development, so it belongs here as a technical option for experienced users rather than the default recommendation for a new Mac or Windows setup.
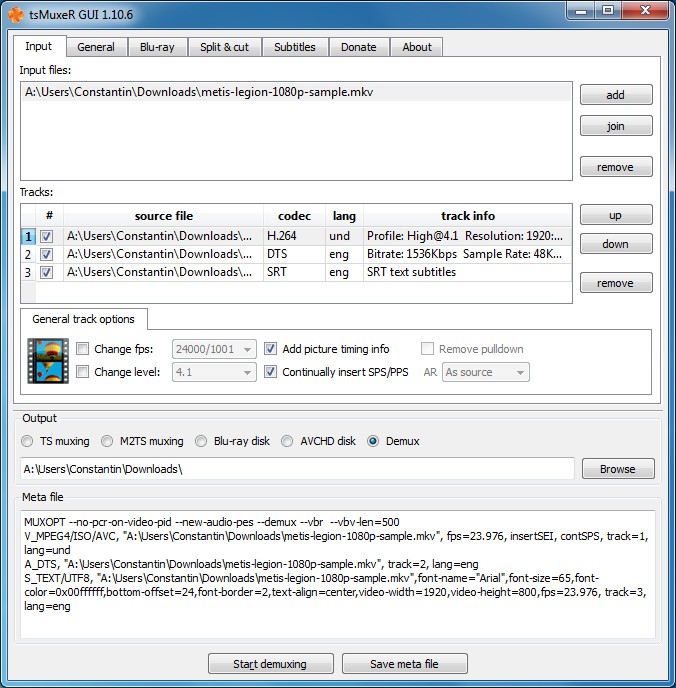
How to Use tsMuxer:
- Load the MKV and review the detected video, audio, and subtitle streams.
- Choose Blu-ray Disc output.
- Create the Blu-ray structure and inspect the resulting BDMV output.
- Use a separate disc-writing utility when physical burning is required.
Use ImgBurn for an Authored Blu-ray or an MKV Data Disc
ImgBurn is useful for a narrower job than the two Blu-ray Creators above. If you want to burn MKV to Blu-ray as a data file, it can write the original MKV to BD-R; if the goal is a standard Blu-ray Video disc, ImgBurn is better used after another tool has already created an ISO or the BDMV/CERTIFICATE structure.
That separation is what makes ImgBurn useful rather than incomplete. It handles the disc-writing stage without pretending to be a full authoring suite. It does not build menus, organize a movie project, or turn a loose MKV into Blu-ray Video by itself, so it should be paired with an authoring or muxing tool when standalone Blu-ray playback is the goal.

Burn an Authored BDMV Folder to Blu-ray
- Open ImgBurn and choose Write files/folders to disc.
- Add the authored BDMV and CERTIFICATE folders at the root of the project.
- Select the Blu-ray writer as the destination and use the Blu-ray Video file-system settings required by the authored structure.
- Write the disc, verify it, and test it in the standalone Blu-ray player.
Burn MKV as a Data Disc
If the goal is storage rather than a standard movie disc, create a data-disc project, add the .mkv file, burn it to the blank Blu-ray, and reinsert the disc to confirm the file can be read. Playback is a separate question: a computer that opens the MKV does not prove that a standalone Blu-ray player can decode the same container, video codec, audio codec, or subtitle format.
Why Won't the Burned Blu-ray Play?
MKV Was Burned as Data Instead of Blu-ray Video
If a computer shows an .mkv file on the disc but a standalone player does not recognize it as a movie disc, the file was probably stored as data rather than authored as Blu-ray Video. Create a Blu-ray structure with an authoring tool, then burn that output.
The Video Had to Be Re-encoded
Avoiding re-encoding is possible only when the input streams and intended Blu-ray output are compatible. If the authoring software needs to change video or audio properties, a new encode may be necessary. That is different from remuxing, which reorganizes compatible streams without creating a newly compressed video stream.
BD25 or BD50 Is Too Small for the Selected Content
Check the estimated project size before authoring. If the selected videos do not fit the smaller target, choose a larger disc size when available, remove material that is not needed, or accept the encoding changes required to reduce the project. Make the capacity decision before the final burn.
The Disc Plays on a PC but Not a Standalone Player
First establish which kind of disc you made. For a data disc, confirm that the standalone player supports MKV and the actual video and audio streams inside the file. For an authored Blu-ray, confirm that the expected BDMV structure was created and written correctly. Test one part of the process at a time so an authoring problem is not confused with media, drive, or playback compatibility.
MKV to Blu-ray FAQs
Yes, if you mean storing the MKV as a data file. If you want a standard movie-style Blu-ray for a standalone player, author the MKV into Blu-ray structure first rather than simply copying the .mkv file to BD-R.
Yes. Use Blu-ray authoring software that supports macOS and MKV input. DVDFab Blu-ray Creator is a cross-platform option for disc, ISO, or folder output; physical burning also requires a compatible Blu-ray writer.
Not necessarily. Compatible streams may be remuxed into Blu-ray structure without a new video encode, while other MKV sources need transcoding before or during authoring.
Burning an unchanged MKV as data does not re-encode the file. Creating Blu-ray Video may use either remuxing or transcoding depending on the source streams and selected settings, so quality loss cannot be ruled out for every project.
Which MKV-to-Blu-ray Method Should You Use?
Choose DVDneXtCOPY Blu-ray Creator when you want a Windows authoring process that keeps the MKV, menu, track, disc-size, and final output decisions in one place. Choose DVDFab Blu-ray Creator when the same type of authored project needs to run on Mac as well as Windows. Use tsMuxer when a technical remux-oriented process suits the source streams and you are comfortable working without a full menu-authoring environment.
Use ImgBurn after the Blu-ray structure already exists, or when you intentionally want a data disc containing the original MKV. Whichever method you choose, test the finished result on the standalone player that matters before treating the project as complete.
 Steven VanceSep 17, 2026
How to Rip Blu-ray on Mac in 2026: 4 Workflows, 5 Methods
![How to Rip 3D Blu Ray: Pick MVC or SBS Before You Start [2026]](https://images.dvdnextcopy.com/2026/09/15/OCieIQbnp92l67jxKZzrGV_sFMToZiaa/feature_cover.jpg) Steven VanceSep 16, 2026
Steven VanceSep 16, 2026How to Rip 3D Blu Ray: Pick MVC or SBS Before You Start [2026]
 Steven VanceSep 15, 2026
Convert BDMV to MP4 on Windows or Mac: Choose the Right Method
 Luna MillerSep 15, 2026
How to Convert BDMV to MKV in 2026: Folder, Remux, or Re-Encode?
 Luna MillerSep 15, 2026
Blu-ray Authoring Software for Windows and Mac: 2026 Picks by Project
 Luna MillerSep 8, 2026
Best Free Blu-ray Copy Software in 2026: Reviews & How-to Guide