 DVDneXtCOPY Blu-ray Ripper
How to Rip Blu-ray on Mac in 2026: 4 Workflows, 5 Methods

Summary: For the simplest one-app Mac Blu-ray ripping workflow, start with DVDFab Blu-ray Ripper. For a free route, use MakeMKV to create the MKV first and HandBrake only when you want a smaller MP4 or another re-encoded file. Leawo is another paid Mac option, while VLC is best kept for readable unprotected media. Physical discs require a compatible external Blu-ray drive.
Table of Contents
Ripping a Blu-ray on a Mac requires an external Blu-ray drive and software that matches the output you want. In this guide, I cover four practical Mac workflows: DVDFab for an all-in-one paid method, MakeMKV plus HandBrake for a free two-stage workflow, Leawo as another commercial option, and VLC for limited media it can already open. The steps focus on the titles, audio, subtitles, format, and output checks that matter once the disc is detected.
How to Rip Blu-ray on Mac with DVDFab Blu-ray Ripper
DVDFab Blu-ray Ripper combines Blu-ray source access, title and track selection, profile setup, editing, and encoding in one Mac application. The current Mac build supports macOS 12 or newer on Intel Core i5 or Apple Silicon Macs, and it accepts Blu-ray discs, ISO images, and folders. For supported commercial discs, its Blu-ray Ripper is designed to handle protections such as AACS, BD+, BD-J, and region-related restrictions before the selected title is converted.
The useful part of the one-app workflow is the control after the disc opens. You can choose individual titles, chapters, audio tracks, and subtitles, then select an MP4, MKV, M2TS, audio, passthrough, or re-encoded profile. Advanced Settings expose codec, resolution, bitrate, frame rate, and other output parameters, while the built-in Video Editor can trim, crop, merge, add a watermark or external subtitles, and adjust brightness, contrast, and saturation. Batch tasks can be queued, and supported Mac hardware can use VideoToolbox acceleration for encoding.
Choose this paid Mac method when you want disc access and conversion in one application instead of handing an intermediate file to a separate transcoder. A passthrough-style profile is the better fit when preserving selected source streams matters most; a re-encoded profile makes more sense when you need a smaller file or broader playback compatibility.
- Install the build that matches an Intel or Apple silicon Mac.
- Load the readable Blu-ray disc, ISO image, or Blu-ray folder.
- Select the main title or the specific titles you want to keep.
- Review the audio tracks, subtitles, chapters, and output profile.
- Choose the destination with enough free space for the finished file.
- Reopen the output and check playback, track switching, and subtitles.
Steps to Rip Blu-ray on Mac with DVDFab
Step 1: Install the Mac build that matches the processor, connect the external drive, insert a readable disc, and open the Ripper module.

Step 2: Let the application scan the source, then choose the main title or specific titles. Keep the audio and subtitle tracks you expect to use later; if the goal is to extract audio from Blu-ray, select the needed audio track and an audio profile.

Step 3: Choose MKV, MP4, or another available profile, then review the video, audio, and subtitle settings instead of accepting a device preset without checking it.

Step 4: Set the destination, start the job, and reopen the completed file to confirm its duration, track switching, subtitle display, and chapter navigation.
How to Rip Blu-ray on Mac Free with MakeMKV + HandBrake
MakeMKV and HandBrake form one two-stage Mac workflow with different jobs. MakeMKV reads DVD and Blu-ray sources and places the selected video, audio, subtitle, chapter, and track metadata into an MKV without re-encoding the media streams. That makes it useful when preservation comes before file size.
MakeMKV currently remains a beta product, and Blu-ray processing is available during the beta period rather than being presented as a permanently free commercial feature. The current 1.18.4 Mac release is available for modern Macs, including Apple Silicon builds. Its main limitation for this workflow is also its strength: it outputs MKV instead of giving you a library of smaller device-oriented encode profiles.
A Blu-ray to MKV workflow is useful when you want the main video plus selected audio, subtitles, and chapters in one container. If the video stream is retained without re-encoding, the file remains close to the size of the selected source content.
Step 1: Create an MKV with MakeMKV
I use MakeMKV first when I want to decide exactly which movie title, HD audio tracks, subtitles, and chapters to keep before making any quality-versus-size decision. Because the video is not re-encoded at this stage, the resulting MKV can remain close to the size of the selected Blu-ray content.
Step 1: Insert the disc, open MakeMKV, and select the detected optical drive.
Step 2: Open the disc, expand the title tree, and deselect titles, audio tracks, or subtitle tracks you do not need.
Step 3: Choose an output folder with sufficient space and create the MKV.

Step 2: Compress the MKV with HandBrake (Optional)
HandBrake is the optional transcoding stage, not the protected-disc access tool in this sequence. It is free and open source, and its official feature set covers MP4, MKV, and WebM output with H.264, H.265, AV1, and other encoders. It can also preserve or re-encode supported audio, carry chapter markers, handle Blu-ray PGS and text subtitles, and process queued jobs.
This is where you make the storage and playback tradeoff. Constant Quality or Average Bitrate encoding lets you control the video-size balance, while filters such as deinterlace, denoise, crop, and scale are available when the source needs them. On supported Macs, HandBrake can also use Apple VideoToolbox hardware encoding. Its own documentation is clear that HandBrake directly processes Blu-ray sources only when they do not contain copy protection, which is why the MakeMKV-first sequence remains cleaner for protected discs.
A Blu-ray to MP4 workflow usually re-encodes the video, which reduces storage use and can simplify playback on Apple devices. The tradeoff is processing time and a quality-versus-size decision.
When Compression Helps
Step 1: Open the finished MKV as the HandBrake source rather than repeating the disc scan.

Step 2: Select a preset and MP4 or MKV container that matches the target player, then review the video dimensions and quality setting.

Step 3: Keep the required audio and subtitle tracks, choose the destination, and start the encode. Recheck the beginning, middle, end, and track switching when it finishes.

How to Rip Blu-ray on Mac with Leawo Blu-ray Ripper
Leawo Blu-ray Ripper for Mac is another paid one-app option for readers who want to convert Blu-ray to digital without pairing extraction and transcoding tools. The current Mac product supports macOS 10.13 through macOS 26 and accepts Blu-ray discs, folders, and ISO images. Leawo documents support for common Blu-ray protections including AACS, BD+, and MKB, while keeping title, audio, and subtitle selection inside the same workflow.
Its profile library covers 180+ mainstream video and audio formats, with both preservation-oriented and re-encoded choices. The built-in editor can trim and crop video, adjust image effects, add text or image watermarks, rotate or flip video, change playback speed, and adjust audio. You can also change codec, bitrate, resolution, frame rate, sample rate, and channel settings, and batch multiple titles when needed.
Leawo is shareware rather than a completely free Mac Blu-ray ripper. The trial converts only the first five minutes of a title and limits encrypted Blu-ray handling to 30 days, so it is better for checking disc recognition, interface, and profile options than for finishing a feature-length rip before purchase.
Steps to Rip Blu-ray on Mac with Leawo
Step 1: Open the Convert area and add the readable Blu-ray disc, folder, or ISO source.

Step 2: Choose Full Movie, Main Movie, or Custom Mode based on whether you need all titles, the longest title, or a selected set.

Step 3: Review the selected title, audio tracks, subtitles, and video angle before choosing the output profile.

Step 4: Select the output format and destination, start the conversion, and inspect the finished file before adding it to a media library.

How to Convert a Readable Blu-ray on Mac with VLC
VLC is a free, open-source cross-platform media player with conversion tools, not a dedicated Mac Blu-ray ripper. The current macOS release is VLC 3.0.23, with separate Intel, Apple Silicon, and Universal downloads. Keep it for a narrow case: macOS and VLC can already read the unprotected source and you only need a basic local conversion.
This method fits a simple source with no need for detailed title, audio, or subtitle management. If VLC cannot open the media normally, switch to a workflow designed for the source instead of adding unofficial components.
Step 1: Open VLC, choose Convert/Stream, and select the readable unprotected source.
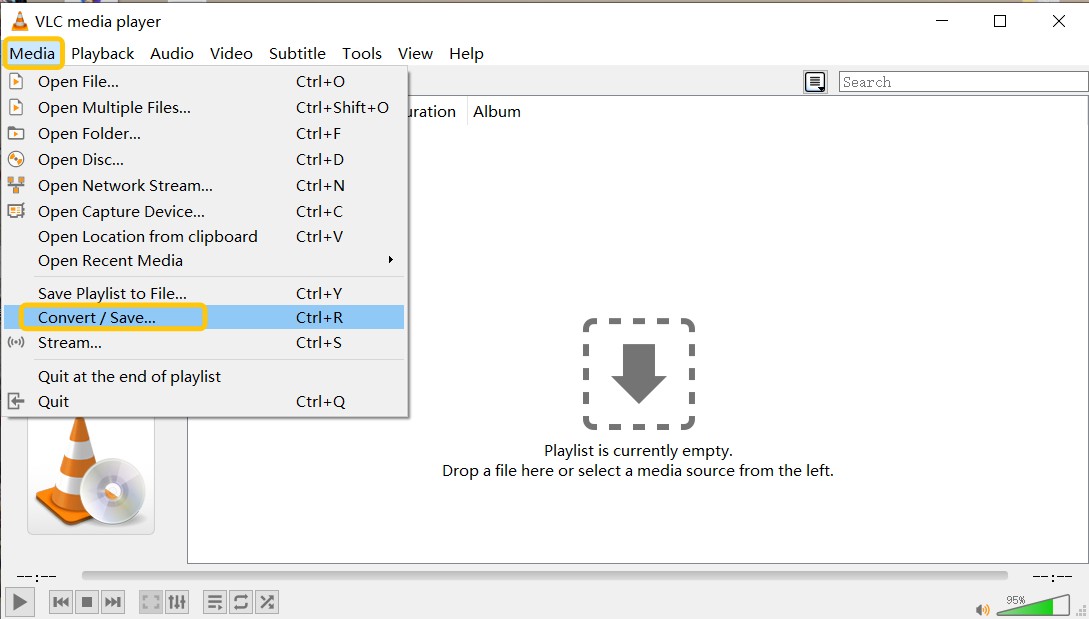
Step 2: Pick a compatible output profile and destination, start the conversion, and test the finished file in the target player.

Which Mac Blu-ray Ripping Method Should You Choose?
The best workflow depends on whether you want a one-app conversion, a free preserve-then-compress route, or only a basic conversion from media the Mac can already read.
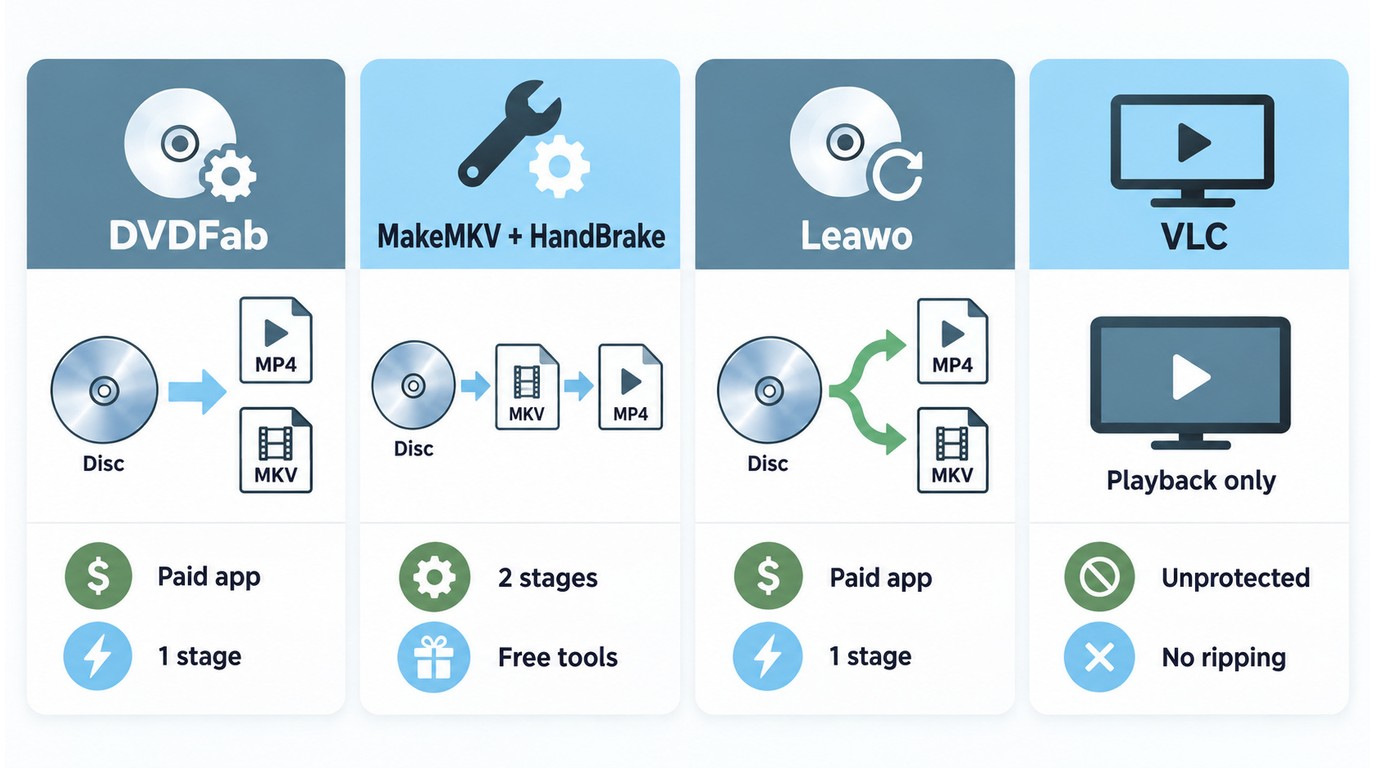
The four workflows differ most in source handling, output control, setup effort, and cost structure. Match the method to your drive and file goal instead of choosing by the longest feature list.
| Workflow | Best fit | Protected Blu-ray access | Output | Track / edit control | Cost / setup |
|---|---|---|---|---|---|
| DVDFab Blu-ray Ripper | One-app Mac conversion | Supports common commercial-disc protections | MP4, MKV, M2TS, audio, passthrough and encoded profiles | Title, chapters, audio, subtitles, editor, advanced settings | Paid; one application |
| MakeMKV + HandBrake | Preserve selected tracks, then compress only if needed | MakeMKV handles supported protected Blu-ray sources; HandBrake itself does not | MKV first; optional MP4, MKV, or WebM encode | Strong track preservation plus detailed encode, subtitle, chapter, and filter control | MakeMKV beta + free HandBrake; two stages |
| Leawo Blu-ray Ripper | Alternative one-app Mac conversion | Supports AACS, BD+, MKB and supported region handling | 180+ mainstream video and audio formats | Titles, audio, subtitles, editor, parameter settings | Paid/shareware; one application |
| VLC | Simple conversion of media it can already read | No built-in commercial Blu-ray decryption workflow | Basic conversion profiles | Limited title, track, and authoring control | Free; limited setup for readable media |
Workflow status reference: DVDFab Blu-ray Ripper's official product page, as of September 2026.
Mac Blu-ray Ripping Troubleshooting
Modern Macs have no built-in optical drive, so start troubleshooting with the external drive, USB connection, app compatibility, power, and disc condition. An Apple Silicon Mac and an Intel Mac can use the same USB optical drive when macOS recognizes it, but the ripping application still needs a compatible build for the processor.
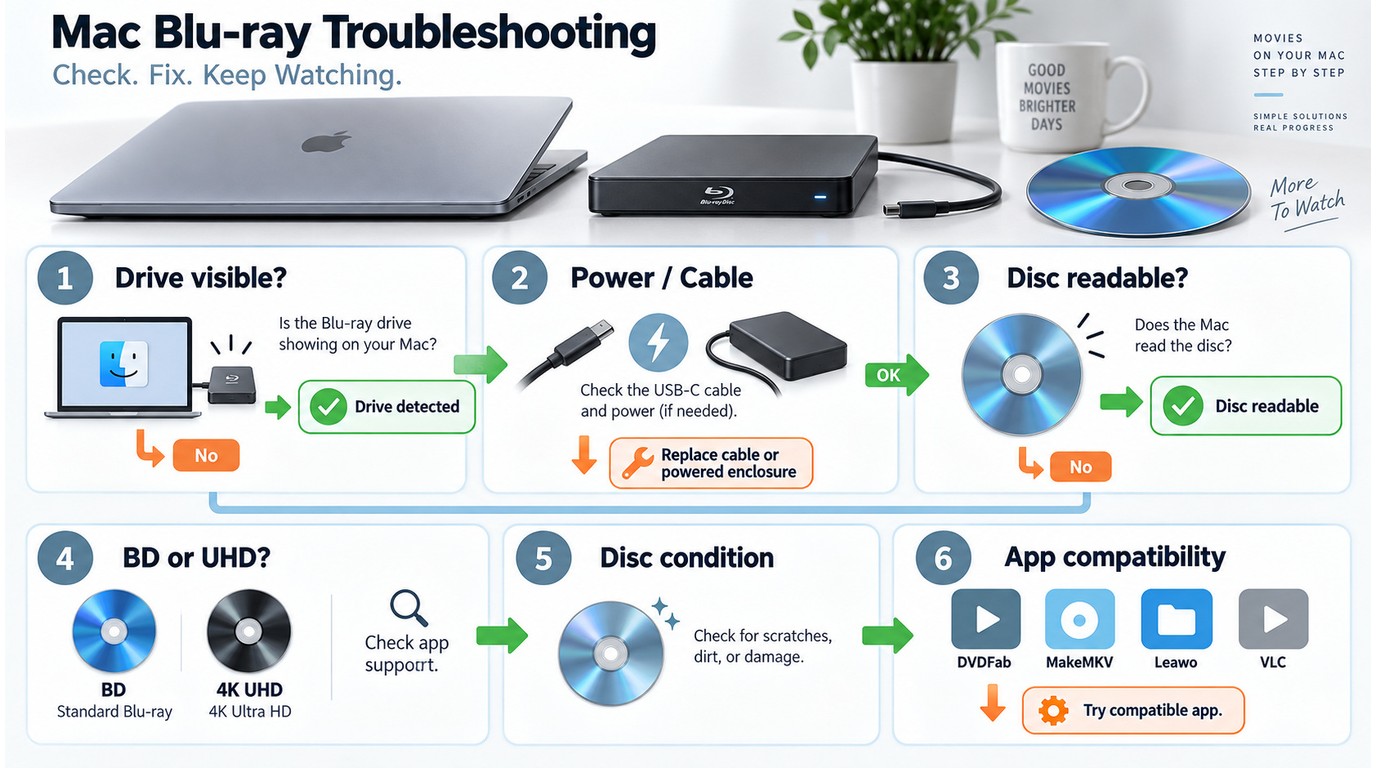
Disc-reading failures usually begin with the connection, power, permissions, drive capability, or disc condition. Check those layers before reinstalling every application.
When the Drive Does Not Appear
- Reconnect the drive directly to the Mac and try a powered hub if it loses power during spin-up.
- Check System Information to see whether macOS detects the USB device.
- Review Privacy & Security prompts and confirm that the installed app matches Intel or Apple silicon.
- Test another cable or port before replacing the drive.
Even when the drive is detected correctly, reserve more storage than the final file needs because temporary files and intermediate MKVs can require extra space.
When Only Some Discs Fail
- Clean the disc and inspect it for scratches, residue, or a damaged label side.
- A drive that reads standard Blu-ray does not automatically qualify as a 4K UHD drive. Match the exact drive model, disc type, and application support before using a 4K Blu-ray workflow; this article does not cover firmware changes.
- Try a known-readable disc to separate a drive problem from a title-specific read failure.
- For an imported disc, check the software's documented region and disc support without changing firmware or access-control settings.
Work only with discs you legally own or are authorized to access, where permitted by applicable law. U.S. access-control rules are purpose-specific, so personal ownership alone does not settle every case. This is not legal advice.
FAQs
Q
Can Apple Silicon and Intel Macs use the same external Blu-ray drive?
Yes, when macOS recognizes the USB drive and the application offers a compatible build for the processor. The optical drive itself connects over USB; the software build determines whether the app runs natively or through Apple's compatibility layer.
A
Q
Can any external Blu-ray drive read 4K UHD discs?
No. Standard Blu-ray support does not establish 4K UHD compatibility. The exact drive model, disc type, and application support must align, so identify all three before buying or following a 4K-specific procedure.
A
Q
Why is an MKV file much larger than an MP4?
An MKV created from selected source tracks can retain the original video stream and several audio or subtitle tracks. An MP4 made with HandBrake usually re-encodes the video, reducing storage use in exchange for processing time and a quality-versus-size choice.
A
Q
Can I add the finished video to Apple TV or Plex?
Yes, if the local file's container, video codec, audio format, and subtitles match the app and playback device. MP4 often needs less conversion for Apple playback, while Plex can transcode an incompatible stream when the server has enough processing capacity.
A
Conclusion
A reliable Mac offline media workflow starts with a recognized drive and ends with a file you can reopen, identify, and play. The software choice comes between those two checks.
- Choose DVDFab when you want a paid one-app Mac method with title, track, and profile selection.
- Choose MakeMKV plus optional HandBrake when you want a free two-stage path from selected tracks to a smaller MP4.
- Choose Leawo when its current Mac build, interface, and output options better match your setup.
- Choose VLC only for limited unprotected-media conversion that it can already open.
![How to Rip 3D Blu Ray: Pick MVC or SBS Before You Start [2026]](https://images.dvdnextcopy.com/2026/09/15/OCieIQbnp92l67jxKZzrGV_sFMToZiaa/feature_cover.jpg) Steven VanceSep 16, 2026
Steven VanceSep 16, 2026How to Rip 3D Blu Ray: Pick MVC or SBS Before You Start [2026]
 Steven VanceSep 15, 2026
Convert BDMV to MP4 on Windows or Mac: Choose the Right Method
 Luna MillerSep 15, 2026
How to Convert BDMV to MKV in 2026: Folder, Remux, or Re-Encode?
 Luna MillerSep 15, 2026
Blu-ray Authoring Software for Windows and Mac: 2026 Picks by Project
 Luna MillerSep 8, 2026
Best Free Blu-ray Copy Software in 2026: Reviews & How-to Guide
 Luna MillerSep 8, 2026
7 Best Free Blu-ray Ripper Software in 2026: Reviews & How to Rip Blu-ray