 DVDneXtCOPY DVD Creator
How to Convert MKV to DVD in 2026: 5 Easy Methods

Summary: To play an MKV on a standard DVD player, create a DVD Video project instead of simply copying the MKV file to a data disc. DVDneXtCOPY DVD Creator is the primary recommendation for a guided Windows workflow, DVDStyler is the main free option, and DVDFab DVD Creator is the strong choice for users who also want editing controls. Cisdem DVD Burner provides another current Windows and Mac workflow, while AVStoDVD is better treated as a legacy Windows option.
Table of Contents
Before You Convert MKV to DVD: Data DVD vs DVD Video
The first decision is whether the disc only needs to store the MKV file or must play in a standard DVD player.
| Comparison | Data DVD | DVD Video |
| What is stored | The original MKV file as computer data | Authored DVD video, audio, menu, and navigation structure |
| Standard DVD player playback | Only if the player supports MKV and the codecs inside it | Designed for standard DVD player playback |
| Video conversion | Normally none | MKV video is converted when required for DVD compatibility |
| DVD menu | No standard DVD menu | Can include menus, chapters, audio, and subtitles |
| Best for | File storage or compatible media devices | Playback on a normal home DVD player |
If the goal is television playback through a standard DVD player, use a DVD Video authoring workflow rather than simply writing the MKV file to a blank disc.
How to Convert MKV to DVD with DVDneXtCOPY DVD Creator
- Supported systems: Windows 11, 10, 8.1, 8, and 7
- Input: MKV, MP4, AVI, MOV, and other supported video formats
- Output: DVD disc, ISO image, DVD folder
- Menu capability: Yes. Templates, text, backgrounds, thumbnails, and navigation elements can be customized
- Video editing capability: Limited. The workflow focuses mainly on DVD settings, audio, subtitles, menus, and preview
DVDneXtCOPY DVD Creator is a dedicated MKV to DVD converter that can import MKV and other supported video formats directly and turn them into an authored DVD Video project. It can create a physical DVD or save the finished project as an ISO image or DVD folder, so a separate MKV to MPEG 2 conversion is not required before authoring.
The workflow is useful when disc size, audio, subtitles, menu design, playback behavior, and output destination need to be managed from one interface. A preview function is also available before creation so the menu and selected content can be checked before a physical disc is written.
Step 1: Open DVDneXtCOPY DVD Creator and Add Your MKV Video
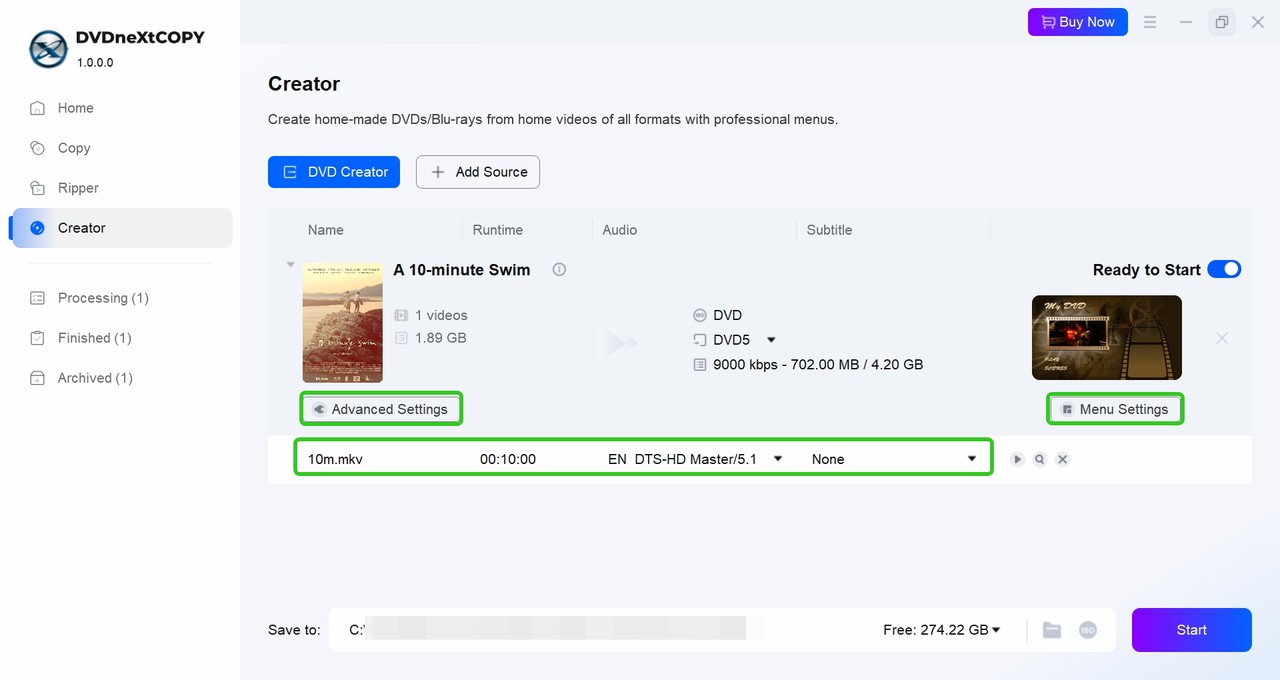
Launch DVDneXtCOPY and open the Creator module, then use the Mode Switcher to select DVD Creator. Click Add in the main interface and browse to the MKV file, or drag the MKV directly into the program. After the file loads, confirm that the displayed title and duration match the source and check the available audio and subtitle tracks. If several MKV files need to be placed on the same disc, click Add again and import the remaining videos before moving to the next step.

Step 2: Choose DVD Size, Audio, Subtitles, and Quality
Open the Audio control beside the loaded title and select the audio track that should be included on the DVD, then open Subtitle and select the required subtitle track or use the available import option if an external subtitle file is needed. Click Advanced Settings, enter the Volume Label, choose DVD 5 or DVD 9 under Output, set Video Quality, review Menu Properties, and choose the required Playback Mode. Return to the main interface and confirm that the estimated project size fits the selected disc capacity.
Step 3: Create the DVD Menu and Preview It
Click Menu Settings to open the menu editor and select a template from the available designs. Click the text elements to change their wording, font, size, or color, then adjust the background, thumbnails, and navigation elements such as Play, Previous, and Next when those controls are available in the selected template. Save the menu changes and use the built in preview to confirm that each menu button opens the intended title and that the selected audio and subtitles are correct before starting the final creation process.

Step 4: Burn MKV to DVD or Save ISO
Insert a blank DVD if the project will be written directly to a physical disc, then go to the output area and choose the optical drive for a physical DVD, the ISO option for a disc image, or a DVD folder on the hard drive. Confirm the destination and click Start. When creation finishes, open the completed output and check the menu, selected audio, subtitles, and several points in the video before archiving the project.

How to Convert MKV to DVD for Free with DVDStyler
- Supported systems: Windows 11, 10, 8, and 7; macOS 10.15 or later; Linux
- Input: MKV and many other formats supported through FFmpeg
- Output: DVD Video disc and ISO image
- Menu capability: Yes. Templates, backgrounds, buttons, text, images, and custom navigation
- Video editing capability: Limited. DVDStyler focuses on DVD authoring rather than general video editing
DVDStyler is a free DVD authoring application and is the main free method in this guide. Version 3.2.1 remains the current stable release, and MKV can be imported into its DVD authoring workflow.
DVDStyler gives users direct control over disc capacity, TV standard, titles, menus, buttons, backgrounds, and navigation. The workflow requires more manual setup than a guided commercial creator, but it can create a complete playable DVD without requiring a paid authoring program.
Step 1: Create a New DVD Project
Start DVDStyler and select Create a new project in the Welcome dialog, or click the New button on the toolbar. Enter the Disc label, choose 4.7 GB for a single layer disc or 8.5 GB for a double layer disc under Disc capacity, and select the required Video Format. Choose NTSC for North America and Japan or PAL for many other regions, confirm the project aspect ratio, click OK, then enter a menu title and select a template for the new DVD project.

Step 2: Import the MKV and Arrange DVD Titles
Click the File Browser tab on the left side of the DVDStyler window and navigate to the folder containing the MKV. When the file appears in the file pane, drag it into the Titleset Manager at the bottom of the window. Repeat the process for any additional videos, arrange the titles in the preferred order, and monitor the project capacity indicator so the authored content remains within the selected DVD size.
Step 3: Create or Edit the DVD Menu
Click Backgrounds on the left and double click a background to apply it to the current menu. To add a menu label, right click inside the Menu Editor, choose Add, select Text, and enter the required wording. Open the Buttons tab and drag a navigation button into the Menu Editor, then double click the button to open its properties and set the correct action, target title, font, color, text, and destination before clicking OK.
Step 4: Preview and Burn the DVD
Click Save to store the DVDStyler project and then click Burn. In the Burn window, enable Preview if you want DVDStyler to build and display the authored project before writing a disc, or choose the ISO option if you prefer to create an image first. Insert a blank DVD when burning directly, select the correct optical drive, check the temporary directory, and click Start. If Preview is enabled, inspect the menu and title navigation before continuing with the physical burn.

How to Burn MKV to DVD with DVDFab DVD Creator
- Supported systems: Windows 11, 10, 8.1, 8, and 7; macOS 10.13 through 15.x
- Input: MKV, MP4, AVI, M2TS, MOV, FLV, and many other video formats
- Output: DVD disc, ISO image, DVD folder
- Menu capability: Yes. Templates, backgrounds, text, buttons, thumbnails, and menu music
- Video editing capability: Yes. Trim, crop, rotate, subtitles, chapters, watermarks, filters, and related tools
DVDFab DVD Creator is an MKV to DVD authoring tool that turns MKV and many other video formats into DVD Video projects. It can burn directly to DVD 5 or DVD 9 media or save the finished project as an ISO image or DVD folder.
What makes it more useful than a basic MKV converter is the amount of control available before authoring. After loading the source, you can adjust disc size and other output settings, choose or customize a DVD menu, edit the video, preview the result, and then select a disc, ISO, or folder as the destination. This makes DVDFab DVD Creator a better fit when the MKV needs trimming, cropping, subtitle changes, or menu customization before it is written as DVD Video.
Step 1: Open DVDFab DVD Creator and Load the MKV
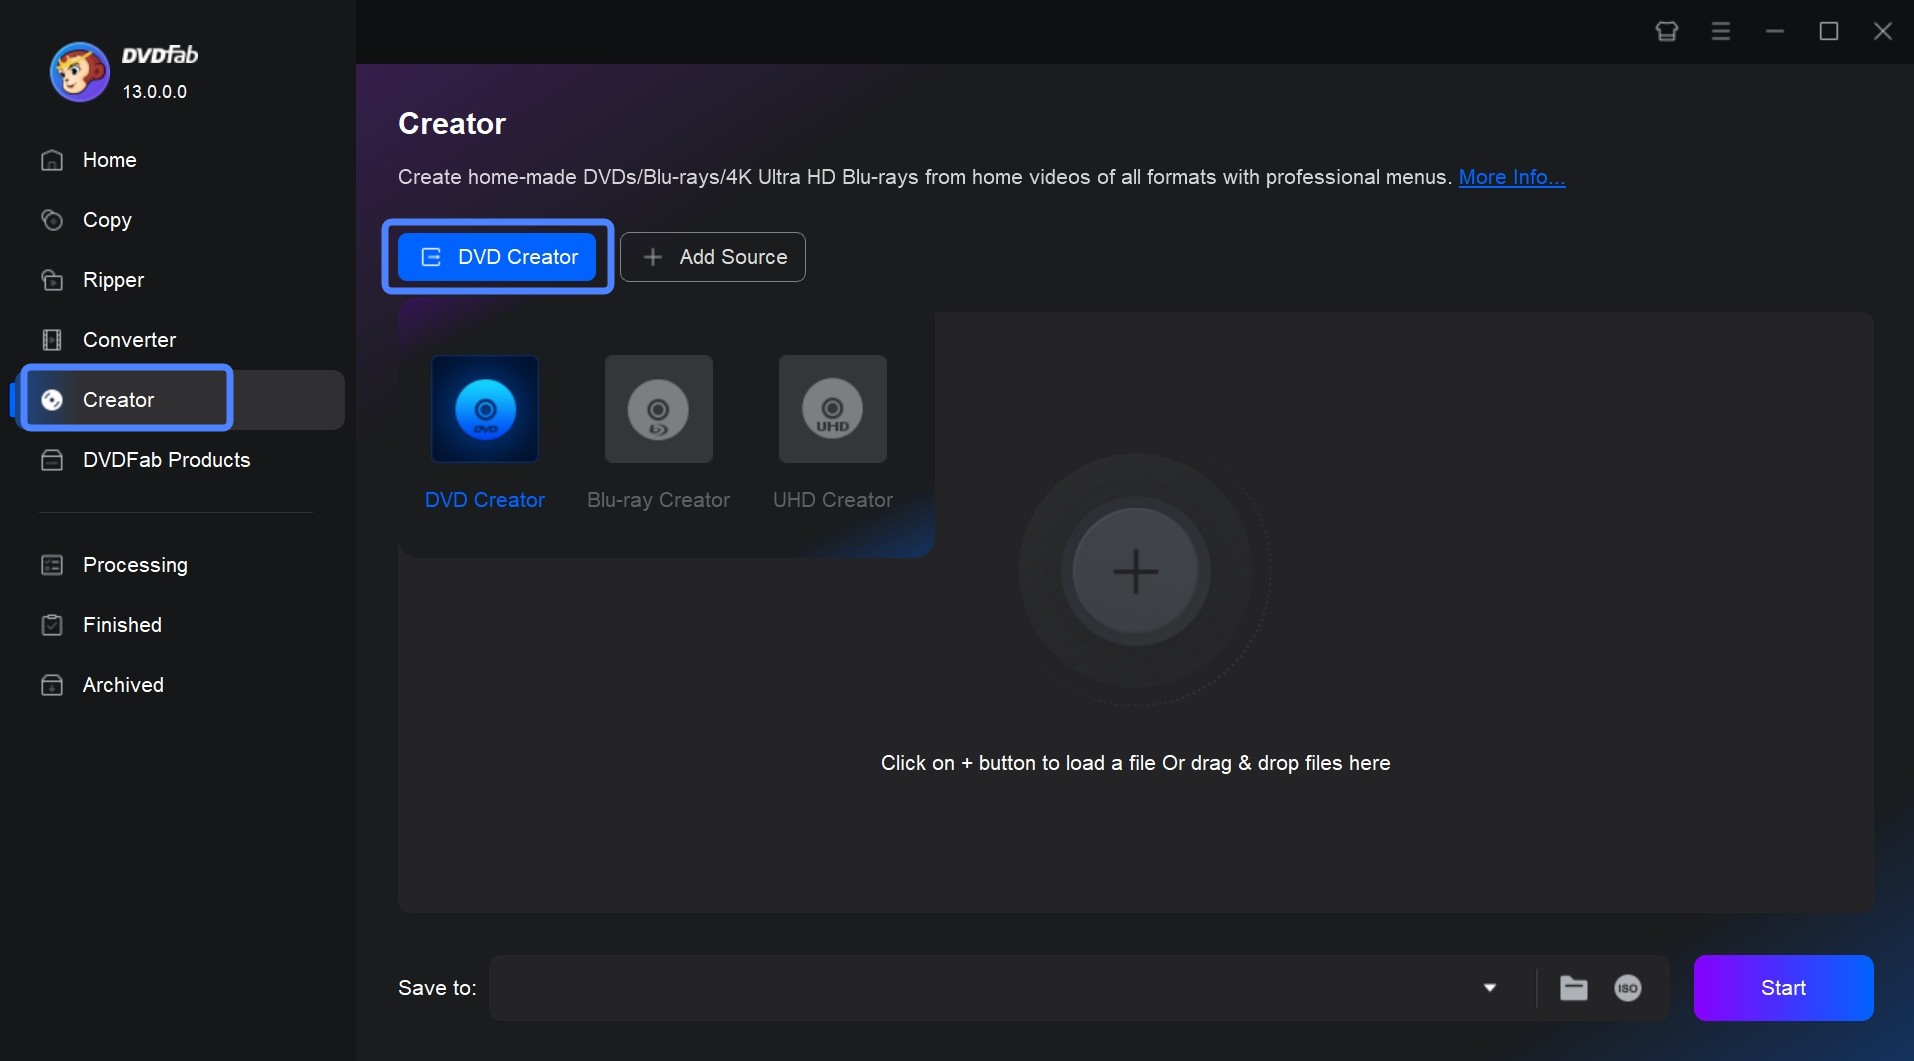
Launch DVDFab and click Creator in the left menu, open the Creator mode selector, and choose DVD Creator. Click Add in the main window or drag the MKV directly into the interface, then wait for source analysis to finish and review the detected title, duration, audio, and subtitle information before continuing.
Step 2: Set DVD Size, TV Standard, and Aspect Ratio
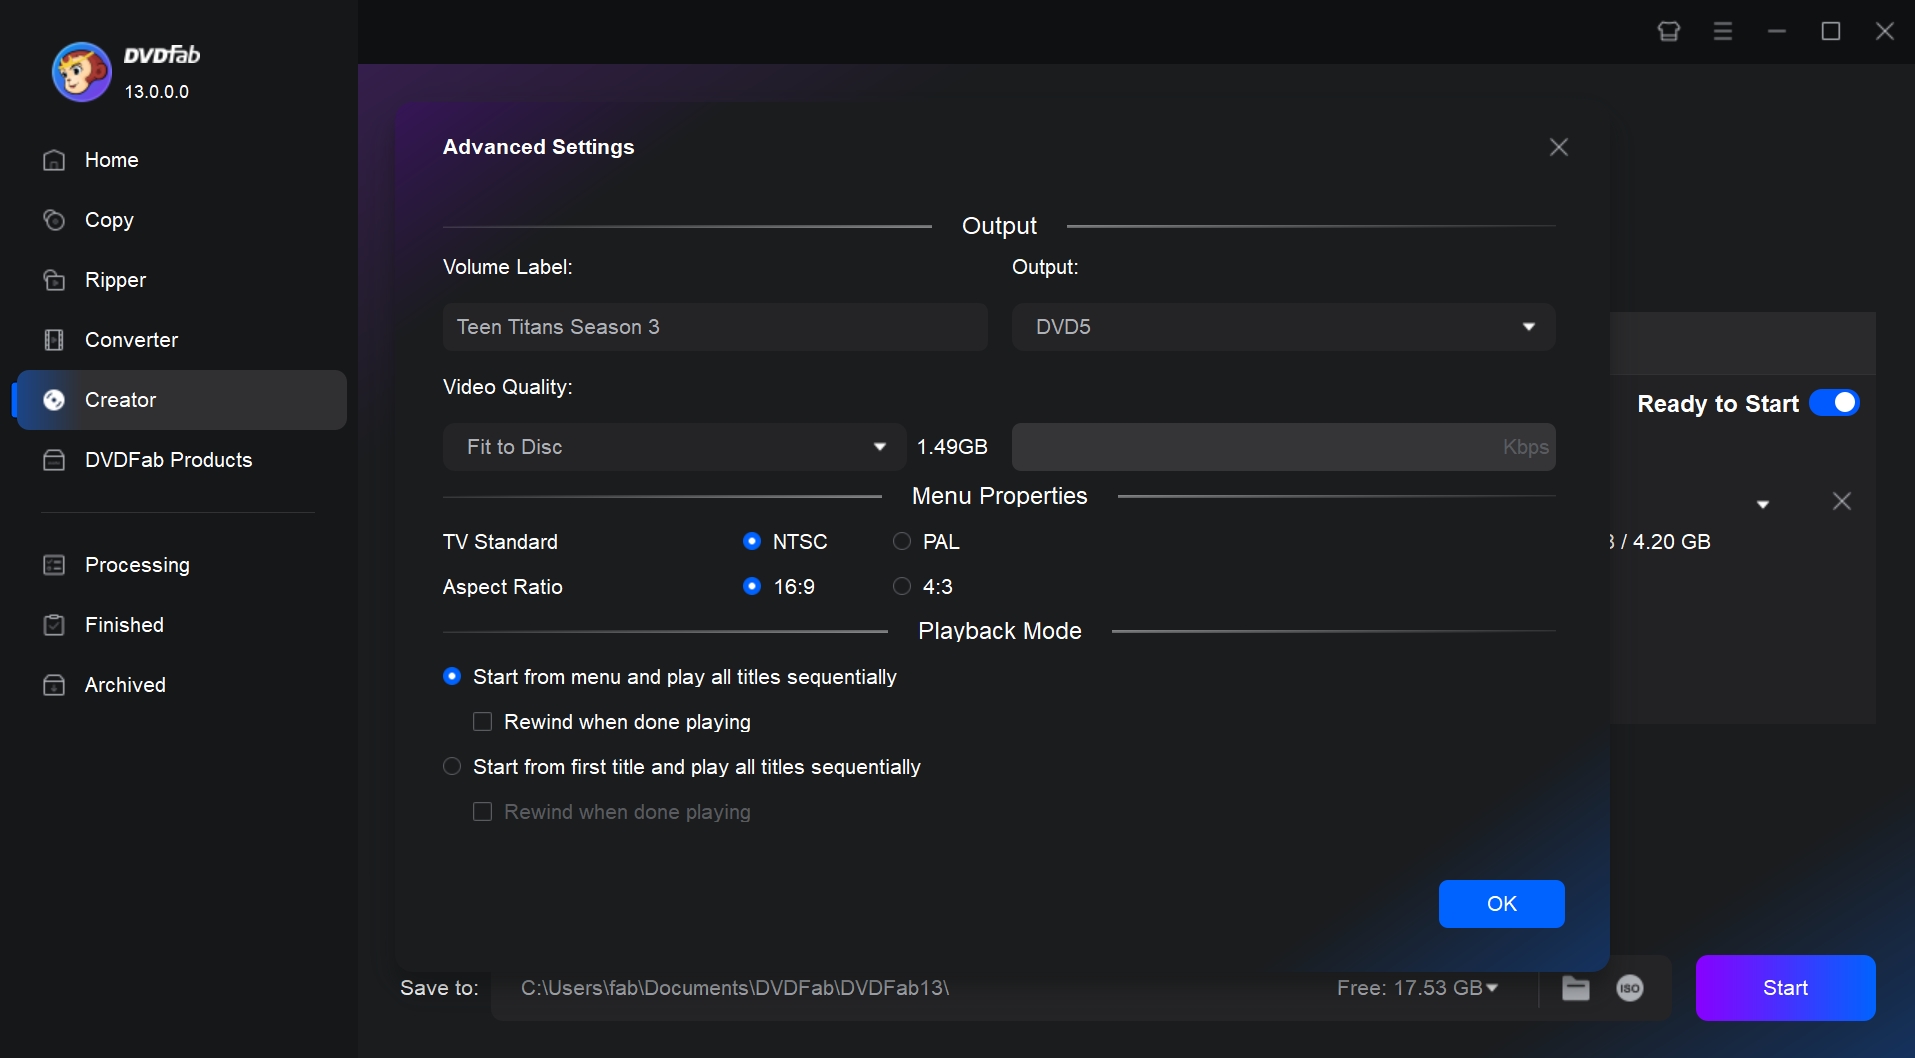
Click Advanced Settings below the loaded source and choose DVD 5 or DVD 9, then set the video quality according to the selected disc capacity. Choose NTSC or PAL for the target player, set the aspect ratio to 16:9 or 4:3, and check the playback mode before closing the panel. If a different audio or subtitle track is required, use the corresponding controls on the source card and add an external subtitle file if needed.
Step 3: Edit the Video and Customize the DVD Menu
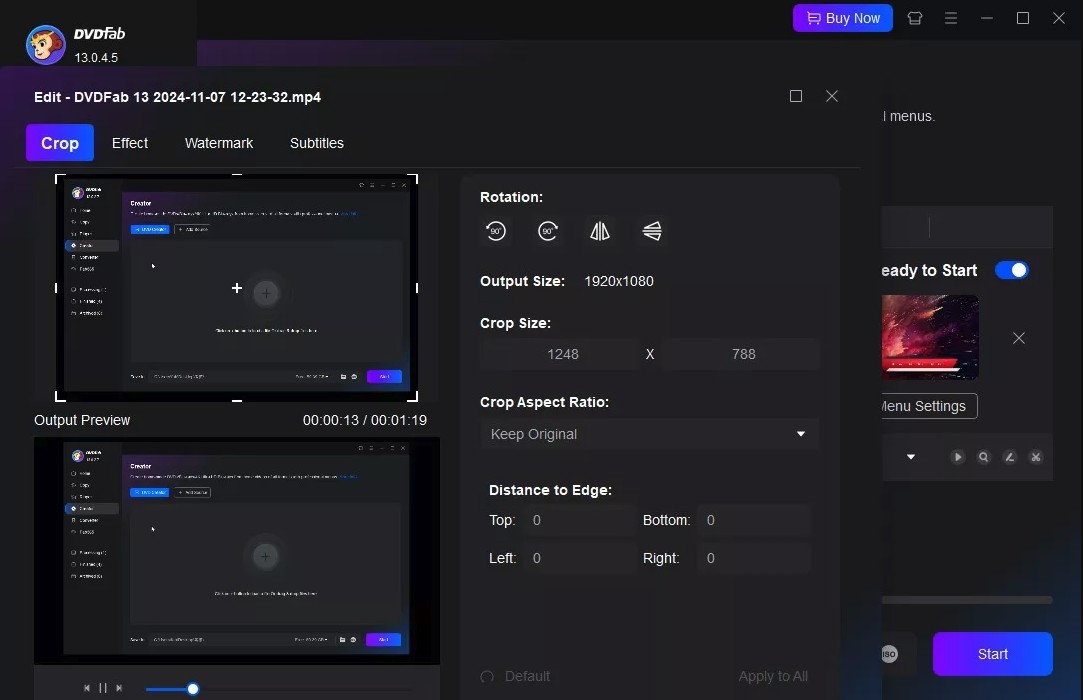
If the MKV requires changes, open the Video Editor control for the source and use the available tools to trim footage, crop or rotate the picture, adjust image properties, add subtitles, create chapters, or make other required changes. Return to Creator, click Menu Settings, select a menu template, and customize the background, text, buttons, thumbnails, and menu music where required. Use the preview function to inspect the edited video and menu before continuing.
Step 4: Create the DVD Disc, ISO, or Folder
Open Save to at the bottom of the interface and select the optical drive to burn a physical DVD, choose the ISO option to create a disc image, or choose the folder option to save an authored DVD folder. Insert a blank DVD if physical disc output is selected, confirm the destination, and click Start to begin creation.
How to Convert MKV to DVD with Cisdem DVD Burner
- Supported systems: Windows 11 and 10, 64 bit; macOS 10.15, 11, 12, 13, 14, 15, and 26
- Input: MKV and many other common video formats
- Output: DVD disc, ISO image, DVD folder
- Menu capability: Yes. Templates, backgrounds, music, text, frames, buttons, title menus, and chapter menus
- Video editing capability: Yes. Trim, crop, rotate, effects, subtitles, chapters, watermarks, and volume controls
Cisdem DVD Burner separates DVD creation into four clear areas: Source, Menu, Preview, and Burn. MKV is supported as an input, and projects can be created as a DVD disc, ISO image, or DVD folder.
The program is useful for users who want a current authoring workflow on modern Windows or Mac systems. Video editing, menu design, title and chapter navigation, preview, and output settings are available inside the same project.
Step 1: Add the MKV and Choose DVD Settings
Launch Cisdem DVD Burner and stay on the Source screen, then click Add Files, choose the MKV from the computer, or drag the file directly into the Source area. After the video loads, check the capacity indicator at the bottom, choose the target disc size, set the TV standard and aspect ratio, and select the required quality setting. If the project needs to be compressed to the selected disc capacity, choose Fit to disc so Cisdem can adjust the bitrate accordingly.

Step 2: Edit the MKV Before Authoring
Locate the MKV thumbnail on the Source screen and click the Edit icon beneath it. Use Trim to remove unwanted sections and Crop or Rotate when the frame requires adjustment, then open the subtitle controls to add or modify subtitles and use the chapter controls to create navigation points when required. Save the changes and return to the Source screen when editing is complete.
Step 3: Create the DVD Menu and Preview It
Click the Menu tab at the top of the window and select a template from the available categories. Modify the background image, menu music, text, buttons, frames, and title or chapter navigation as required, or enable No Menu if the project does not need one. When menu editing is finished, click the Preview tab and use the simulated DVD player controls to check the title menu, chapter menu, and navigation.

Step 4: Choose Output and Burn
Open the Burn tab and choose DVD Disc, DVD Folder, or ISO as the output type. If DVD Disc is selected, insert a blank DVD and choose the detected burner, then set the playback mode, DVD name, output path, and number of copies when required. Review the selected options and click Burn to create the final output.
How to Convert MKV to DVD with AVStoDVD
- Supported systems: Windows 11, 10, 8.1, 8, 7, and Vista; version 2.8.9 is legacy software
- Input: MKV and other supported media formats
- Output: DVD compatible streams, DVD folder, ISO image, and physical DVD through ImgBurn
- Menu capability: Yes. Internal DVD Menu Editor with static and motion menus
- Video editing capability: Basic video and audio processing through AviSynth filters
AVStoDVD can convert MKV and other media files into DVD compatible streams, author multiple audio and subtitle tracks, create menus, build ISO images, and use ImgBurn for physical disc writing.
The important limitation is maintenance. The latest public release is version 2.8.9 from October 11, 2020. AVStoDVD therefore makes more sense as a legacy Windows option for users already familiar with its authoring workflow than as the first choice for a new 2026 setup.
Step 1: Add the MKV Title
Start AVStoDVD and use the Add Title command to load the MKV into the project. Wait for source analysis to finish and review the detected video stream, audio streams, subtitles, and duration, then select the imported title and open Title Edit if source specific settings need to be changed before authoring.

Step 2: Set DVD Video and Audio Options
Open Preferences and choose the required DVD standard and target disc size, then open Title Edit for the imported MKV and review the video processing and encoding settings. Select the audio streams that should be kept and retain or add the required subtitle stream before returning to the main project.
Step 3: Configure the DVD Menu
Open the DVD Menu command and use the menu Wizard or internal Menu Editor to choose a menu style, set the title labels, and configure navigation elements such as Play All and menu arrows. Adjust the menu background, text, and other available properties, then use the available preview option to inspect the menu before authoring the project.
Step 4: Create DVD Files, ISO, or Burn the Disc
Open the project output settings and choose DVD Folder, ISO Image, or the disc burning workflow, then select the output folder and start the project. If a physical DVD is required, make sure ImgBurn is installed and configured before starting because ImgBurn is not included in the AVStoDVD installer package.
MKV to DVD Converter Comparison
| Tool | Systems | Free Option | MKV Input | DVD Menu | ISO or Folder | Video Editing | Best Fit |
| DVDneXtCOPY DVD Creator | Windows 11, 10, 8.1, 8, 7 | Trial | Yes | Yes | Yes | Limited | Guided DVD creation |
| DVDStyler | Windows 11, 10, 8, 7; macOS 10.15 or later; Linux | Free | Yes | Yes | ISO | Limited | Free DVD authoring |
| DVDFab DVD Creator | Windows 11, 10, 8.1, 8, 7; macOS 10.13 through 15.x | Trial | Yes | Yes | Yes | Yes | Commercial authoring with editing |
| Cisdem DVD Burner | Windows 11, 10; macOS 10.15 through 26 | Trial | Yes | Yes | Yes | Yes | Current Windows and Mac workflow |
| AVStoDVD | Windows 11, 10, 8.1, 8, 7, Vista | Free | Yes | Yes | Yes | Basic | Legacy Windows authoring |
DVDStyler is the clearest free option for a complete DVD authoring workflow. DVDneXtCOPY provides the most guided Windows workflow in this guide, while DVDFab and Cisdem add broader editing and platform options. AVStoDVD remains useful mainly for users who already work with its older Windows authoring environment.
What Happens to MKV Quality When You Convert It to DVD?
MKV describes a container rather than a fixed level of video quality. An MKV file may contain standard definition MPEG 2, 1080p H.264, 4K HEVC, or many other types of video. Creating a standard DVD Video disc can therefore require both resizing and video encoding.
Why 1080p and 4K MKV Become Standard Definition
Standard DVD Video uses standard definition video. A typical NTSC DVD project uses 720 by 480 video, while a typical PAL DVD project uses 720 by 576. A 1080p or 4K MKV therefore does not remain at its original resolution when it is authored as a standard DVD Video disc because the source must be scaled to a DVD compatible resolution. Keep the original MKV if retaining the original HD or 4K version matters.
Does MKV to DVD Conversion Lose Quality?
Usually, yes, when the MKV contains video that is not already compatible with the DVD Video format. A common H.264 or HEVC MKV normally has to be encoded as DVD compatible MPEG 2, and a source that is higher than DVD resolution also needs to be resized. Some already compatible MPEG material can be used by certain authoring programs without another video encode, but that exception does not apply to most modern HD MKV files.
DVD 5 or DVD 9: Which Gives Better Results?
DVD 5 is the common single layer option, while DVD 9 uses a double layer disc and provides substantially more capacity. A short video may fit on DVD 5 at a suitable DVD bitrate, while a longer movie, several titles, or multiple audio tracks can benefit from the extra space available on DVD 9. The better choice depends on total running time, audio tracks, menu content, and target quality rather than on the MKV extension itself.
FAQs
Usually no. DVD authoring software such as the tools in this guide can accept MKV directly and perform the required DVD compatible video encoding during the authoring process. A separate MPEG 2 conversion is only necessary when a particular workflow or source requires it.
Yes. You can create an ISO image or DVD folder without a physical DVD writer when the selected authoring program supports those outputs. A DVD writer is only required when the finished project needs to be written to a blank physical disc.
This usually happens when the source aspect ratio and the DVD project settings do not match. Check whether the source is intended for 16:9 or 4:3 display and select the corresponding aspect ratio before authoring the DVD.
Conclusion
Converting MKV to DVD for a standard DVD player means creating a DVD Video project rather than simply copying the MKV file onto a Data DVD.
DVDneXtCOPY DVD Creator is the primary recommendation for users who want a guided Windows workflow with MKV input, DVD settings, menus, preview, and DVD, ISO, or folder output. DVDStyler is the strongest choice when a free authoring workflow is the priority. DVDFab DVD Creator is the third recommendation for users who want additional editing controls, while Cisdem offers a current Windows and Mac workflow. AVStoDVD remains available for traditional Windows authoring, but its latest public release dates to 2020.
![Top 8 Best MP4 to DVD Converters on Windows & Mac [2026 Tested]](https://images.dvdnextcopy.com/2026/09/17/I2v69nzxIF6Xn7iue3ZRMGJ5-Ls0SF_z/feature_cover.jpg) Luna MillerSep 21, 2026
Luna MillerSep 21, 2026Top 8 Best MP4 to DVD Converters on Windows & Mac [2026 Tested]
 Luna MillerSep 21, 2026
DVD Region Codes Explained: Region 1 and Playback Options
![How to Remove DVD Copy Protection: Software and Free Methods [2026]](https://c.dvdnextcopy.com/media/How_to_Remove_DVD_Copy_Protection_d24c38a790.png) Steven VanceSep 21, 2026
Steven VanceSep 21, 2026How to Remove DVD Copy Protection: Software and Free Methods [2026]
 Luna MillerSep 21, 2026
How to Rip a Copy-Protected DVD on Win & Mac: 6 Ways
 Steven VanceSep 18, 2026
Top MP4 to ISO Converter in 2026: DVD Authoring vs Online Tools
 Steven VanceSep 18, 2026
How to Digitize DVD Collection: 5 Ways in 2026