 DVDneXtCOPY Blu-ray Ripper
How to Extract Audio from Blu-ray in 2026: FLAC, WAV, MP3 & Original Audio

Summary: You can extract audio from Blu-ray discs, ISO files, or folders as the original audio stream or convert it to FLAC, WAV, MP3, and other formats. For the most direct option, I recommend DVDneXtCOPY Blu-ray Ripper: it handles protected Blu-rays and supports CopyAudio for source audio plus Hi-Fi Audio profiles for lossless FLAC/WAV output. Lossless Extract is better for concert and Blu-ray Audio discs.
Table of Contents
A Blu-ray movie can contain several very different audio tracks: a main DTS-HD Master Audio or Dolby TrueHD soundtrack, another language mix, stereo audio, audio description, and one or more commentary tracks. A concert or Blu-ray Audio disc may add another layer of complexity because individual songs can be stored as chapters within a single long title.
Before ripping, I identify the title and audio track I actually want, then decide whether to keep the original soundtrack codec or convert it to a standalone audio format. The table below covers that output choice, and the five methods that follow show how I rip Blu-ray audio.
What Audio Format Should You Extract from Blu-ray?
The output format depends on what you want to keep. Choose a direct-stream or original-stream option when you need the Blu-ray soundtrack in its source codec, such as DTS-HD Master Audio or Dolby TrueHD. Choose FLAC for a lossless file that is easier to tag and play in a music library, WAV for uncompressed PCM or editing, and MP3/AAC when smaller files and broad device playback matter more than lossless quality.
| Your Goal | Recommended Output | Result |
|---|---|---|
| Keep the original Blu-ray soundtrack codec | Direct Stream / Original Stream | Keeps the source audio without transcoding |
| Create a lossless music-library file | FLAC | Lossless conversion in a smaller, tag-friendly file |
| Use uncompressed audio for editing | WAV | Stores decoded audio as uncompressed PCM |
| Reduce file size for phones or everyday playback | MP3 / AAC | Uses lossy compression for smaller files |
Quick Comparison of 5 Blu-ray Audio Rippers
The five tools below take different routes to Blu-ray audio extraction. Some work as direct Blu-ray audio rippers, some focus on high-resolution music and concert discs, and MakeMKV with MKVToolNix uses a two-step remux-and-extract process. Compare their operating systems, supported Blu-ray sources, protection handling, and audio outputs before choosing a method.
| Tool | OS | Blu-ray Sources | Protected Disc Access | Main Audio Options | Best For |
|---|---|---|---|---|---|
| DVDneXtCOPY Blu-ray Ripper | Windows / macOS | Disc / ISO / Folder | AACS, BD+, BD-J, region codes | AudioCopy, Hi-Fi FLAC/WAV, MP3 and other audio profiles | One-step original-stream or Hi-Fi audio extraction |
| Lossless Extract | Windows / macOS / Linux | Disc / BDMV / ISO | AACS via libaacs/key database; MakeMKV fallback available | FLAC, M4A, MKA, direct-stream options | Blu-ray Audio, concerts, chapters and metadata |
| DVD Audio Extractor | Windows / macOS / Ubuntu Linux | Blu-ray disc | Use with readable or unprotected Blu-ray sources | FLAC, WAV, MP3, OGG and direct demux | Dedicated audio-only extraction |
| MakeMKV + MKVToolNix | Windows / macOS / Linux | Blu-ray to MKV | AACS and BD+ | Original DTS, TrueHD, PCM, FLAC and other extracted tracks | Original codec extraction through a two-step process |
| DVDFab Blu-ray Ripper | Windows / macOS | Disc / ISO / Folder | AACS, BD+, BD-J, region codes | FLAC, WAV, MP3, AAC and Hi-Fi Audio profiles | Alternative GUI with Hi-Fi profiles and chapter splitting |
Method 1: Extract Audio from Blu-ray with DVDneXtCOPY Blu-ray Ripper
DVDneXtCOPY Blu-ray Ripper can extract audio directly from a protected Blu-ray disc, ISO image, or folder. Its audio profiles cover three useful outputs: AudioCopy for keeping the selected source stream without transcoding, Hi-Fi Audio profiles for lossless FLAC or WAV output, and common formats such as MP3 for smaller files. It also supports track selection before extraction and can handle common Blu-ray protections such as AACS, BD+, BD-J, and region codes.
For a movie soundtrack I expect to keep long term, I usually save a source-preserving version first and make a separate library-friendly copy only when I know I will play it outside home-theater software. That keeps me from returning to the disc later just to create another audio version. The 30-day trial is enough to run a few Blu-rays through this routine before deciding whether the software fits a larger collection.
Step 1: Load the Blu-ray Disc, ISO, or Folder
Install and launch DVDneXtCOPY, then switch to the Ripper module.
For a physical Blu-ray, insert the disc into the Blu-ray drive and let the program detect it. For an ISO image or BDMV folder, click Add Source or drag the source into the main window.

Step 2: Select the Correct Title and Audio Track
Open Choose Other Titles if the source contains several playlists or titles. Select the movie, concert, or program whose audio you want to extract. Back on the main screen, choose the required audio track and check the language, codec, and channel information rather than relying only on the default selection.

Step 3: Choose AudioCopy, FLAC, or Another Audio Profile
Open the profile selector. Under Format > Audio, choose AudioCopy to copy the selected source audio without transcoding, or choose MP3/AAC and other regular audio profiles for smaller files. For high-fidelity conversion, open the Hi-Fi Audio section and select a FLAC or WAV profile, including stereo or multichannel output when available.

Step 4: Set the Output Folder and Start Ripping
Click the folder control at the bottom of the interface and choose where the extracted audio will be saved. Press Start. DVDneXtCOPY switches to the Processing screen and displays the task status until the Blu-ray audio extraction finishes.

Method 2: Extract High-Resolution Blu-ray Audio with Lossless Extract
Lossless Extract is built around audio extraction rather than general video conversion. It accepts Blu-ray discs, BDMV folders, and ISO files, detects playlists and lossless audio streams, and supports PCM, DTS-HD Master Audio, and Dolby TrueHD/Atmos sources. Its output options include FLAC, M4A, MKA, and direct-stream extraction, while chapter navigation, preview, gapless output, CUE data, and metadata tools make it particularly useful for Blu-ray Audio and concert releases. For AACS-encrypted physical Blu-rays, it can use libaacs with a key database and fall back to MakeMKV when the required key is unavailable locally. Newer discs can still depend on key coverage.
Concert discs are where I find Lossless Extract's chapter and gapless tools most useful. I can split a performance into song files when the chapter marks are clean, or keep one continuous extraction with CUE information when transitions should stay uninterrupted. The metadata and artwork tools also reduce the cleanup needed before the files go into a music library.
Step 1: Add the Blu-ray Disc, BDMV Folder, or ISO
Open Lossless Extract and add the physical Blu-ray volume, BDMV folder, parent disc folder, or Blu-ray ISO. The application scans the Blu-ray structure and displays the detected playlists and audio streams.
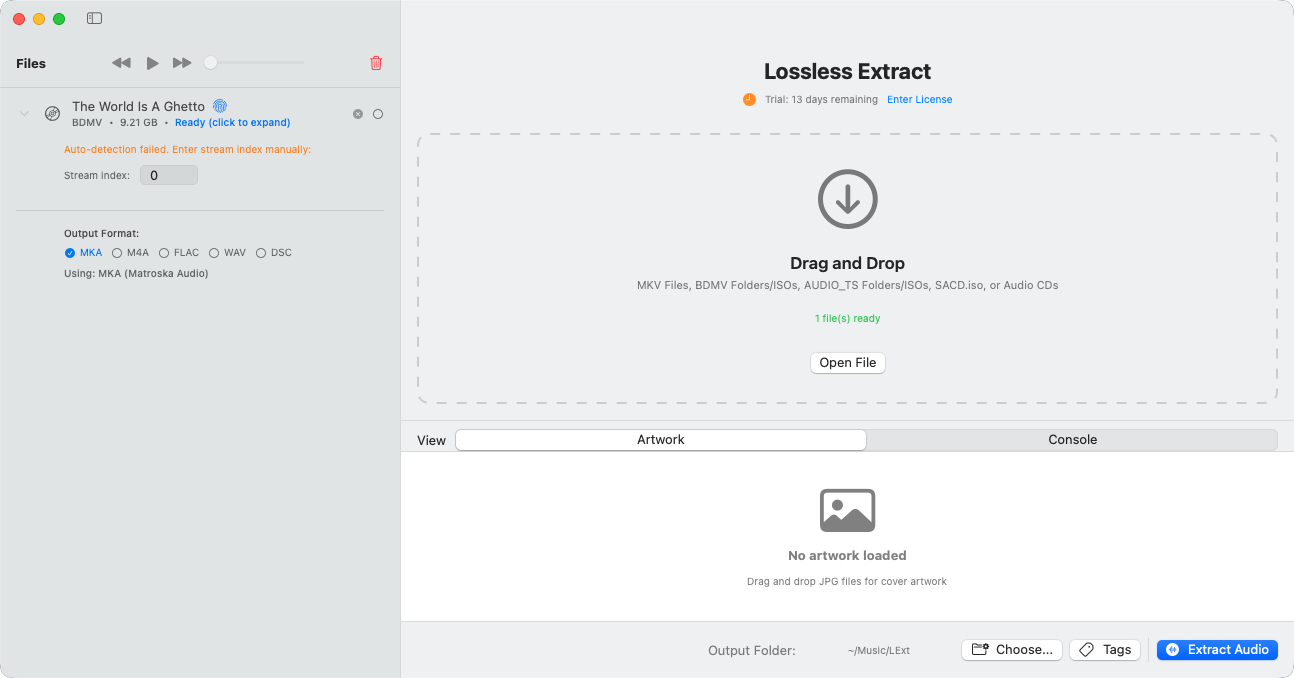
Step 2: Select the Playlist, Audio Stream, and Chapters
Review the detected playlists and audio streams, then select the soundtrack or mix you want. Preview the stream or chapter before extraction when you need to distinguish between stereo, multichannel, commentary, or alternate mixes. For a concert or Blu-ray Audio disc, select the chapters that correspond to the songs you want.
Step 3: Choose FLAC, M4A, MKA, or Chapter Output
Use the output-format control beside the selected stream. Choose FLAC for a manageable lossless audio file, MKA or direct-stream output when keeping the source codec is the priority, or another supported format when it better matches your playback setup. If the disc represents one continuous concert, decide whether you want separate chapter files or gapless output before starting.
Step 4: Set the Destination and Extract the Audio
Review the selected streams and output directory, then start the extraction. When the project uses chapter splitting, check the first and last extracted tracks before reorganizing the source files so you can confirm that the selected chapter range is correct.
Method 3: Rip Blu-ray Audio with DVD Audio Extractor
DVD Audio Extractor is a dedicated audio ripper rather than a general Blu-ray video converter. It can extract audio from Blu-ray and DVD sources and encode the selected material as FLAC, WAV, MP3, or OGG. It also supports direct demuxing of source audio, multichannel output, resampling, chapter selection, metadata, and audio preview. The current release is version 8.8.0; the current builds support Windows 11 and later, Apple Silicon macOS, and Ubuntu 24.04 and later. For protected commercial Blu-rays that it cannot open directly, use a separate disc-access step or another ripper with Blu-ray decryption support.
When I am extracting an album or concert into individual files, the wizard-style audio workflow is the part I value most. I can move from chapter selection to format, naming, and metadata without working through video settings, which makes the process easier to manage when the final result is a music library rather than a movie file.
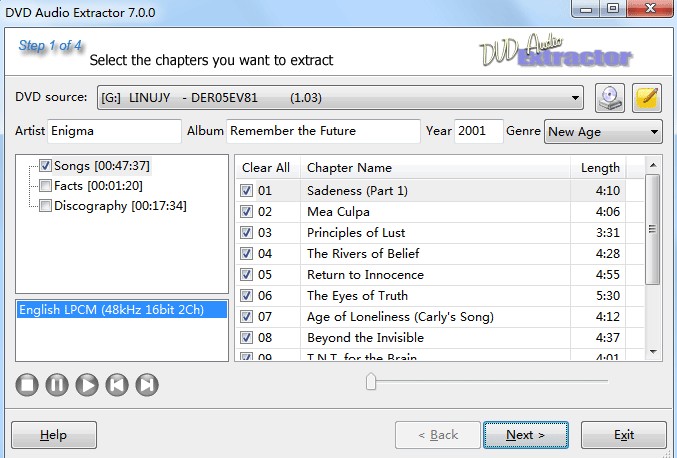
Step 1: Open the Blu-ray and Select the Title or Chapters
Insert the Blu-ray and launch DVD Audio Extractor. Choose the soundtrack or concert program you want to extract, select the required chapters, and then choose the audio stream you want to save.
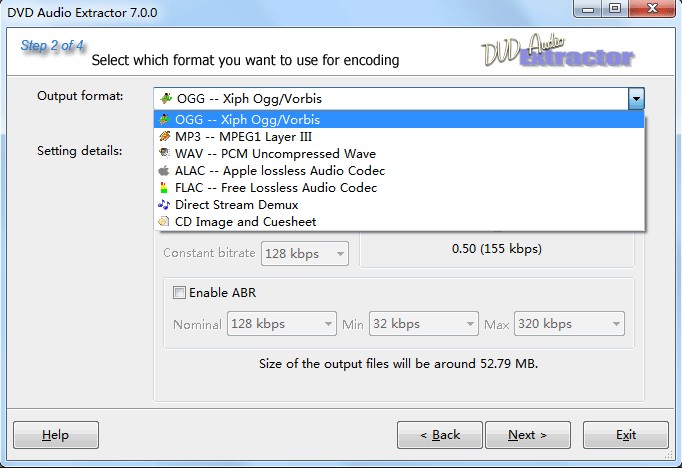
Step 2: Choose FLAC, WAV, MP3, OGG, or Direct Demux
Move to the output-format page. Choose FLAC for a compressed lossless file, WAV when you want uncompressed PCM, or MP3/OGG for smaller files. Use direct demux when you want a supported source audio stream saved without first encoding it into another audio format.
Step 3: Set Sample Rate, Channels, File Splitting, and Metadata
Choose the output location and adjust the audio settings that matter for the selected format. DVD Audio Extractor can retain multichannel audio, resample to a selected sample rate, save chapters separately, and write metadata such as artist, album, year, genre, and chapter names into supported output files. Avoid unnecessary resampling unless a playback or editing device requires it.
Step 4: Start the Audio Extraction
Continue to the final page and start the extraction. If individual chapters are saved as separate files, check their names and order before importing them into a music library.
Method 4: Extract Original Blu-ray Audio with MakeMKV and MKVToolNix
MakeMKV does not directly export an audio-only file from a Blu-ray. It first reads the disc and creates an MKV while preserving the selected video and audio tracks, including HD audio, chapter information, and track metadata. It can read Blu-rays protected with AACS and BD+. MKVToolNix then provides mkvextract, which can extract individual tracks from that MKV into standalone files.
I reserve this two-step method for cases where keeping the original Blu-ray audio codec matters more than getting a ready-made FLAC or MP3 in one pass. The intermediate MKV acts as a temporary container for the disc streams, and mkvextract then pulls out only the audio track I want. The tradeoff is extra storage and another step, so I skip this route when a direct FLAC export is the goal.
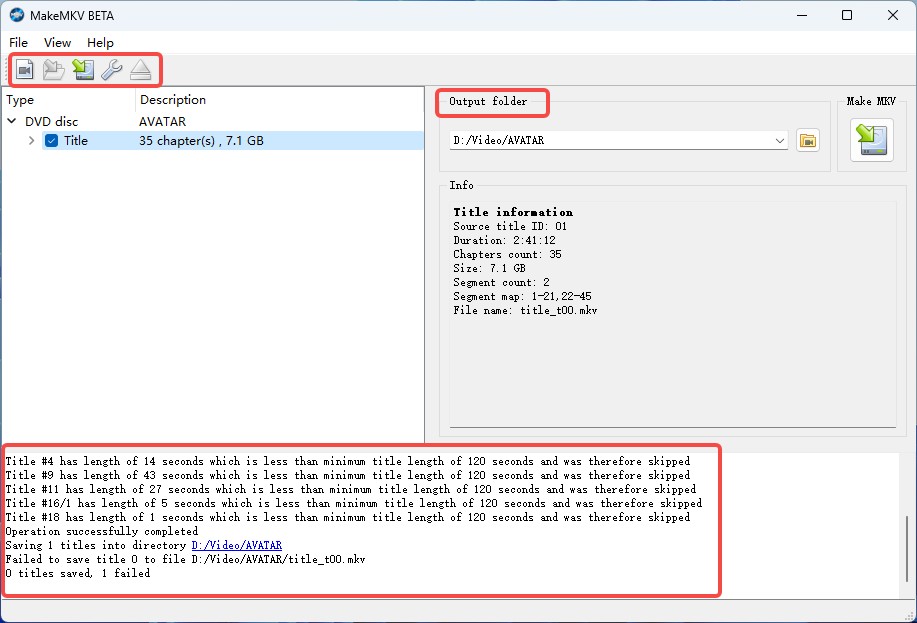
Step 1: Open the Blu-ray in MakeMKV and Select the Audio Track
Launch MakeMKV and open the Blu-ray. Expand the required title and examine its streams. Keep the HD audio track you want, such as the required DTS-HD, TrueHD, or PCM stream, and deselect unnecessary tracks if you want to reduce the size of the intermediate MKV.
Step 2: Save the Selected Blu-ray Title as MKV
Choose an output directory and create the MKV. When the file is complete, inspect it in MKVToolNix or a media-information utility and verify that the intended audio stream is present before you continue.
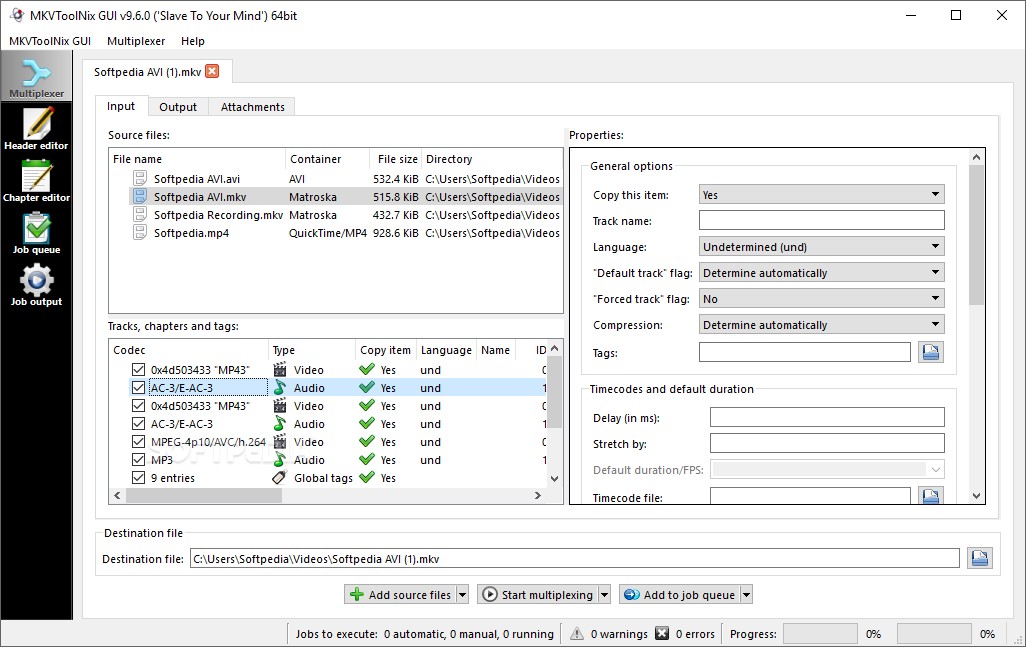
Step 3: Identify the Audio Track ID with MKVToolNix
Open the MKV in MKVToolNix or identify the tracks with its command-line tools. Note the track ID assigned to the audio stream you want to extract; you will use that ID in the mkvextract command.
Step 4: Extract the Selected Audio Track with mkvextract
Use the track-extraction mode of mkvextract:
mkvextract source-file.mkv tracks TRACK_ID:output-file For example, if the desired TrueHD stream is track ID 2:
mkvextract "movie.mkv" tracks 2:"movie-audio.thd" mkvextract writes the track according to its codec: DTS audio is extracted as raw DTS, TrueHD/MLP as raw TrueHD/MLP, FLAC as FLAC, and integer PCM as WAV. Use a matching file extension so the result is easy to identify later.
Method 5: Extract Blu-ray Audio with DVDFab Blu-ray Ripper
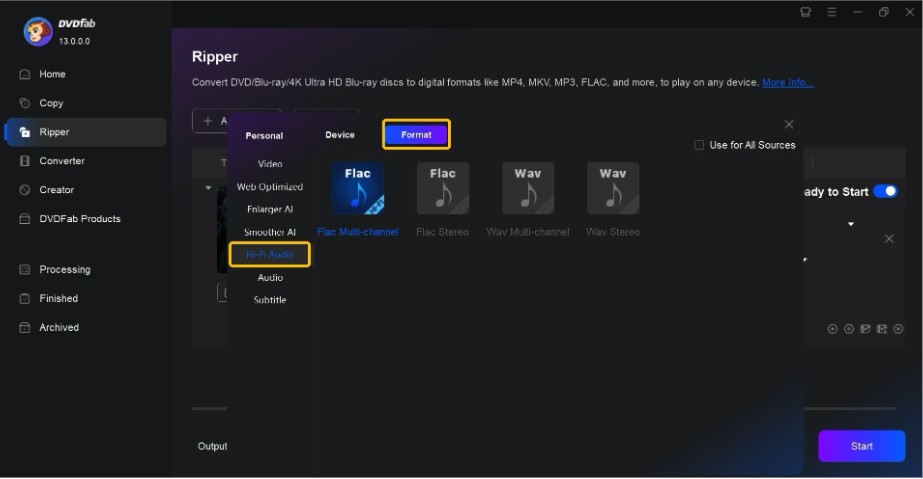
DVDFab Blu-ray Ripper can extract audio directly from a Blu-ray disc, ISO, or folder and provides common audio formats such as MP3, AAC, M4A, FLAC, and OGG. For high-resolution output, its Hi-Fi Audio section includes FLAC Stereo, FLAC Multi-channel, WAV Stereo, and WAV Multi-channel profiles. It also lets you choose titles, chapters, and audio streams, adjust sample rate and channel settings, and split the output by chapter. It can open commercial Blu-rays protected by AACS, BD+, BD-J, and region codes.
For a surround music collection, I use FLAC Multi-channel when I want a smaller lossless library file and WAV Multi-channel when the next step is editing or processing. On concert discs, chapter splitting is useful for turning one long program into separately browsable tracks. I usually choose a stereo profile only when the playback target does not need the surround mix.
Step 1: Load the Blu-ray Disc, ISO, or Folder in Ripper
Open DVDFab and select the Ripper module. Insert the physical Blu-ray or use Add Source or drag-and-drop for an ISO image or folder.
Step 2: Choose the Audio Profile and Required Stream
Click Choose Other Profile > Format. For high-resolution extraction, open Hi-Fi Audio and choose FLAC Stereo, FLAC Multi-channel, WAV Stereo, or WAV Multi-channel. For smaller everyday files, use the regular Audio section for formats such as MP3 or AAC. Then choose the title, chapter range, and audio stream you want from the Blu-ray.
Step 3: Adjust Channels, Sample Rate, and Chapter Splitting
Open Advanced Settings. Depending on the selected profile, DVDFab provides controls for audio channels and sample rate, with supported Hi-Fi profiles allowing sample rates up to 192 kHz. Turn on Split if you want chapters saved separately; leave No Split selected when you prefer one continuous output file.
Step 4: Choose the Destination and Start Ripping
Set the output folder at the bottom of the interface and click Start to extract the selected Blu-ray audio. When the task finishes, open one or two output files and confirm that the codec and channel count match the profile you selected.
FAQs
Yes, but the output method matters. If you want to retain the original Blu-ray codec, choose AudioCopy, Direct Stream Copy, an original-stream output, or extract the original track through MakeMKV and MKVToolNix. Converting DTS-HD or TrueHD to FLAC can still produce lossless audio, but the result is no longer the original DTS-HD or TrueHD bitstream.
Yes, when the disc uses chapters or track markers that correspond to individual songs. Lossless Extract can export Blu-ray chapters as separate files or as a gapless file, DVD Audio Extractor supports chapter-by-chapter output, and DVDFab provides a chapter Split option for supported audio profiles. Preview the chapter changes on live material because some markers fall inside applause or transitions rather than exactly at a song boundary.
The most common cause is selecting the wrong title or audio stream. Blu-rays can contain several language tracks, commentary, audio description, stereo and multichannel mixes, or both a lossy core and an HD stream. Return to the title and audio-track list and check the language, codec, duration, and channels before ripping again. If the Blu-ray itself cannot be opened, the issue may instead be source access or disc protection.
Open the result in a media-information utility and compare the codec, sample rate, channel layout, and duration with what you selected before extraction. For AudioCopy or another direct-stream method, confirm that the expected source codec such as DTS-HD or TrueHD is still present. For FLAC or WAV, check that stereo, 5.1, or 7.1 output matches the profile you intended to create.
Conclusion
When I extract audio from Blu-ray, I choose the output by how I plan to use it. DVDneXtCOPY AudioCopy keeps the selected source stream without audio transcoding, while its Hi-Fi Audio profiles convert the soundtrack to lossless FLAC or WAV. MP3 or AAC is more suitable when smaller files matter more than preserving the full-resolution source.
For most protected movie Blu-rays, DVDneXtCOPY Blu-ray Ripper remains my primary recommendation because it combines disc/ISO/folder access, audio-track selection, original-stream AudioCopy, and Hi-Fi FLAC/WAV output in one interface. Lossless Extract is better suited to Blu-ray Audio and concert projects that need chapter, gapless, or metadata controls, while MakeMKV + MKVToolNix is useful when you specifically want the original HD audio stream through a two-step process. DVDFab Blu-ray Ripper is another current GUI option with Hi-Fi profiles and chapter-splitting controls.
 Steven VanceSep 17, 2026
How to Rip Blu-ray on Mac in 2026: 4 Workflows, 5 Methods
![How to Rip 3D Blu Ray: Pick MVC or SBS Before You Start [2026]](https://images.dvdnextcopy.com/2026/09/15/OCieIQbnp92l67jxKZzrGV_sFMToZiaa/feature_cover.jpg) Steven VanceSep 16, 2026
Steven VanceSep 16, 2026How to Rip 3D Blu Ray: Pick MVC or SBS Before You Start [2026]
 Steven VanceSep 15, 2026
Convert BDMV to MP4 on Windows or Mac: Choose the Right Method
 Luna MillerSep 15, 2026
How to Convert BDMV to MKV in 2026: Folder, Remux, or Re-Encode?
 Luna MillerSep 15, 2026
Blu-ray Authoring Software for Windows and Mac: 2026 Picks by Project
 Luna MillerSep 8, 2026
Best Free Blu-ray Copy Software in 2026: Reviews & How-to Guide