 DVDneXtCOPY DVD Ripper
How to Transfer DVDs to iPad or iPhone in 2026: 3 Workflows

Summary: To transfer DVDs to an iPad or iPhone, rip the disc on a computer first. DVDneXtCOPY handles supported protected DVDs and creates iPad-ready files, HandBrake is a free encoder for unprotected discs, and MakeMKV preserves DVD streams in MKV. After ripping, transfer the MP4 or MKV to your device with Finder or Apple Devices over USB, AirDrop from a Mac, cloud storage such as iCloud Drive, or VLC Wi-Fi sharing.
Table of Contents
A physical DVD cannot be played directly on an iPad or iPhone, even with a USB optical drive. To transfer DVDs to iPad, make a DVD to digital copy on a computer, encode it for the iPad video format, then move the file with Finder, Apple Devices, AirDrop, cloud storage, or VLC Wi-Fi sharing.
The route is straightforward once the disc has been digitized: decide what to keep, create a compatible file, and choose a transfer method that matches how you manage your library.
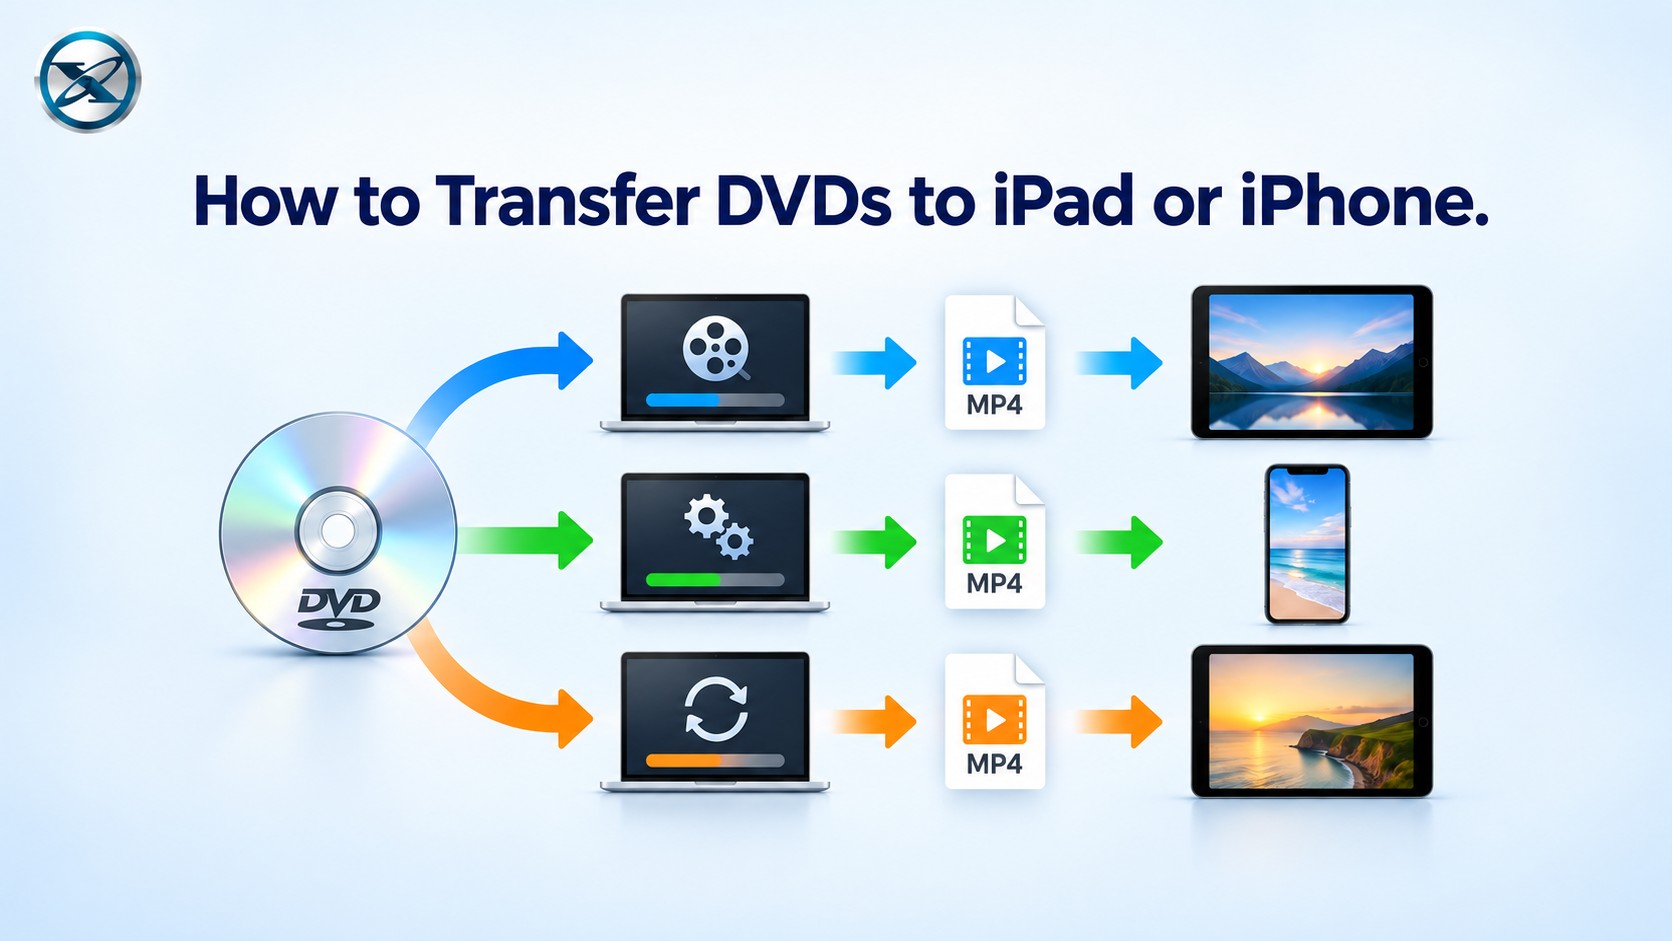
How to Transfer DVDs to iPad/iPhone: 3 Workflows
The following three DVD ripper software programs take different paths from a DVD to something you can watch on an iPad or iPhone. DVDneXtCOPY combines disc access, conversion, device profiles, and editing in one program. HandBrake focuses on encoding readable sources. MakeMKV takes a preservation-first approach by copying the selected streams into MKV before you decide whether to play or compress them.
| Ripping Feature | DVDneXtCOPY DVD Ripper | HandBrake | MakeMKV |
| OS | Windows 11/10/8.1/8/7 | Windows, macOS, Linux | Windows, macOS, Linux |
| DVD decryption | Built in; supports common protections including CSS, region codes, RCE, UOPs, and Sony ARccOS | No built-in DVD decryption | Built-in disc decryption; no additional decryption software required |
| Output formats | MP4, MKV, AVI, MOV, audio formats, SRT, and device profiles | MP4, MKV, WebM | MKV |
| Video re-encoding | Yes; passthrough profiles are also available for supported outputs | Yes | No; selected video and audio streams are copied without re-encoding |
| Video editing | Trim, crop, rotate, watermark, external subtitles, audio and other controls | No full video editor; provides encoding, crop, filter, audio, subtitle, and chapter controls | No |
| iPad/device profiles | Yes | Presets can create compatible MP4 files | No |
| Recommended scenario | Convert a supported commercial DVD directly to an iPad-ready video | Encode an unprotected or home DVD for free | Preserve DVD streams in MKV before playback or later compression |
1. DVDneXtCOPY DVD Ripper: Direct DVD-to-iPad Conversion
DVDneXtCOPY DVD Ripper comes in my first recommendation because it can process copy protected DVDs you legally own. It provides over 1,000+ output formats, including specific device profiles for Apple and Huawei phones and tablets. It also provides a video editor that allows you to trim and crop the video and add video effects, subtitles, and watermarks, so that you can make the video more personalized.
This tool offers a 30-day free trial with full functionality, and no watermark will be embedded in the output file during the trial period.
- Support copy-protected DVDs
- Batch conversion and fast speed
- Support DVD to iPad, DVD to iPhone format, and other video and audio formats
- Support deleting unwanted subtitles, adding external subtitles, and output subtitles to srt format
- Built-in video editor allowing for cropping, rotating, adding subtitles/watermarks, and adjusting audio and playback speed
How to convert a DVD for iPad or iPhone with DVDneXtCOPY:
Step 1. Load the DVD source. Install DVDneXtCOPY on the Windows PC and open the Ripper module. Insert the physical DVD, or use Add Source to load a DVD ISO or DVD folder already stored on the computer.
Step 2. Select the movie, audio, and subtitles. Review the detected titles and chapters rather than accepting the first selection automatically. Keep the audio and subtitle tracks you want in the portable copy.

Step 3. Choose the iPad output. Select an Apple-oriented profile or choose MP4 manually. MP4 with H.264 video and AAC audio is a practical default when the same file may be played across different Apple devices.

Step 4. Adjust the video only when needed. Open Advanced Settings or Video Edit if you need to change resolution, codec, crop the picture, trim part of the movie, add an external subtitle, or adjust another specific setting.
Step 5. Choose the destination and start. Set the output folder and begin the conversion. When the file is finished, reopen it and check the movie duration, audio, subtitles, and chapters before moving it to the iPad or iPhone.
2. HandBrake: Free Encoding for Unprotected DVDs
HandBrake is a free, open-source video transcoder for Windows, macOS, and Linux. It can read unprotected DVDs and other readable video sources and encode them as MP4, MKV, or WebM. Unlike the other two tools here, HandBrake does not include DVD decryption and does not circumvent copy protection.
That distinction makes it a good option for home-recorded DVDs and other unprotected sources. HandBrake provides much more encoding control than MakeMKV: you can change the video codec and quality, crop the picture, select audio and subtitle tracks, preserve chapter markers, and reduce the file size for portable playback.
- Free
- Controls audio, subtitles, filters, crop, quality, and chapter markers
- Supports queued encoding jobs
How to convert an unprotected DVD for iPad with HandBrake:
Step 1. Open the readable DVD source. Start HandBrake and select the DVD or DVD backup. Let HandBrake scan the source and choose the movie title you want to encode.
Step 2. Select an MP4 preset. Choose a suitable preset and use MP4 when broad playback compatibility on an iPad or iPhone is more important than retaining every original disc stream.
Step 3. Check audio, subtitles, and chapters. Review these tabs before starting. HandBrake can retain detected chapter markers and lets you choose which audio and subtitle tracks belong in the output.

Step 4. Choose the destination. Set the folder and filename for the finished MP4. If several readable titles need conversion, add them to the queue.
Step 5. Start encoding and verify the file. After HandBrake finishes, reopen the video and switch through the audio and subtitle tracks you intended to keep before transferring the file to the Apple device.
3. MakeMKV: Preserve DVD Streams Before Playback or Conversion
MakeMKV solves a different problem from HandBrake. Rather than compressing the movie or creating an iPad-specific MP4, it takes the selected content from a DVD and places the video, audio, subtitles, chapter information, and metadata into an MKV container without re-encoding the video and audio streams.
It is available for Windows, macOS, and Linux and includes the disc access needed for DVD conversion without requiring separate decryption software. The tradeoff is equally clear: MKV is its output format, there is no built-in video editor, and the resulting file is not compressed into a smaller mobile-oriented encode.
This makes MakeMKV useful when you want to preserve the DVD streams first and decide what to do with them later. You can transfer the MKV to an iPad and play it with an app such as VLC, or open the MKV in HandBrake afterward and create a smaller H.264/AAC MP4.
- Selected DVD video and audio streams without video re-encoding
- Multiple audio tracks
- Subtitle tracks
- Chapter information
- Track metadata such as language and audio type
How to transfer a DVD with MakeMKV:
Step 1. Open the DVD. Install MakeMKV, insert the disc, and select the optical drive. Open the DVD and wait for MakeMKV to scan its titles.
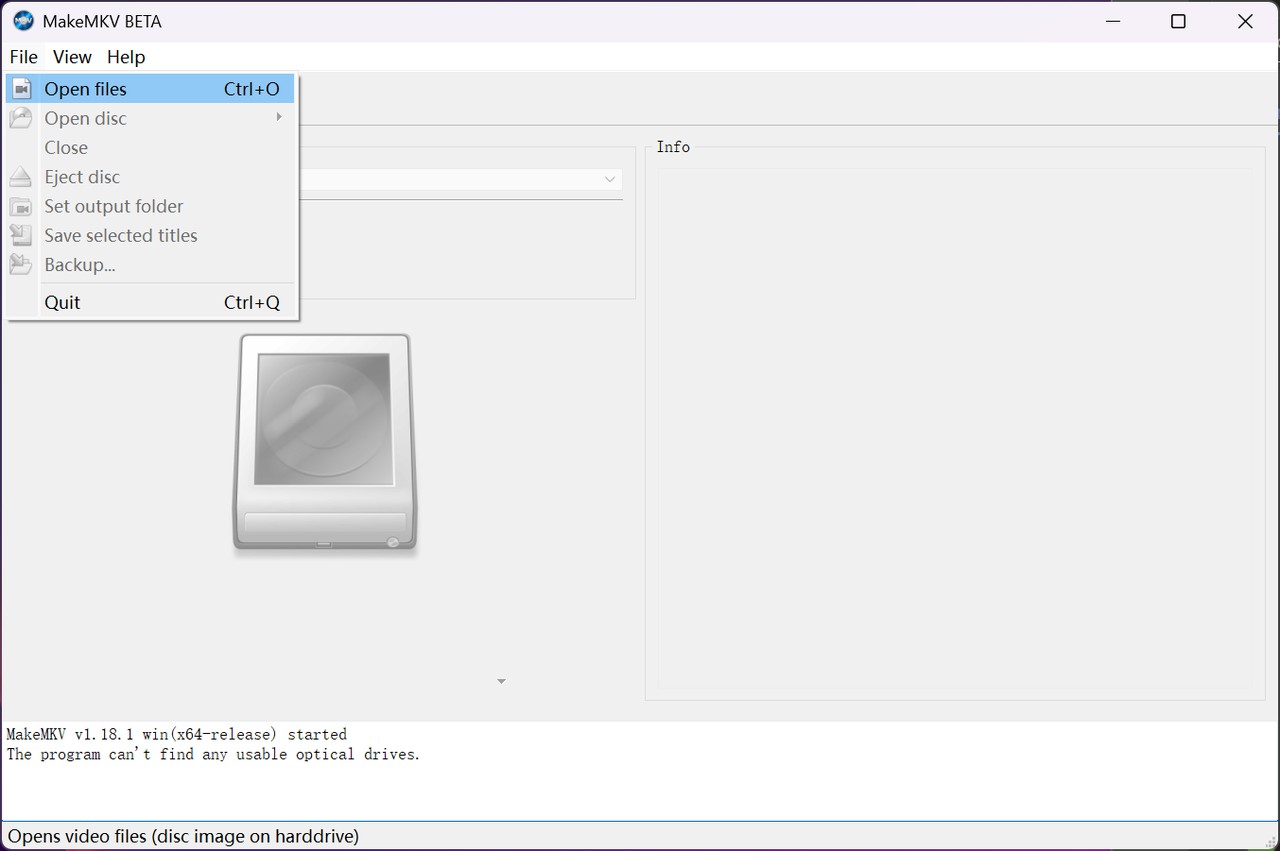
Step 2. Select the content to keep. Expand the movie title and review its audio and subtitle tracks. Remove tracks you do not need rather than copying every available stream automatically.
Step 3. Choose the MKV destination. Select the folder where the MKV should be saved. Because MakeMKV does not re-encode the video into a smaller mobile format, make sure enough storage is available on the computer and destination device.
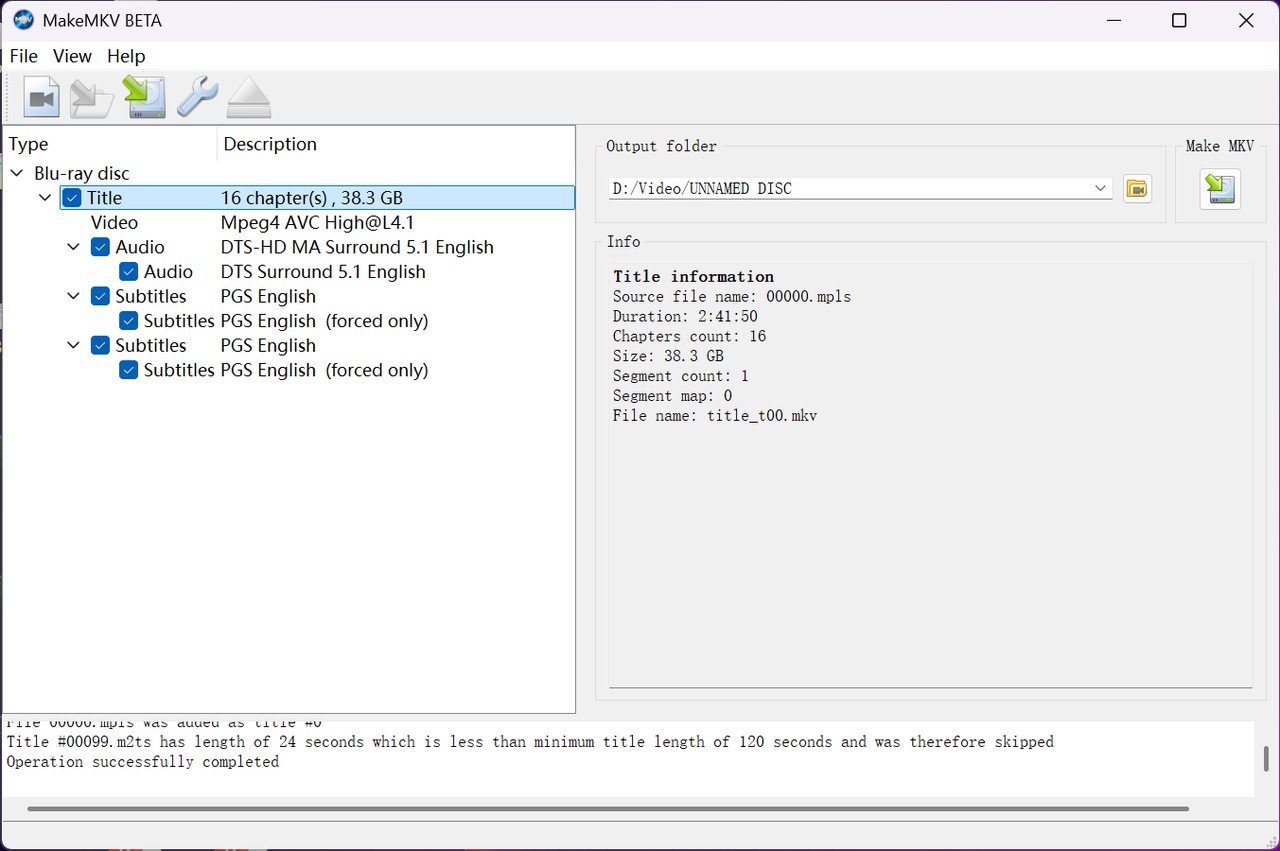
Step 4. Create and verify the MKV. Start MakeMKV and reopen the completed file afterward. Confirm that the selected audio tracks, subtitles, chapters, and movie duration are present.
Step 5. Choose how you want to use the MKV on iPad. If keeping the original DVD streams is the priority, transfer the MKV to VLC on the iPad or iPhone for playback. If storage space and wider Apple playback compatibility matter more, use HandBrake to encode that MKV into an H.264/AAC MP4 before transferring it.
How to Transfer the Converted DVD Video to iPad or iPhone
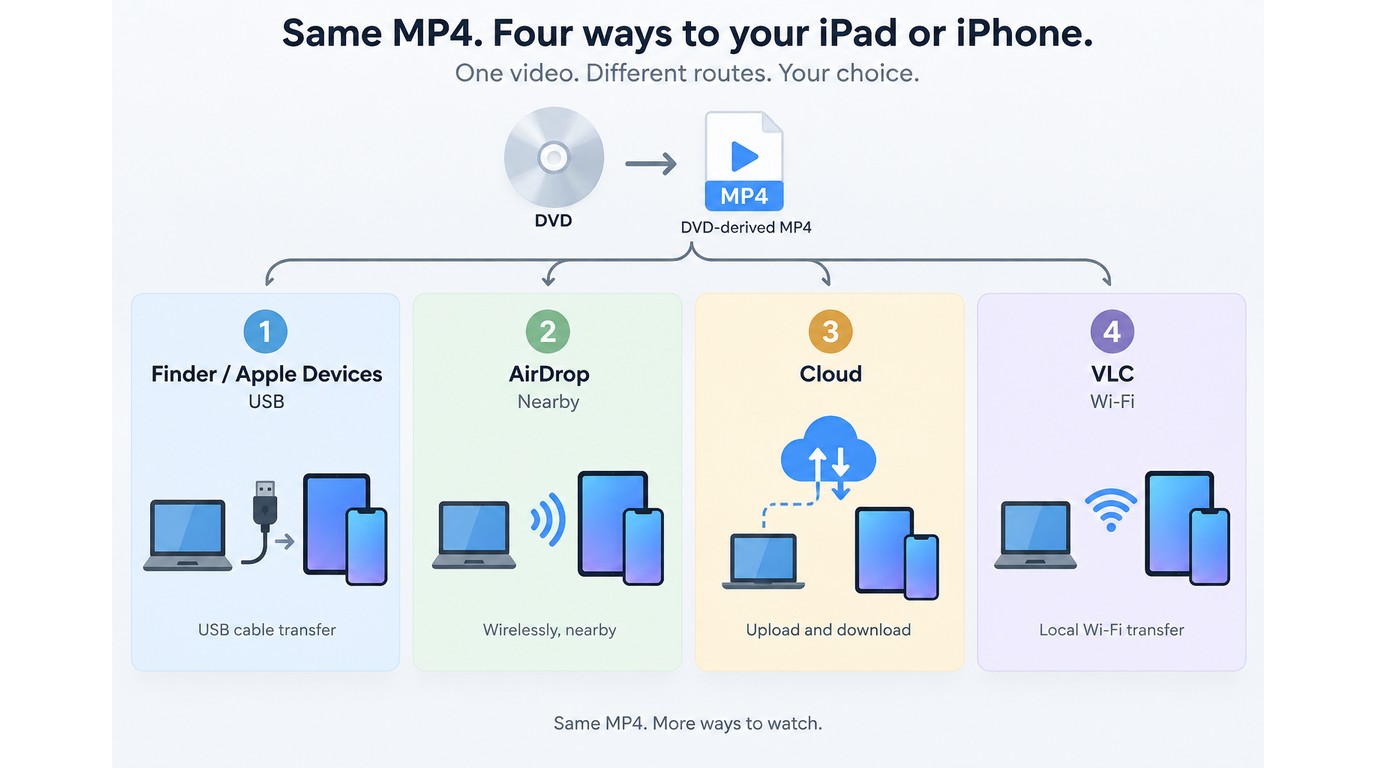
Once the DVD has been ripped, you are transferring a normal video file rather than the physical disc. An MP4 created by DVDneXtCOPY or HandBrake is the simpler choice for broad Apple playback, while an MKV from MakeMKV is better paired with an app such as VLC that supports the container and its multiple audio and subtitle tracks.
Finder or Apple Devices via USB
On macOS Catalina or later, Finder handles file sharing between a Mac and an iPad or iPhone. On Windows 10 or later, Apple directs users to the Apple Devices app. iTunes remains relevant mainly for older supported systems.
- Connect the iPad or iPhone to the computer and unlock the device.
- Open Finder on a Mac or Apple Devices on Windows, then select the connected device.
- Select a compatible app or media-sharing area and add the converted video.
- Wait for the file transfer to finish.
- Open the destination app on the iPad or iPhone and test the video.
File Sharing works only with apps that support it, so the destination application determines which video formats can be opened after transfer.
AirDrop
AirDrop is convenient when the converted video is on a Mac and the iPad or iPhone is nearby. Send the finished file from the Mac, accept it on the device, and choose the appropriate app or storage location.
It works well for occasional files without setting up a synced media library. For several large DVD files, a wired transfer may be easier to manage.
Cloud Storage
iCloud Drive or another supported cloud service is useful when the same converted movie needs to be available on several devices. Upload the video from the computer and open or download it from the corresponding app on the iPad or iPhone.
This method consumes cloud storage and requires an upload and download, so it makes more sense for cross-device access than for moving a large local collection quickly.
VLC Wi-Fi Sharing for MP4 or MKV
VLC for iOS and iPadOS can play MKV files as well as multiple audio and subtitle tracks, which makes it especially useful for MakeMKV output. It also provides Wi-Fi sharing for moving videos from a computer to the VLC media library.
- Open VLC on the iPad or iPhone and enable its Wi-Fi sharing feature.
- Make sure the computer and Apple device are connected to the same local network.
- Open the address shown by VLC in a browser on the computer.
- Add the MP4 or MKV file through the web interface.
- After the transfer finishes, open the video in VLC and check playback, audio, and subtitles.
Before removing the original conversion file from the computer, play the beginning, middle, and end of the transferred movie. Switch through any audio and subtitle tracks you deliberately kept. A completed transfer bar confirms that the file arrived; it does not confirm that the correct title or tracks were selected during ripping.
FAQ
Can I connect a DVD drive directly to an iPad and watch the movie?
No. Connecting a USB optical drive does not give iPadOS a DVD-Video playback system. Rip or convert the DVD on a computer first, then transfer the resulting video file.
Can I plug a USB DVD drive straight into an iPad?
No. An iPad or iPhone cannot use a USB optical drive as a DVD player, so digitize the disc on a computer and transfer a compatible video file.
Conclusion
The simplest route is to create one iPad-friendly video first and choose the transfer method afterward. MP4 with H.264 and AAC is a practical default when broad playback compatibility matters. DVDneXtCOPY suits Windows users who need more control over supported DVD sources, subtitles, or editing; HandBrake is enough for many unprotected or home DVDs; and MakeMKV is better when you want to keep the DVD video, audio, subtitles, and chapters in MKV first.
Whichever converter you use, finish by reopening the video on the iPad or iPhone and checking its duration, audio, subtitles, and chapters.
![Top 8 Best MP4 to DVD Converters on Windows & Mac [2026 Tested]](https://images.dvdnextcopy.com/2026/09/17/I2v69nzxIF6Xn7iue3ZRMGJ5-Ls0SF_z/feature_cover.jpg) Luna MillerSep 21, 2026
Luna MillerSep 21, 2026Top 8 Best MP4 to DVD Converters on Windows & Mac [2026 Tested]
 Luna MillerSep 21, 2026
DVD Region Codes Explained: Region 1 and Playback Options
![How to Remove DVD Copy Protection: Software and Free Methods [2026]](https://c.dvdnextcopy.com/media/How_to_Remove_DVD_Copy_Protection_d24c38a790.png) Steven VanceSep 21, 2026
Steven VanceSep 21, 2026How to Remove DVD Copy Protection: Software and Free Methods [2026]
 Luna MillerSep 21, 2026
How to Rip a Copy-Protected DVD on Win & Mac: 6 Ways
 Steven VanceSep 18, 2026
Top MP4 to ISO Converter in 2026: DVD Authoring vs Online Tools
 Steven VanceSep 18, 2026
How to Digitize DVD Collection: 5 Ways in 2026