 DVDneXtCOPY DVD Ripper
How to Upload a DVD to YouTube: Convert to MP4, Then Publish

Summary: A DVD's VIDEO_TS folder or raw VOB files won't upload directly to YouTube, so you first convert the disc to an MP4 file (H.264 video, AAC audio), then upload that MP4 in YouTube Studio. I've done this for a stack of family camcorder discs a relative handed me, and once you settle on the right settings it's a two-step routine.
Table of Contents
Below I'll walk through how to upload a DVD to YouTube end to end: what YouTube will and won't accept, how to prepare the disc, four ways to convert DVD to MP4, and the YouTube Studio upload flow itself.
Understanding YouTube Upload Restrictions
Before posting anything on YouTube, make sure you're familiar with the platform's upload restrictions. See details below.
Rights and Permission Check Before Uploading
Whether you can upload a disc depends less on the format and more on rights. A quick check before you start:
- A home recording, wedding video, or content you legally own and are authorized to share on an unprotected disc is generally fine to upload.
- A copyrighted commercial title you don't have distribution rights to shouldn't be uploaded, even if you paid for the disc. Content ID may claim, block, or remove it, and that applies to private uploads too.
- Background music matters. A camcorder clip with a pop song playing in the room can still pick up a Content ID claim on the music.
- If the disc has copy protection, that's a separate signal that the content isn't yours to redistribute. If you need a personal backup of a copy-protected DVD you own, that's a different task from public upload.
Supported Formats and Recommended Upload Settings
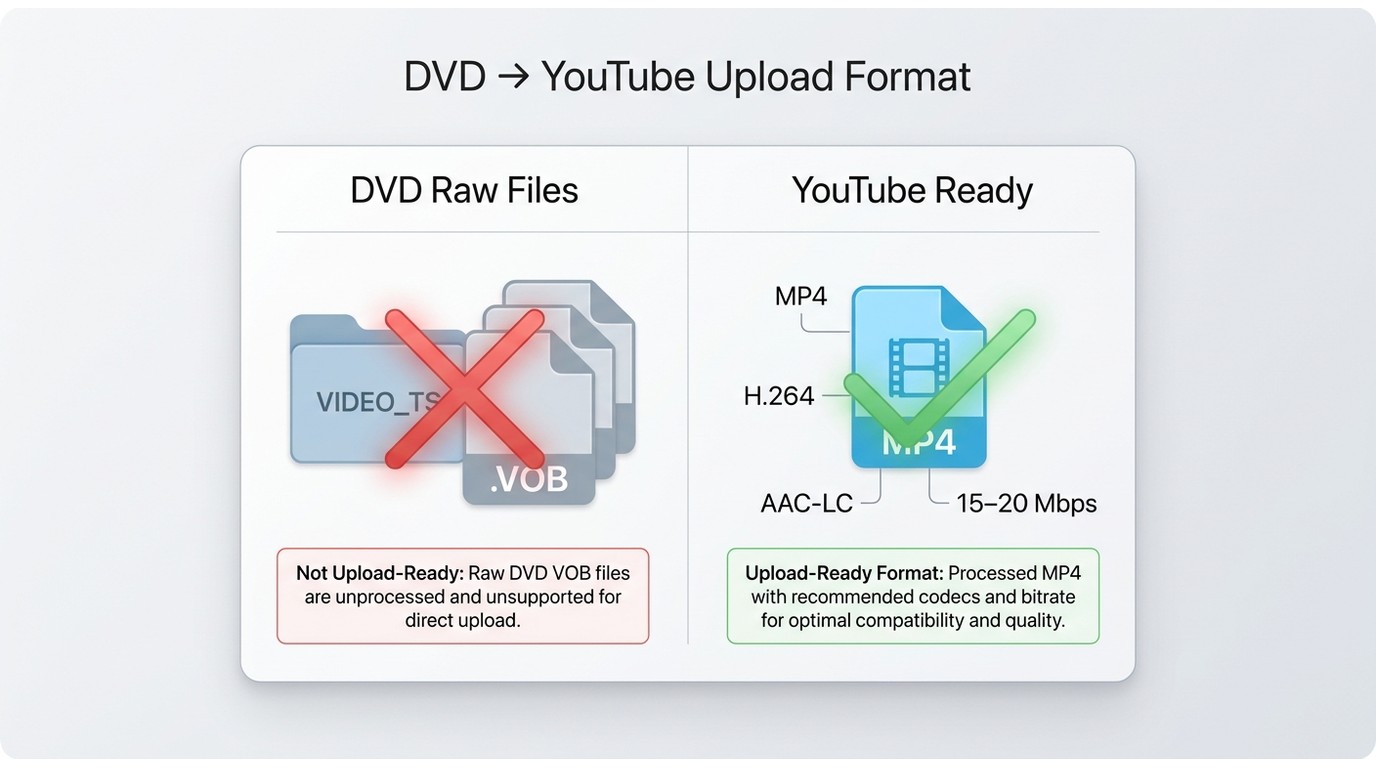
YouTube accepts a wide range of containers (MP4, MOV, AVI, WMV, FLV, WebM, MPEG-PS, 3GPP, AVCHD, range of containers (MP4, MOV, AVI, HEVC, DNxHR, CineForm) and codecs (H.264, H.265, VP8, VP9, AAC, MP3, Opus, Vorbis, PCM, WAV). In practice, the safe default that plays nicely with both YouTube's encoder and old DVD sources is a single row worth memorizing:
| Setting | Recommended value for a DVD upload |
|---|---|
| Container | MP4 |
| Video codec | H.264 |
| Audio codec | AAC-LC |
| Resolution | Keep the source (up to 720x480 NTSC / 720x576 PAL for standard DVD) |
| Frame rate | Match the source (constant, not variable) |
| Bitrate | Around 15-20 Mbps for a clean upload |
| Deinterlacing | On, for interlaced DVD content |
| Aspect ratio | 16:9 preferred; crop or pad 4:3 if you want to avoid pillarboxing |
If you remember nothing else: MP4 container, H.264 video, AAC audio, matched frame rate, deinterlace on. That's the row I keep pinned when I sit down with a batch of discs.
Preparing to Rip Your DVD
Preparing to rip your DVD involves several things, including choosing the right tools and knowing some tips when ripping DVD to YouTube.
Choosing the Right DVD Ripper
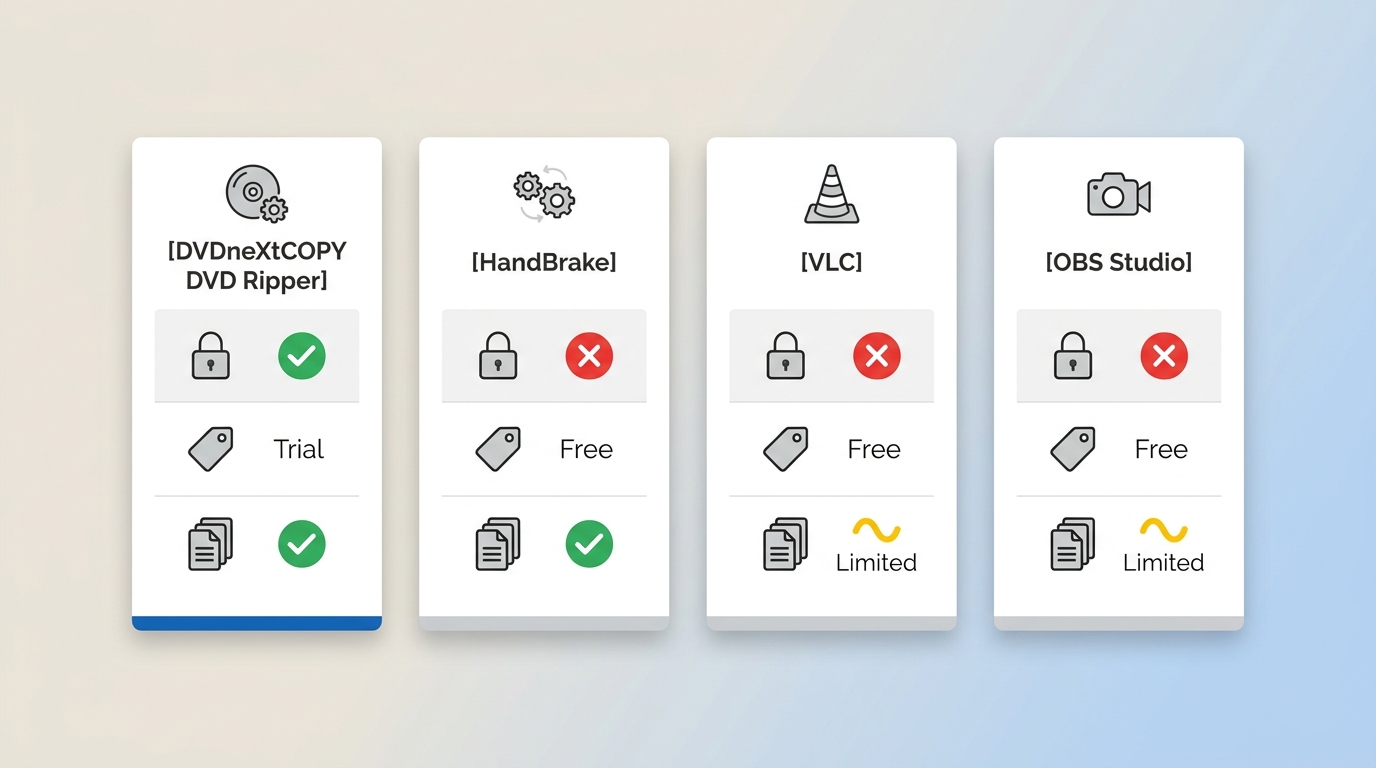
When you set out to rip a DVD for YouTube, the picks worth considering are DVDneXtCOPY DVD Ripper, HandBrake, VLC Media Player, and OBS Studio. What actually matters when you're staring at a stack of discs is whether the tool can open your disc at all (protected discs narrow the list fast), how many clicks it takes to reach an MP4/H.264/AAC output, and whether it can batch a season of episodes without babysitting.
Tips for Ripping DVD to YouTube
Here are some tips for ripping DVD to YouTube:
- Pick the full main title: DVDs often list several titles, and the largest one usually isn't automatic. If you pick the wrong one you can end up with a rip that stops before the credits or skips segments. Preview the title length against the box runtime before you commit.
- Keep the source resolution and full runtime: Don't downscale a DVD to 360p to save space. Standard DVD is already 480p/576p, and YouTube's encoder will happily take the full resolution and length.
- Aspect ratio: 16:9 is what YouTube's player expects. A 4:3 source will show pillarbox bars on the sides, which is fine for archival home video but looks dated on modern channels.
- Rights: Only rip content you legally own or have permission to share, and remember that even home footage can pick up a Content ID claim on background music.
- Video length: Unverified YouTube accounts are capped at 15 minutes per upload. Verify the account first if you're posting a full ceremony or feature-length home movie.
Best Methods to Convert Your DVD
Four practical routes cover almost every disc you'll hand me: a paid tool that handles copy-protected discs (DVDneXtCOPY DVD Ripper), two free tools for unprotected discs (HandBrake, VLC), and a real-time screen-capture fallback (OBS Studio) for when the disc simply won't let a ripper read it.
Convert Your DVD with DVDneXtCOPY DVD Ripper
DVDneXtCOPY DVD Ripper is a Windows desktop app for turning DVDs you legally own into YouTube-ready MP4 files. You can choose an H.264 preset, adjust resolution and bitrate, and preview the main title before committing.
Best for: Windows users with a mix of unprotected and copy-protected home video discs who want a straightforward MP4 output without piecing together several tools.
How to convert your DVD with DVDneXtCOPY DVD Ripper
Here are the four steps I actually run when a disc lands on my desk. The upload itself moves to the shared YouTube Studio walkthrough further down, so I only cover conversion here.
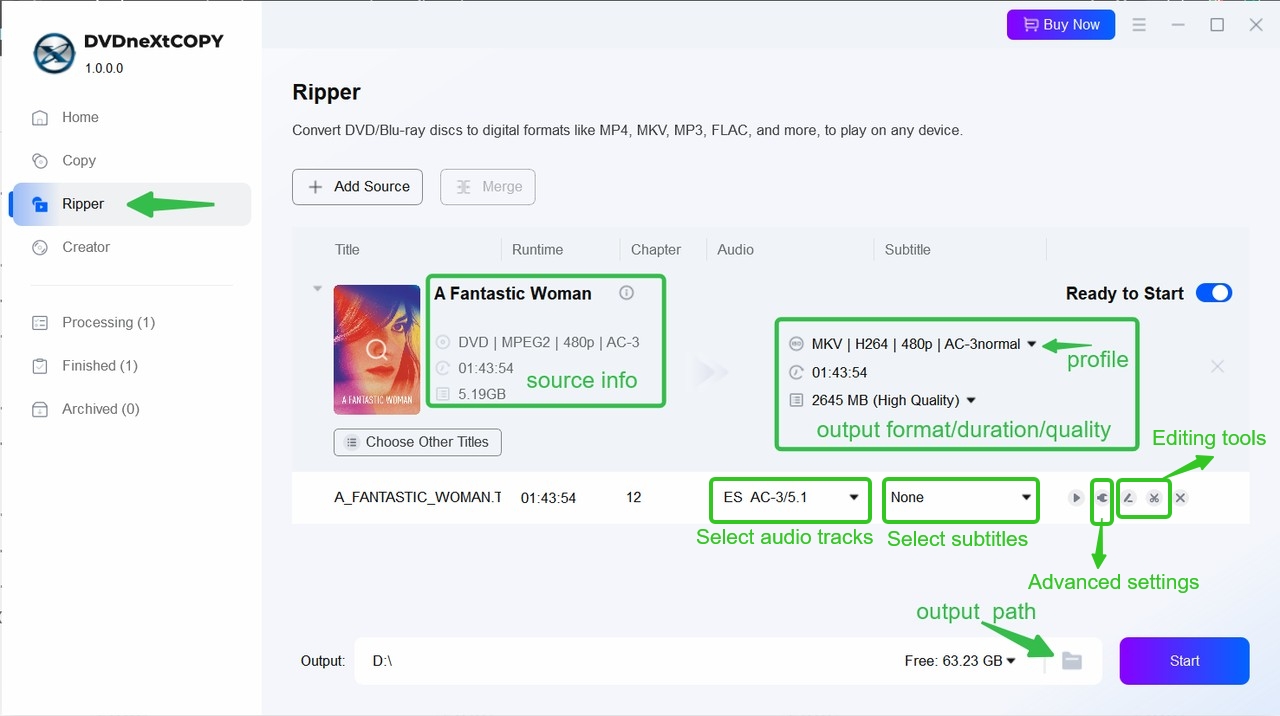
Step 1: Install and load your DVD
- Download and install DVDneXtCOPY for Windows.
- Launch the app and open the Ripper module.
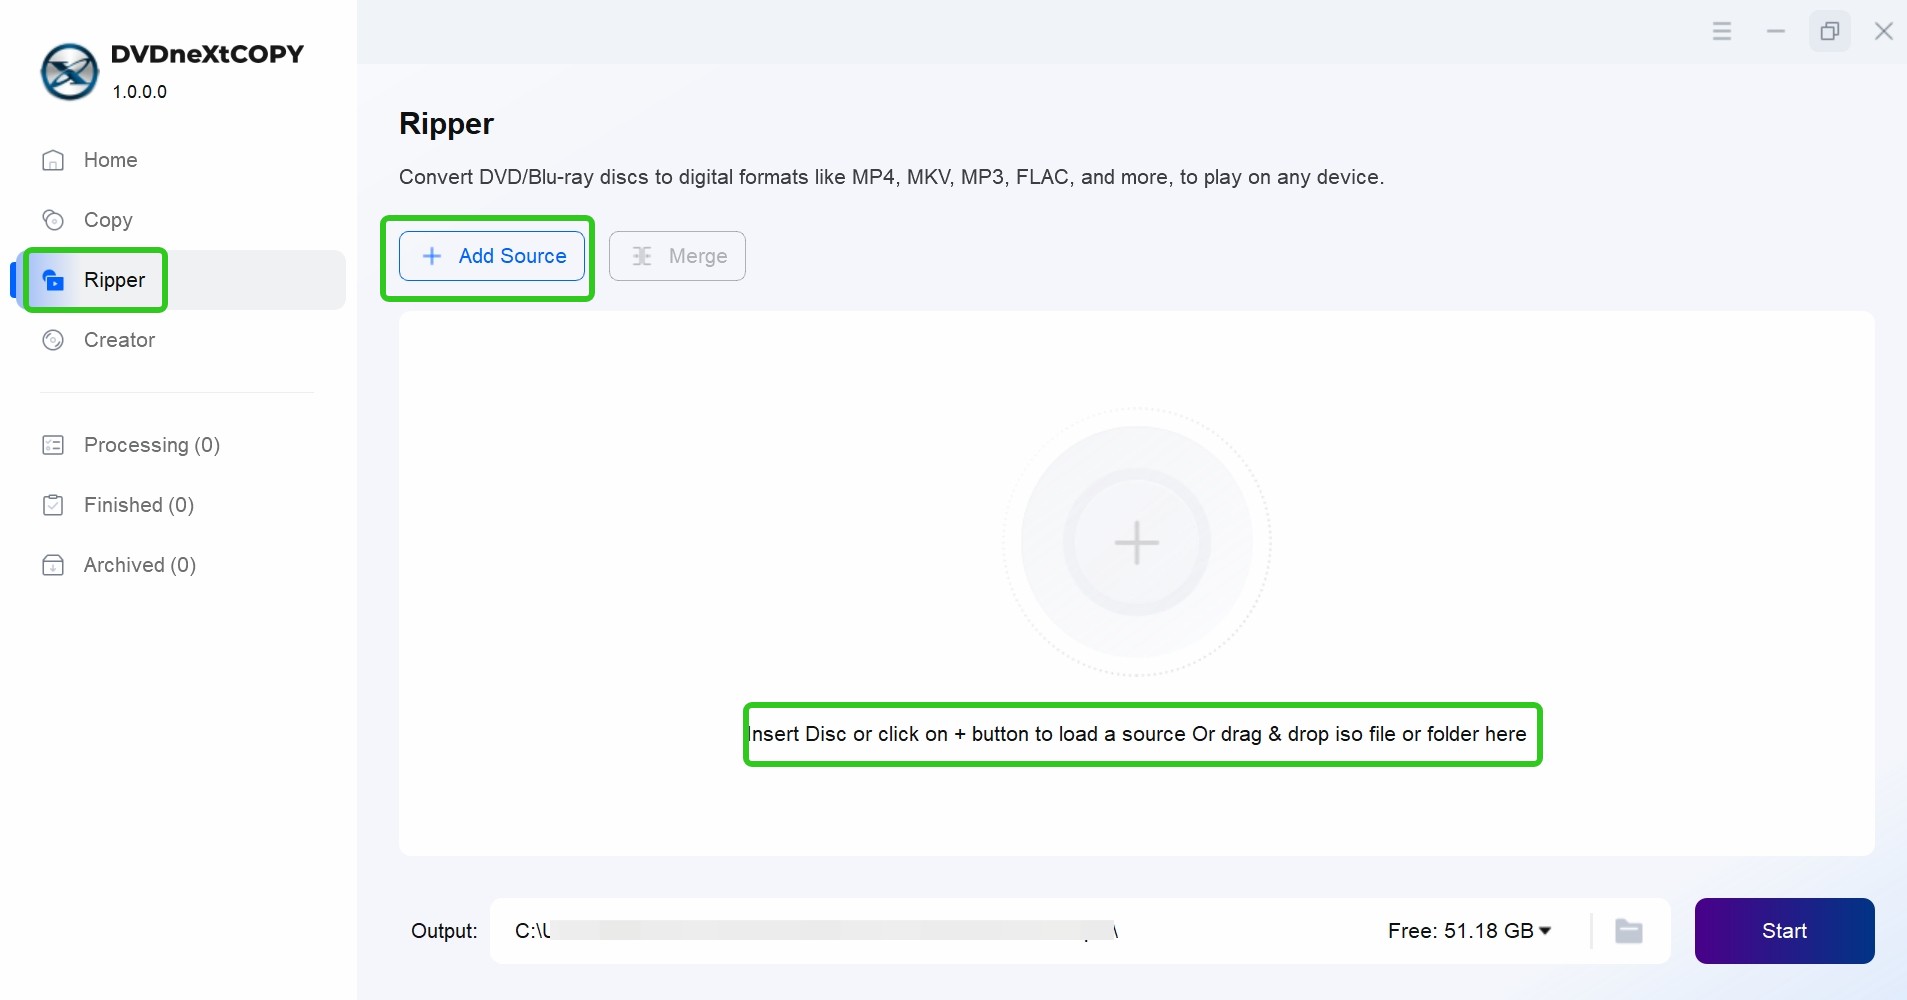
- Insert your DVD into the disk drive and the program will auto detect it.
- If your DVD has multiple titles, audio tracks, or subtitles, pick the ones you want with "Choose Other Titles", "Audio", and "Subtitles". This is where I catch discs with multiple episodes or a shorter TV cut hiding as the default title — SRT extraction lives here too if you need burned-in or sidecar subtitles.
Step 2: Select Your Output Format
- Click "Choose Other Profile" > "Format" > "Video" and pick an MP4 profile with H.264. If you want to convert DVD to MP4 without transcoding audio, the Passthrough option keeps the original stream intact.
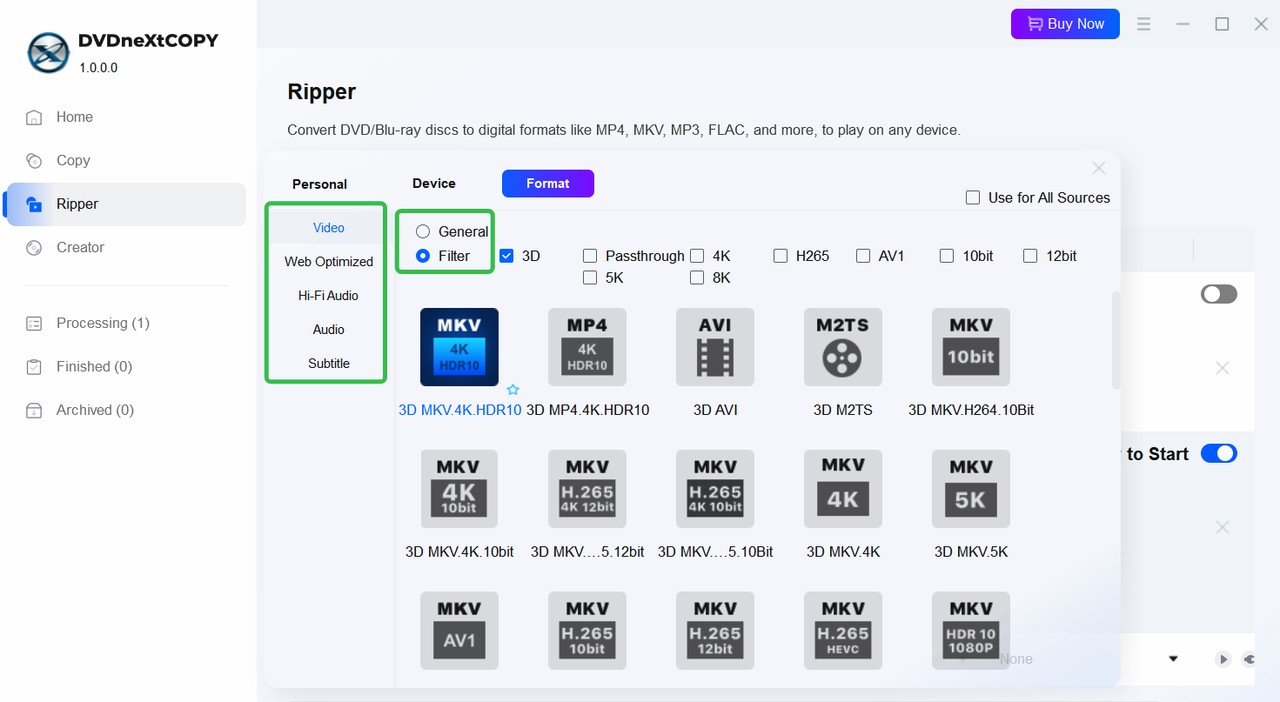
- Go to "Advanced Settings" to adjust the audio codec and bit rate. For YouTube uploads, it’s recommended to use AAC-LC audio codec and set the video bit rate between 15-20 Mbps.
Step 3: Edit Your Video and Begin Conversion
- If you want to trim opening menus, crop pillarbox bars off a 4:3 source, or drop a title card at the front, open "Video Edit" for the built-in trim, crop, merge, watermark, and subtitle controls. For a batch of discs I usually skip editing and let the encoder handle everything with GPU acceleration in the background.
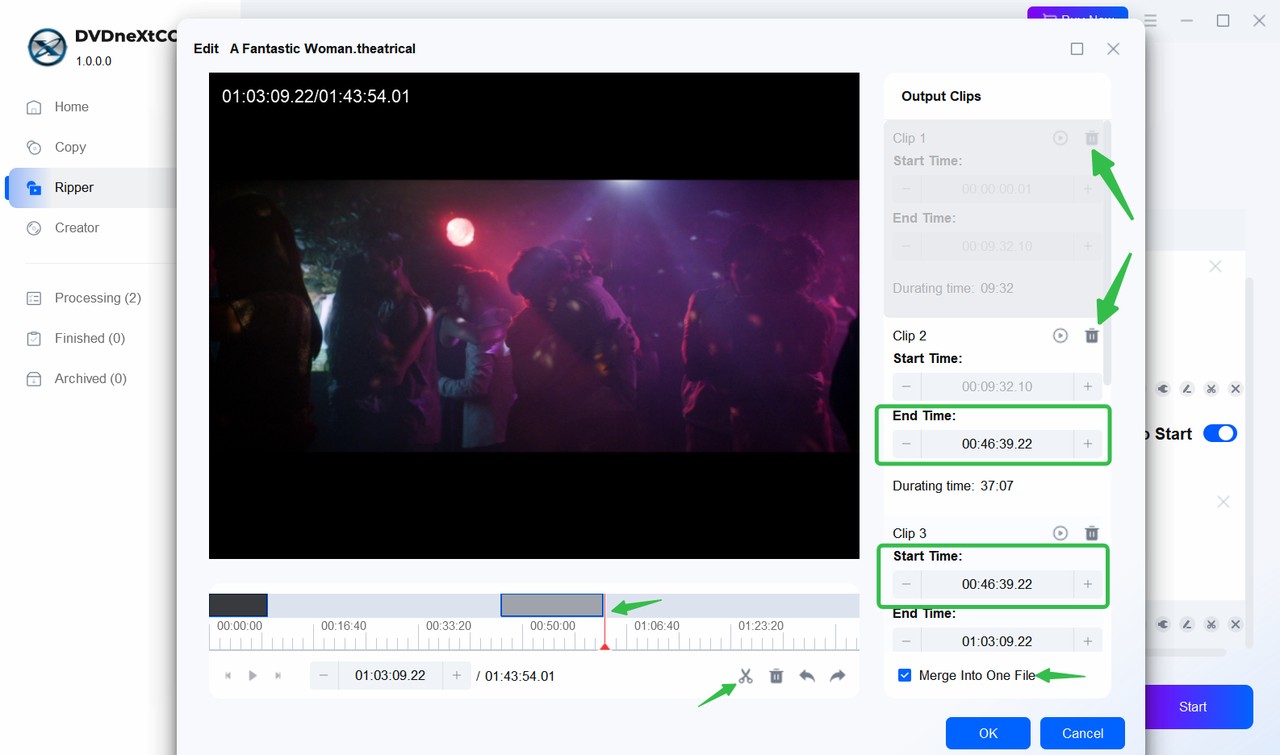
- Choose the output path for the converted file before you start the conversion.
- Click "Start" to begin the conversion.
Once the MP4 lands in your output folder, jump to the Upload Your Converted Video to YouTube section below for the YouTube Studio walkthrough — the same steps apply no matter which converter you used.

Convert a DVD with HandBrake
HandBrake is a free, open-source encoder that converts unprotected DVDs to MP4 or MKV. It won't open a copy-protected commercial disc on its own, so keep it for camcorder discs, home-authored DVDs, and anything without CSS.
Best for: unprotected discs and users comfortable picking a preset and tweaking a few knobs by hand.
How To Convert DVD to YouTube With HandBrake
You can convert DVD to YouTube via HandBrake with the following steps:
- First, insert the DVD into your optical drive.
- Open HandBrake, you will be prompted to select a source.
- Choose your DVD and click "Open". HandBrake will scan the DVD for titles.
- From the "Title" menu, select the main title you want to rip.
- Choose your desired output format like MP4 that is compatible with YouTube and adjust the settings as needed.

- Hit the "Start" button to initiate ripping the DVD.
- Once the process is complete, upload the ripped video to YouTube.
Convert a DVD with VLC Media Player
VLC is a free media player that can transcode an unprotected DVD to MP4 through its Convert / Save dialog. Output quality is reasonable for a free tool and depends on the profile you pick, though the interface for encoding isn't as guided as a dedicated ripper. Like HandBrake, it can't open a copy-protected disc.
Best for: a quick one-off rip of a home-authored disc when you already have VLC installed.
How To Convert DVD to YouTube Using VLC Media Player
Follow the steps below to convert DVD to YouTube with VLC:
- Place the DVD onto the device's DVD drive.
- Open VLC Media Player.
- Click on the "Media" menu and select "Convert / Save…."

- Switch to the "Disc" tab and select "DVD" as the disc type.
- Browse to the DVD source and click "Convert / Save."
- Select a profile, e.g. "Video – H.264 + MP3 (MP4)."

- Choose the destination file location and click "Start."
- Upload the DVD video to YouTube.
Record a DVD with OBS Studio

OBS Studio isn't a ripper — it's a screen and window capture tool. If a disc plays in a software DVD player on your PC but no ripper will read it, OBS can record what's on screen while it plays. Expect trade-offs: real-time capture is limited to whatever your player outputs, sync can drift on long recordings, and any hiccup in playback lands in the file.
Best for: a last-resort fallback when the disc plays but won't rip.
How To Convert DVD to YouTube With OBS Studio
Before you start the step-by-step process of converting a DVD to YouTube with OBS Studio, make sure you have the software installed and your DVD is ready to play. Once you’re ready, follow the steps below to record and upload your DVD.
- Run OBS Studio and press "Settings" from the bottom right.
- From the "Settings" window, choose the "Output" tab.

- Under "Recording" enter the file path and select your desired output video format.
- Go to the "Sources" tab and add "Display Capture" as your source.
- Insert the DVD and play it with a DVD player.
- Click the "Start Recording" button to start capturing.

- When you’re done, click "Stop Recording."
- Upload the recorded DVD to YouTube.
Comparison of DVD-to-YouTube Conversion Methods
Same job, four different fits. This table compares the four methods on the traits that actually change the outcome for a DVD-to-YouTube workflow.
| Tool | Compatible OS | Input support | Output formats | Interface | Video editing | Price / trial | Best for |
|---|---|---|---|---|---|---|---|
| DVDneXtCOPY DVD Ripper | Windows | DVD disc / ISO / folder, including common protections | MP4, MKV, AVI, MOV, and other profiles | Guided wizard with presets | Trim, crop, merge, watermark, subtitles | 30-day free trial; paid license | Mixed libraries with protected and home discs |
| HandBrake | Windows, macOS, Linux | Unprotected DVD disc / ISO / folder | MP4, MKV | Manual parameters, presets available | Basic trim, no merge | Free, open-source | Unprotected discs, users OK with manual settings |
| VLC Media Player | Windows, macOS, Linux | Unprotected DVD disc / ISO / folder | MP4, and other profiles from the Convert / Save dialog | Menu-driven, no wizard | Filters only, no timeline editing | Free, open-source | One-off rips when VLC is already installed |
| OBS Studio | Windows, macOS, Linux | Whatever your DVD player app displays on screen | MP4, MKV, MOV, FLV, and others | Broadcast-style with scenes and sources | Live filters, no post-editing | Free, open-source | Fallback capture when nothing else opens the disc |
Upload Your Converted Video to YouTube
Once you have the MP4 file, the upload flow is the same for every method above:
- Sign in to YouTube Studio at studio.YouTube.com. If you're posting anything over 15 minutes, verify the account first at YouTube.com/verify.
- Click Create in the top right, then Upload videos, and pick your MP4.
- On the Details screen, fill in the title, description, and a few tags. Add a thumbnail if you have one.
- Set the audience — mark Made for kids only if the content is genuinely directed at children; misclassifying it triggers restrictions.
- On the Video elements and Checks screens, add end screens or cards if you want, and wait for the copyright and ad-suitability checks to finish. If Content ID flags anything, you'll see it here before publishing.
- Pick a visibility: Public, Unlisted, or Private. Unlisted is what I use for family videos I share by link but don't want in search results.
- Click Publish (or schedule it).
FAQs on Uploading a DVD to YouTube
Can I upload a commercial DVD to YouTube?
It depends on rights, not the disc itself. You need to either legally own the content and hold distribution rights, or have permission from the rights holder. A copyrighted commercial title you don't have rights to can trigger Content ID claims, blocking, or removal, and that applies even if you mark the upload private.
Why am I unable to upload a DVD video longer than 15 minutes?
YouTube limits new users to upload 15-minute videos. If you try to upload a video longer than that, the upload will fail. To upload longer videos on YouTube, you need to verify your account. Go to the YouTube upload page to verify your account https://www.YouTube.com/verify.
What should I do if my upload fails or the audio is out of sync?
For a failed upload, the usual suspects are file format, network drops, and YouTube's guidelines — see Google's troubleshooting tips. For audio-video drift after conversion, I've had the best luck re-ripping with a constant frame rate (not variable) and double-checking that I picked the correct main title. Real-time capture with OBS is where I see the worst drift on long recordings. If the disc is protected or physically damaged and the rip fails partway, swap to a different tool rather than retrying the same one.
How can I avoid a copyright claim when I upload my DVD?
Only upload content you legally own or are authorized to share. The trap most home videos fall into is background music — a birthday party clip with a pop song on the stereo can still get a Content ID claim on the music. And no, there's no reliable seven-second rule; Content ID matches on fingerprint, not duration, so short snippets can still be flagged. Check the copyright section in YouTube Studio's Checks screen before you publish.
Is it illegal to convert a DVD to MP4?
Converting a disc you legally own to MP4 for personal use is generally treated as personal backup where local law permits it. The legal risk on YouTube isn't the format conversion — it's uploading content you don't have rights to distribute. Keep the personal MP4 for yourself; upload only what you own or are authorized to share.
Conclusion
Sorting the shelf of family DVDs I mentioned at the top came down to two calls per disc: is the content mine to share, and is the disc protected? For clean, unprotected home discs, HandBrake or VLC is enough — free and predictable. For a mixed batch with a few copy-protected titles you legally own and only want to back up personally, DVDneXtCOPY DVD Ripper is what I reach for so the whole pile runs in one sitting. OBS stays in reserve for the one disc a year that plays but won't rip. Convert to MP4 with H.264 and AAC, upload in YouTube Studio, and let the Checks screen catch any Content ID surprises before you publish.
 Luna MillerOct 8, 2026
How to Block Someone on TikTok: App & Website Guide
 Luna MillerSep 21, 2026
10 Free Sites to Download Subtitles for Movies & TV Shows in 2026
 Luna MillerSep 17, 2026
How to Delete a TikTok Story in 5 Steps (2026)
 Luna MillerSep 16, 2026
How to Fix Cinavia Message Code 3: Start With the Source
![WinX DVD Author Review & Tutorial: Features, How to Use, and Limits [2026]](https://c.dvdnextcopy.com/uploads/images/17884278134315877-5212fbb54f6ef7f5e20bf1765fc74e79.jpg) Luna MillerSep 3, 2026
Luna MillerSep 3, 2026WinX DVD Author Review & Tutorial: Features, How to Use, and Limits [2026]
 Luna MillerAug 31, 2026
How to Rip a DVD with HandBrake in 2026: Steps, Settings & Limitations