 DVDneXtCOPY DVD Creator
How to Burn YouTube Videos to DVD in 2026: Playable & Data DVD

Summary: To burn YouTube videos to DVD, first save a local video file that you are allowed to use. Choose DVD-Video for regular DVD-player playback or a data DVD for file storage. For most Windows users who want a playable DVD, I recommend DVDneXtCOPY DVD Creator because it combines DVD authoring, menu editing, audio and subtitle controls, DVD-5/DVD-9 settings, ISO/folder output, and project preview. DVD Flick is a free legacy alternative, while Windows Media Player Legacy is better suited to data DVDs.
Table of Contents
A YouTube page itself cannot be burned directly to a DVD as a playable movie disc. To burn a YouTube video to DVD, you first need the video saved as a local file and then need to decide whether you want a DVD-Video disc or a data DVD. A DVD-Video disc is authored with the structure and navigation required by standalone DVD players, while a data DVD simply stores the original video file.
For YouTube videos I want to watch on a living-room DVD player, I usually burn a DVD video disc. If I only need a physical copy of the video file, I use a data DVD to avoid unnecessary conversion. In this article, I’ll show the methods I use to burn YouTube videos to either a playable DVD or a data DVD.
Can You Burn YouTube Videos to DVD? What You Need First
Yes. The important prerequisite is having a local copy of the YouTube video that you are permitted to use. YouTube lets you download videos that you uploaded yourself through YouTube Studio as MP4 files. Videos uploaded by other users are not available through that own-upload download feature.
Use videos you uploaded yourself, videos you have permission to use, or files that YouTube or the rights holder has made available for download.
Once the video is stored locally, choose DVD-Video for a playable movie-style disc or data DVD for file storage.
DVD-Video vs. Data DVD: Which One Do You Need?
A DVD-Video disc is authored for movie-style playback. It can contain a DVD menu, titles, chapters, audio, and subtitles, depending on the software you use. This is the type to choose when the disc is intended for a conventional DVD player.
A data DVD simply stores the original computer files on the disc. It is useful for storage and computer playback, but a standalone DVD player needs to support the actual video file and codec before it can play the content.
| Method | Output | DVD Menu | Regular DVD Player | OS / Status | Best For |
|---|---|---|---|---|---|
| DVDneXtCOPY DVD Creator | DVD-Video disc, ISO, DVD folder | Yes | Designed for DVD-Video playback | Windows / 30-day trial | Playable DVD with menus |
| DVD Flick | DVD-Video | Basic menu support | Designed for DVD-Video playback | Windows / legacy open source | Free legacy DVD authoring |
| Windows Media Player Legacy | Data DVD | No | Only when the player supports the stored file type | Windows 10/11 optional feature | File storage and computer playback |
Method 1: Burn YouTube Videos to a Playable DVD with DVDneXtCOPY DVD Creator
DVDneXtCOPY DVD Creator can author local YouTube video files such as MP4, AVI, MOV, and MKV into DVD-Video, with support for more than 200 input formats. It can burn the finished project directly to disc or save it as an ISO image or DVD folder. Its menu editor supports custom backgrounds, text, thumbnails, and buttons, while the output settings cover disc type, aspect ratio, audio tracks, and subtitles. A built-in preview is available before burning.
For a multi-video YouTube project, I would choose DVDneXtCOPY when I want several clips arranged as separate titles behind a menu that is easy to browse on a TV. Saving the authored project as an ISO or DVD folder is also useful when I want to check the finished structure first or keep a copy for later burning.
Step 1: Add the Local YouTube Video File
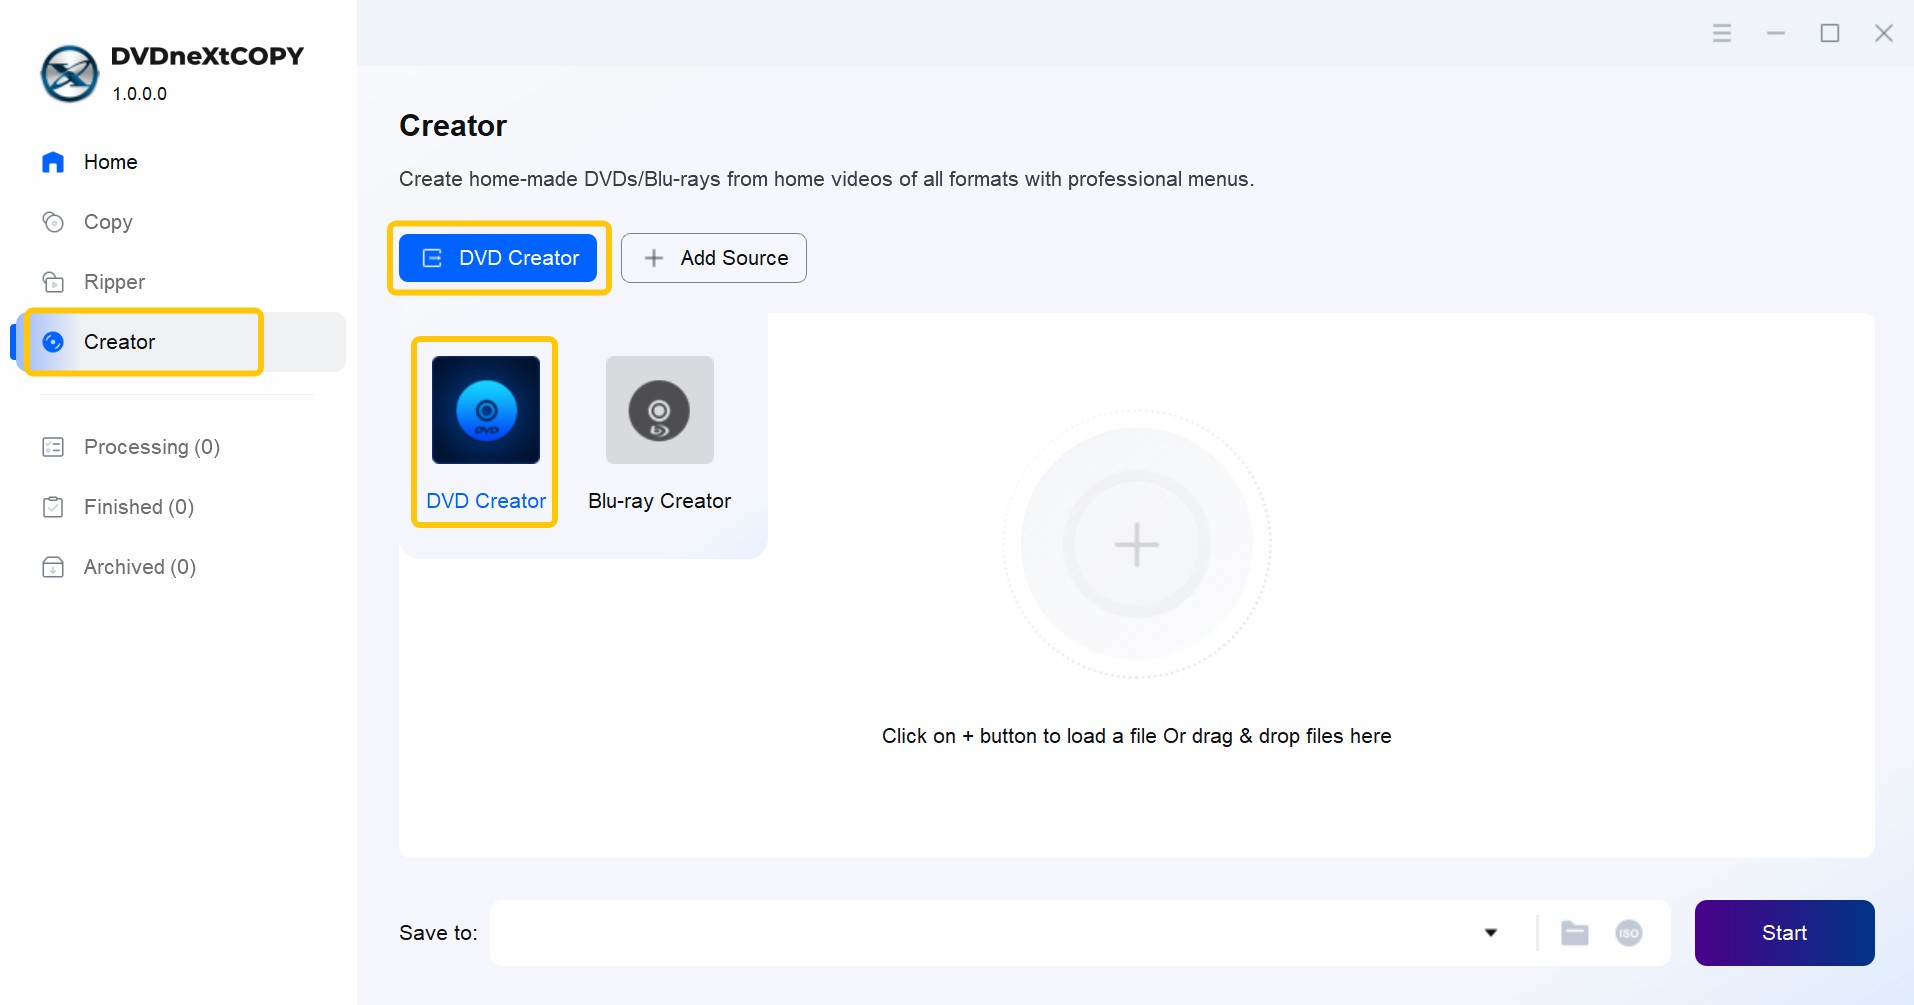
Install and open DVDneXtCOPY, select Creator, and enter DVD Creator mode. Click Add to load the local video file, or drag the video directly onto the main interface. If you want several videos on one DVD, add them to the same project and check their order before moving on.
Step 2: Set the Disc, Audio, and Subtitle Options
After the videos are loaded, review the title information shown in the main interface. Keep the audio and subtitle tracks that you want available on the finished disc. If you have several videos, arrange the playback order before authoring.
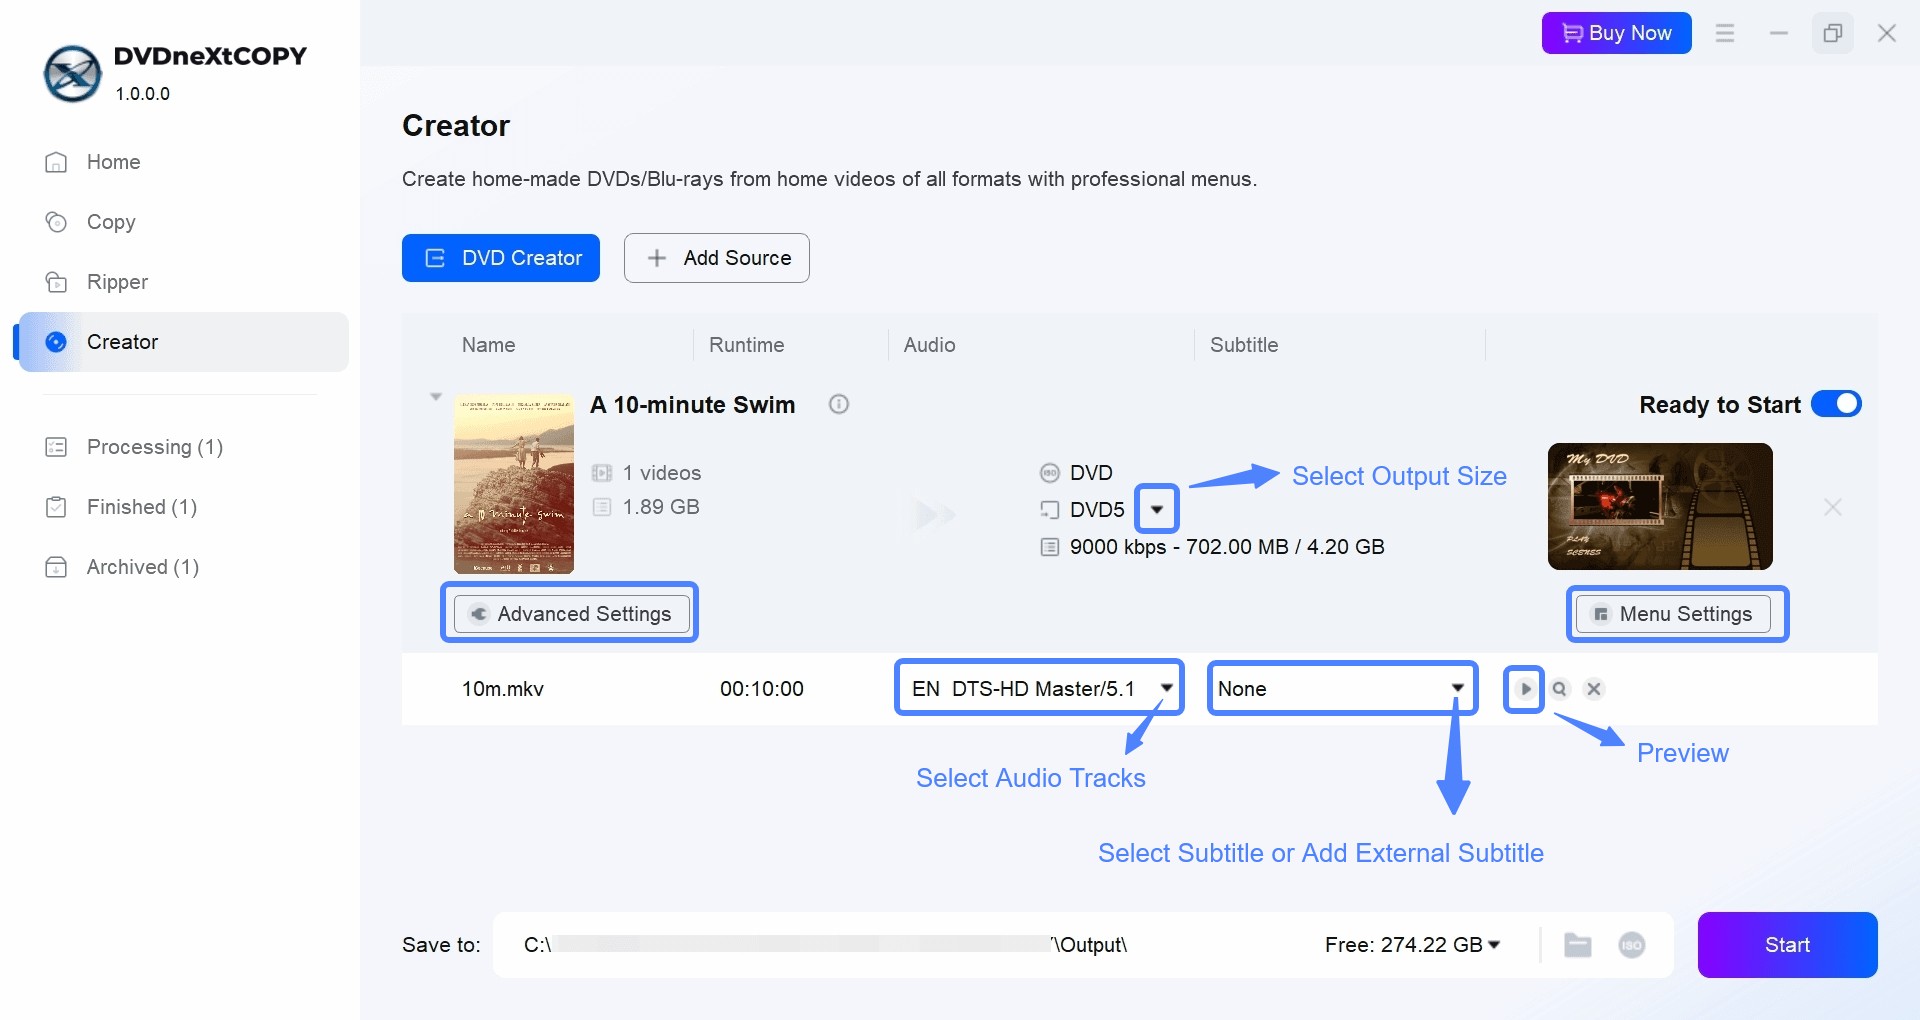
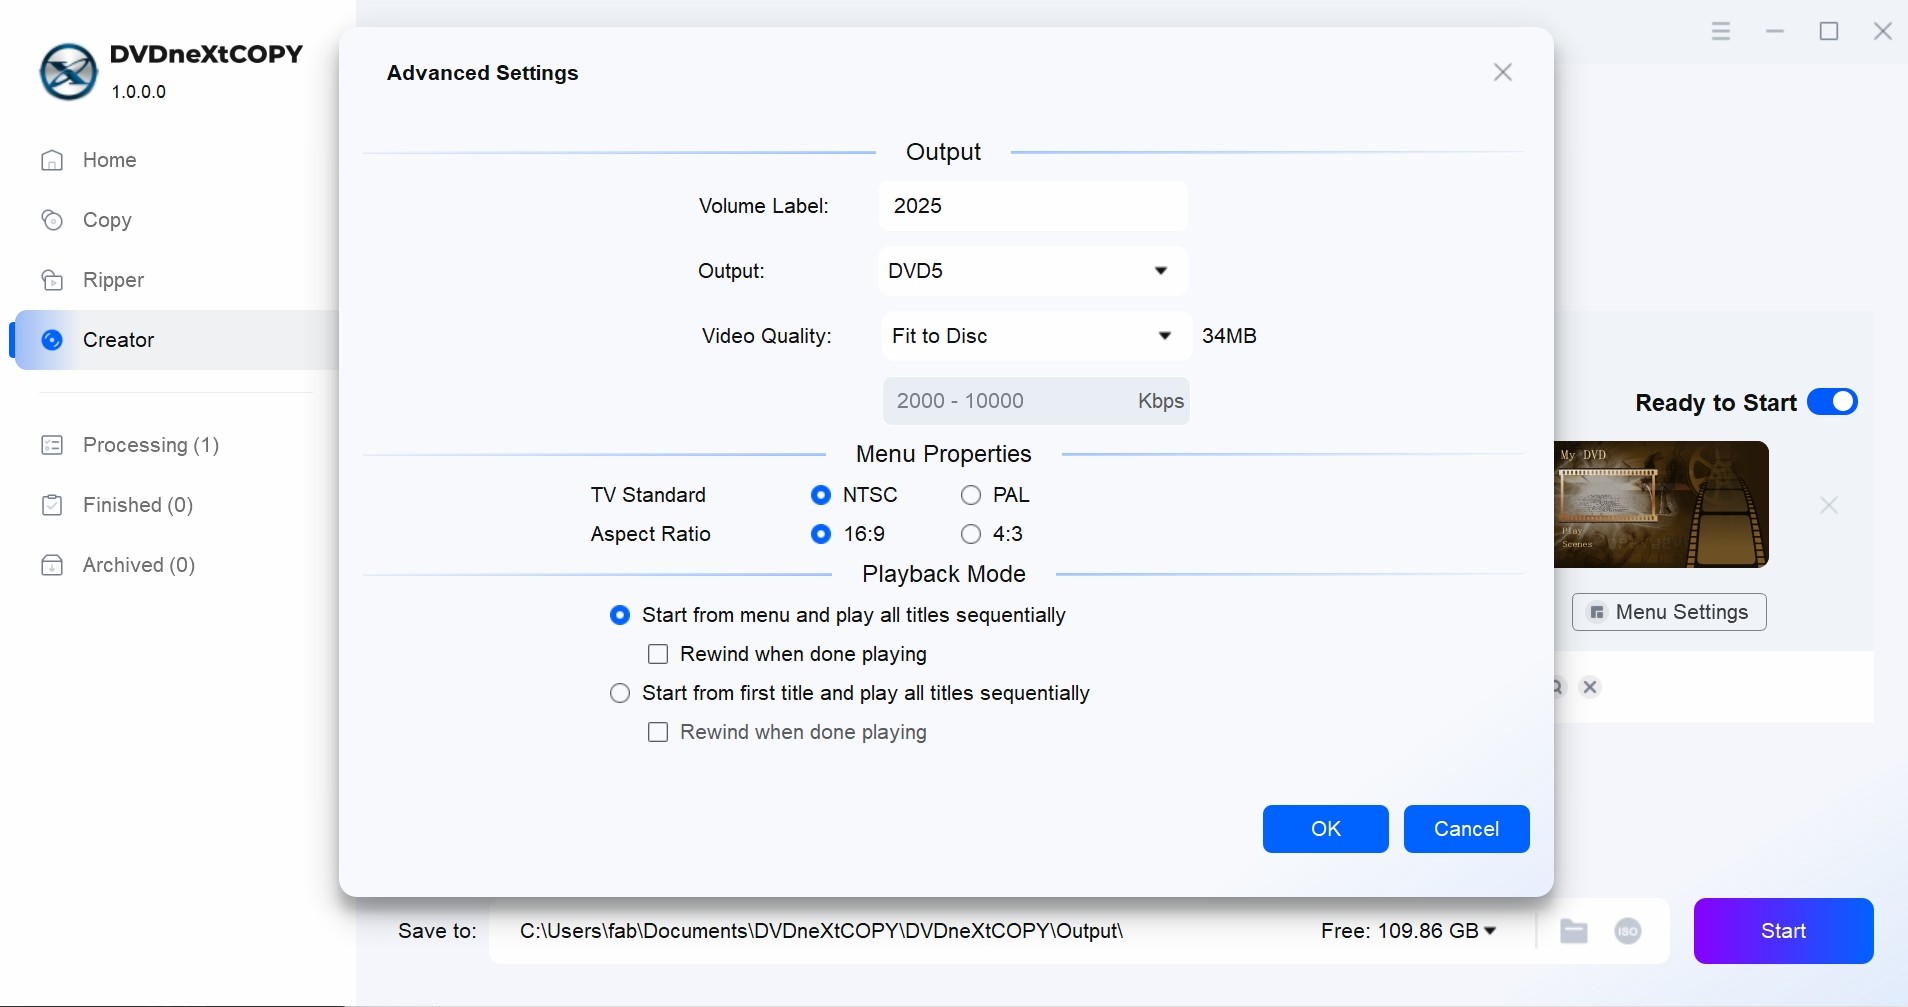
Open Advanced Settings to give the disc a volume label and choose the appropriate capacity, such as DVD-5 or DVD-9. The final DVD size also depends on how the video is encoded during authoring, so do not choose the disc size from running time alone.
Step 3: Customize and Preview the DVD Menu
Open Menu Settings and select a template if you want navigation on the finished disc. You can edit elements such as the background, title text, thumbnails, fonts, and buttons. A menu is especially useful when one disc contains several short videos because each title can be selected from the menu instead of playing the disc sequentially.
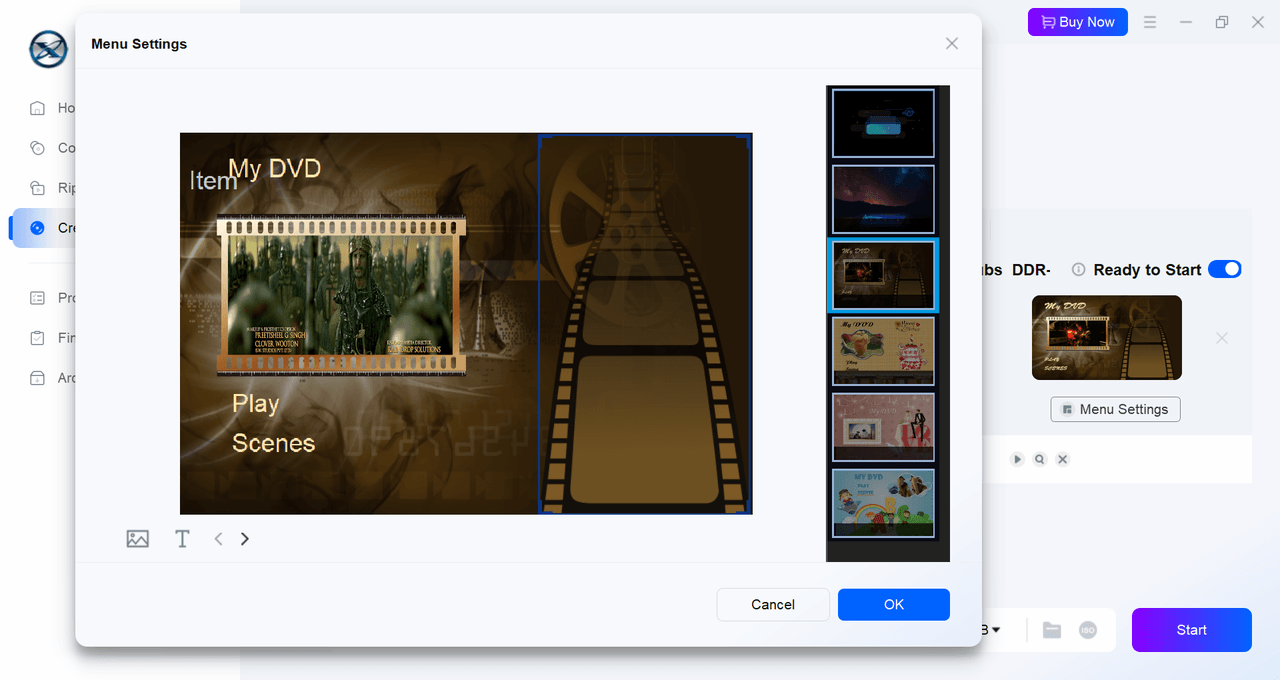
Use the built-in preview before writing the physical disc. I would check the title order, menu navigation, and selected audio or subtitle tracks here rather than discovering a setup mistake after the disc has been burned.
Step 4: Burn Your YouTube Video to a DVD or Save an ISO/Folder
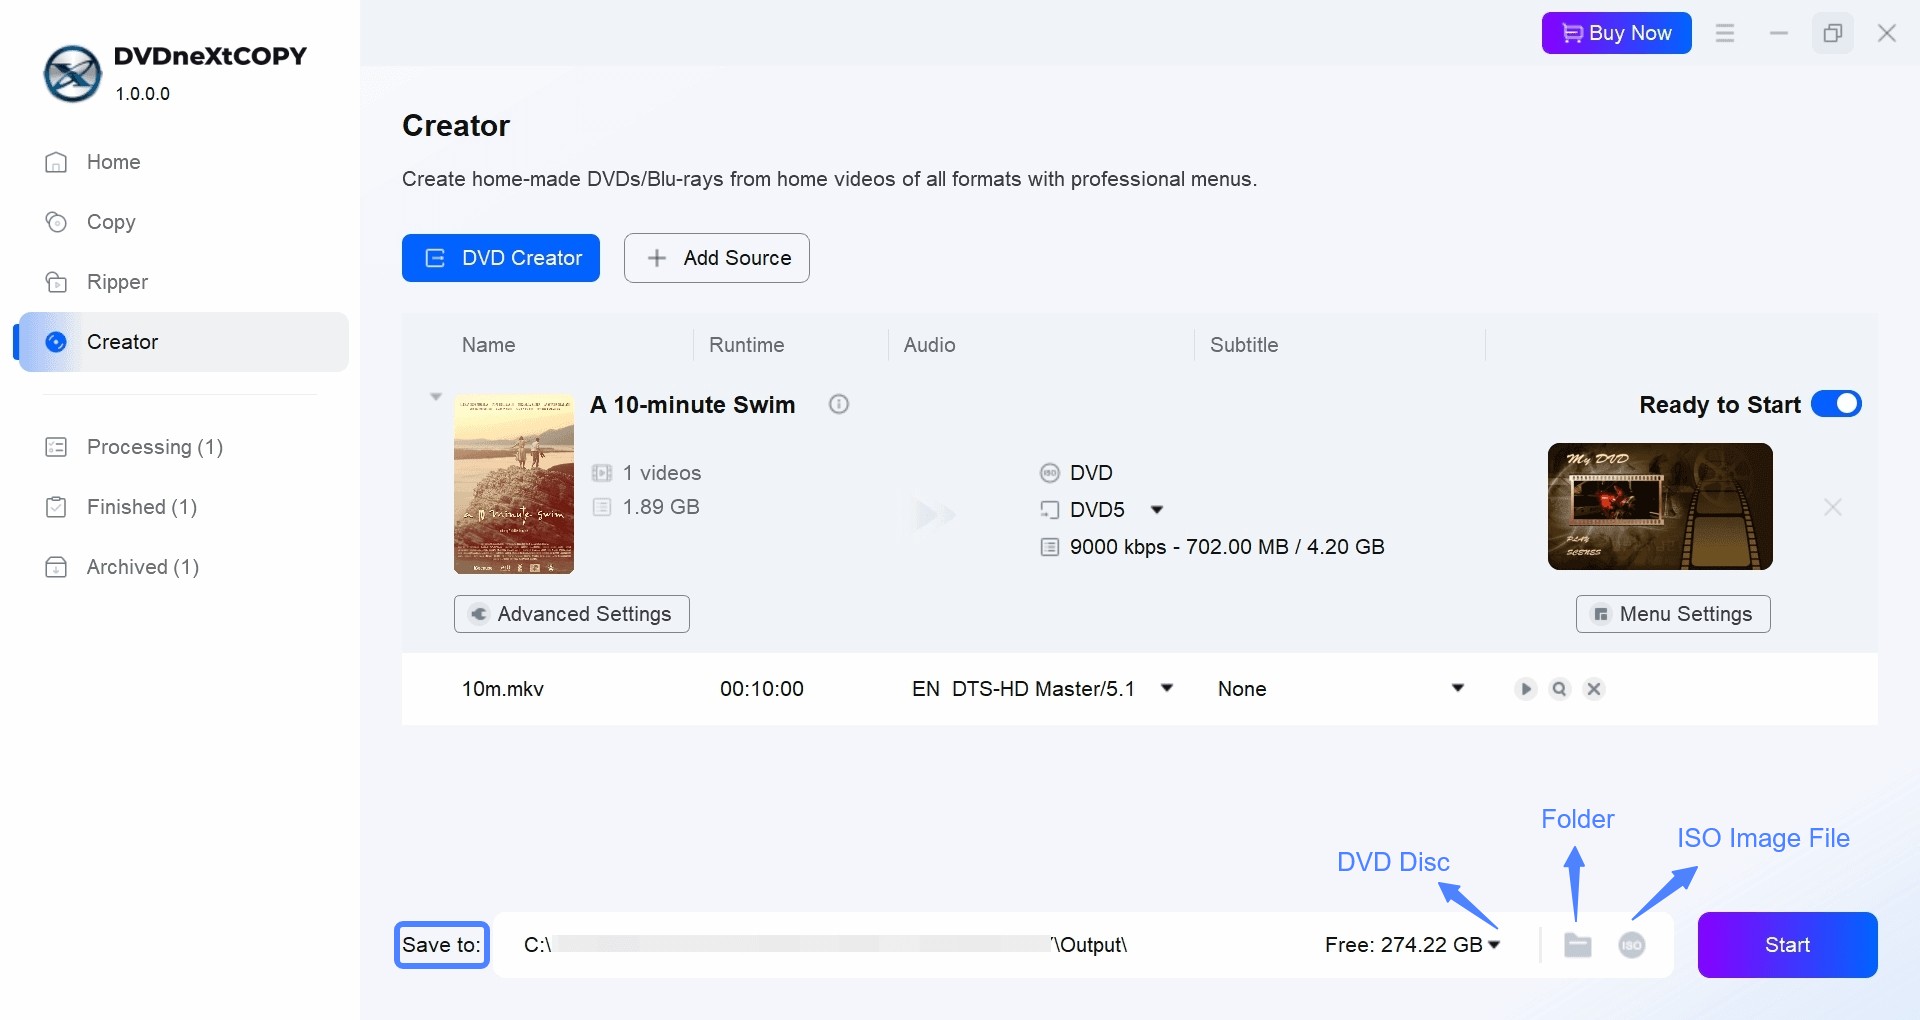
Choose the optical drive if you want to burn directly to a blank DVD. You can also save the authored project as an ISO image or DVD folder if you want to inspect or burn the project later. Insert the correct blank disc, check the destination once more, and click Start.
Method 2: Burn YouTube Videos to DVD Free with DVD Flick
DVD Flick is a free, open-source DVD authoring software that can turn local YouTube video files into DVD-Video and burn the finished project to disc. It supports containers and codecs such as AVI, Matroska, MPEG-4, QuickTime, H.264, and AAC, along with SRT and SSA/ASS subtitles. You can add multiple titles, create a basic DVD menu, attach subtitle or audio tracks, and let FFmpeg handle decoding and DVD encoding. The current official release remains version 1.3.0.7, with documented OS support through Windows 7.
For a free DVD authoring project, DVD Flick still covers the basics: multiple video titles, simple menus, subtitles, and additional audio tracks can all be included in one DVD-Video project. Its main limitation today is age rather than missing core authoring functions. Since the official system requirements stop at Windows 7, I would not make it my first choice for a Windows 11 authoring setup.
Step 1: Add the Video
Download DVD Flick from its official site, install it, and open the program. Select Add title, then choose the local video you want to put on the DVD. Add additional titles if the disc will contain more than one video.

Step 2: Configure the Project and Menu
Open the project settings and check the disc configuration before encoding. If you want navigation, choose and configure one of DVD Flick's available DVD menus. Keep the layout simple when the disc contains only a few videos so each title remains easy to find.

Step 3: Create and Check the DVD
Select Create DVD to begin authoring the project. After it finishes, test the resulting disc or authored files before deleting the source videos. Check the beginning, a middle section, and the end of a title, and confirm that the menu and any subtitles you added work as intended.
Method 3: Burn YouTube Videos to a Data DVD Without Third-Party Authoring Software
Windows Media Player Legacy can burn local YouTube video files to a data DVD without installing a third-party DVD authoring program. It writes the original video files to disc instead of creating a DVD-Video structure, so there is no DVD menu or title navigation. Microsoft documents data-DVD burning for music, pictures, and videos; playback on a standalone DVD player depends on whether that device supports the stored file type.
I would use this method when the DVD is mainly for storing video files, moving them between PCs, or playing them on a device that already supports the file format. It requires fewer authoring steps because there is no menu design or DVD-Video encoding stage, but that simplicity is also its main limit: a data DVD is not a substitute for a standard DVD-Video disc. Windows Media Player Legacy is available on Windows 10 and 11, and on some editions it must be enabled as an optional feature.
Step 1: Open Windows Media Player Legacy and Insert a DVD
Open Windows Media Player Legacy and insert a blank recordable DVD into the DVD burner. If the app is not available on your installation, check Windows Optional Features and enable Windows Media Player Legacy first.
Step 2: Create the Data-DVD Burn List
Open the Burn tab, choose Burn options > Data CD or DVD, and add the local video file to the burn list. If several files are being written to the disc, arrange them in the order you want for easier browsing later.

Step 3: Start the Burn and Test the Files
Select Start burn and wait for the disc to finish. Reinsert the DVD afterward and open the files from the disc. If the intended destination is a standalone DVD or Blu-ray player, test it there as well. A successful data burn confirms that the files were written correctly; it does not mean every DVD player can decode them.
FAQs
Not as a normal local video file. YouTube Premium offline downloads are stored for playback inside YouTube and are encrypted on the device. If it is your own uploaded video, use YouTube Studio's download option to obtain an MP4 file instead.
For a data DVD, capacity is mainly determined by the size of the original files; a standard single-layer data DVD holds about 4.7 GB. For DVD-Video, running time alone is not enough to predict capacity because the authoring software may re-encode the video. Bitrate, disc type, and quality settings all affect how much content fits.
Yes, provided you already have a local video file that you are allowed to use, a writable DVD drive, and DVD-authoring software that supports your version of macOS. The methods above focus on Windows, so Mac users should choose a DVD burner for Mac rather than Windows Media Player Legacy or DVD Flick.
Conclusion
To burn YouTube videos to DVD for regular DVD-player playback, DVDneXtCOPY DVD Creator is my first choice among the three methods here. It handles DVD-Video authoring, adds customizable menus, supports DVD-5/DVD-9 settings plus audio and subtitle controls, and can save the project as an ISO image or DVD folder before burning. DVD Flick is still useful when you specifically want a free legacy DVD authoring tool on an older Windows system.
For a data DVD, Windows Media Player Legacy is the simpler choice because it writes the local video files directly to disc, but playback depends on whether the destination device supports those file types. Whichever way you burn a YouTube video to DVD, keep the source file until you have reopened the finished disc and verified the video, audio, navigation, and subtitles you need.
![Top 8 Best MP4 to DVD Converters on Windows & Mac [2026 Tested]](https://images.dvdnextcopy.com/2026/09/17/I2v69nzxIF6Xn7iue3ZRMGJ5-Ls0SF_z/feature_cover.jpg) Luna MillerSep 21, 2026
Luna MillerSep 21, 2026Top 8 Best MP4 to DVD Converters on Windows & Mac [2026 Tested]
 Luna MillerSep 21, 2026
DVD Region Codes Explained: Region 1 and Playback Options
![How to Remove DVD Copy Protection: Software and Free Methods [2026]](https://c.dvdnextcopy.com/media/How_to_Remove_DVD_Copy_Protection_d24c38a790.png) Steven VanceSep 21, 2026
Steven VanceSep 21, 2026How to Remove DVD Copy Protection: Software and Free Methods [2026]
 Luna MillerSep 21, 2026
How to Rip a Copy-Protected DVD on Win & Mac: 6 Ways
 Steven VanceSep 18, 2026
Top MP4 to ISO Converter in 2026: DVD Authoring vs Online Tools
 Steven VanceSep 18, 2026
How to Digitize DVD Collection: 5 Ways in 2026