 DVDneXtCOPY DVD Creator
How to Burn a DVD in 2026: Data & Video DVD Guide

Summary: To burn a DVD, first decide whether you need a data disc or a playable DVD-Video. Windows File Explorer and macOS Finder can write files to a data DVD without extra software, while a DVD that should play in a standard DVD player needs DVD authoring software such as DVDneXtCOPY DVD Creator, DVDStyler, or Burn. This guide covers both DVD burning methods, the required hardware and disc types.
Table of Contents
A DVD can finish burning successfully and still fail in the player connected to your TV. In many cases, the disc itself is readable; the problem is that the video was written as a regular file instead of being authored as DVD-Video.
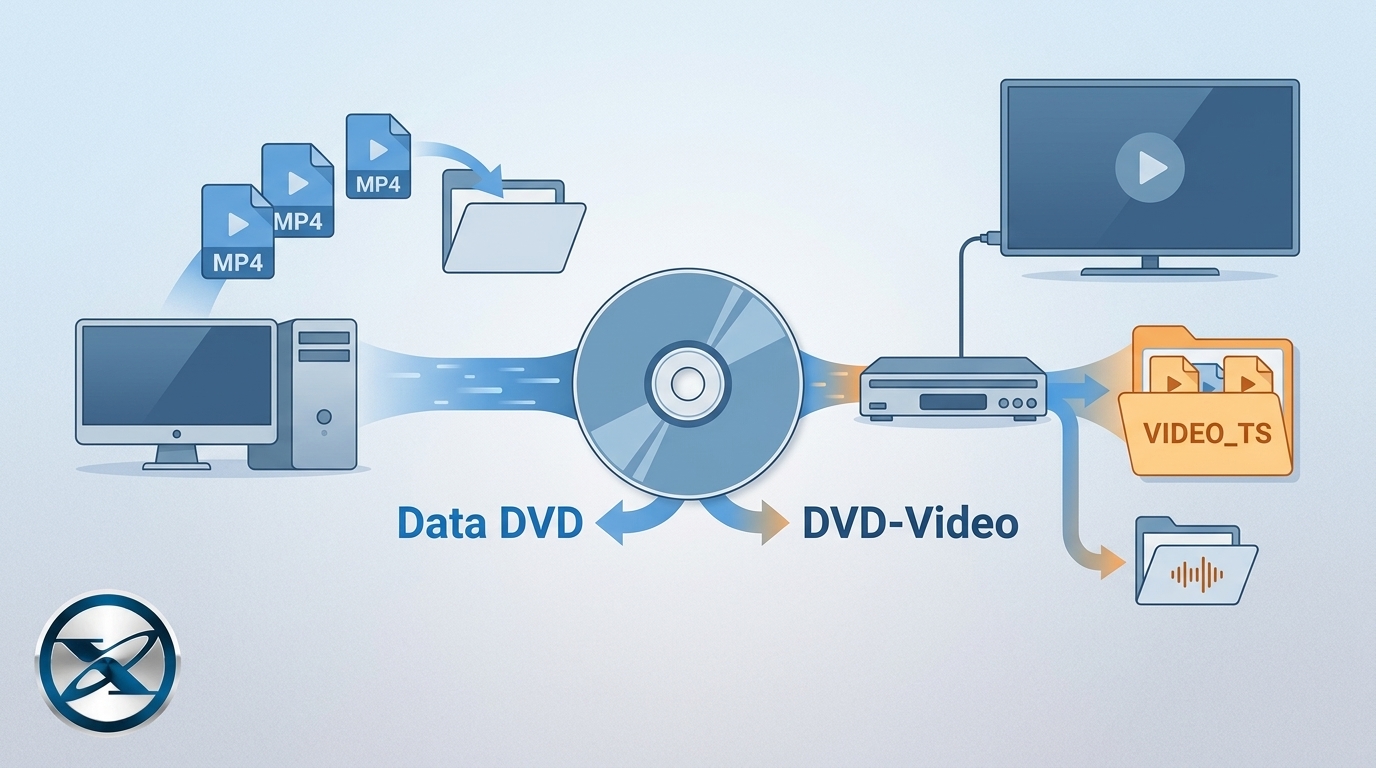
That distinction determines which method to use. If you only want to store MP4 files, photos, documents, or other data, Windows and macOS include basic disc-burning tools. If you want to turn movies or home videos into a DVD with standard DVD-Video structure and optional menus, you need DVD creator software.
Before You Burn: Choose a Data DVD or Playable DVD-Video
The first decision is what you expect the finished disc to do. A data DVD stores files as files. A DVD-Video disc is authored for conventional DVD playback.
| What You Want | DVD Type | Recommended Method | Plays in a Standard DVD Player? |
|---|---|---|---|
| Store MP4 files, photos, documents, or other files | Data DVD | Windows File Explorer or macOS Finder | Usually not for ordinary video playback |
| Watch videos like a normal movie DVD | DVD-Video | DVDneXtCOPY DVD Creator, DVDStyler, or Burn | Yes, when authored correctly |
| Write an existing disc image to a blank DVD | Disc image | Disc-image burning tool | Depends on what the image contains |
Dragging an MP4 file onto a blank DVD does not automatically turn it into DVD-Video. To convert MP4 to a playable DVD, the video needs to be authored into a DVD-Video structure before the disc is written. On Windows, the option With a CD/DVD player creates a mastered data disc; it does not author an MP4 into the structure used by a conventional movie DVD.
What You Need to Burn a DVD
- A writable DVD drive: The optical drive must support DVD writing, not only DVD reading. Many newer laptops and Macs do not include an internal optical drive, so an external USB DVD writer may be necessary.
- A blank DVD: DVD-R and DVD+R are write-once discs, while DVD-RW and DVD+RW can be erased and reused. Support varies between burners and older DVD players, so check the specifications of the devices you plan to use.
- Enough disc capacity: A single-layer DVD is commonly sold as 4.7 GB, while a dual-layer DVD is commonly sold as 8.5 GB. For a data DVD, the files need to fit within the available space. For DVD-Video, the size of the original MP4 or MKV is not the same as the final DVD project size because authoring software may re-encode the video to DVD-compatible specifications.
- Enough free computer storage: DVD authoring can create temporary encoded files before the physical disc is written. Keep enough free space for the source videos and temporary project data.
- The right software: You do not need dedicated DVD authoring software to store ordinary files on a disc. You do need it when converting video files into a playable DVD-Video structure.
How to Burn a Playable DVD-Video from Video Files
If the disc is meant for a regular DVD player, use authoring software. Authoring prepares the source video for DVD playback and can also create menus, arrange multiple titles, and manage audio or subtitle tracks before the disc is written.
Burn a DVD on Windows with DVDneXtCOPY DVD Creator
DVDneXtCOPY DVD Creator is built for burning video files into DVD projects on Windows. It accepts common sources such as MP4, MKV, AVI, and MOV and can output a physical DVD, ISO image, or DVD folder. It also provides menu templates, disc settings, audio and subtitle controls, and preview.
I would use this type of authoring setup when the result needs to behave like a movie DVD rather than simply hold video files. It is more software than you need for a basic data disc, but the menu and project controls are useful when several videos need to be organized on one DVD.
Step 1: Add the videos. Launch DVDneXtCOPY DVD Creator, enter the DVD Creator module, and click Add Source or drag the source videos into the program. If you are combining several clips, check their order before continuing.

Step 2: Configure the DVD and menu. Choose the disc type and other project settings, then open Menu Settings if you want a navigation menu. Review the selected audio and subtitle tracks before moving on. For more detailed menu design options, see our guide to creating a DVD menu.

Step 3: Choose the destination and start burning. Insert a compatible blank DVD and select the optical drive as the output destination. If you do not want to burn immediately, you can instead save an ISO image or DVD folder. Preview the project before starting so you can catch a wrong title order, menu link, audio track, or subtitle selection before the disc is written.

Burn a DVD Free with DVDStyler
Burn is an open-source macOS utility for data, audio, and video discs. As a lightweight dvd burner for mac, its video mode can also create DVD-Video and convert source media when needed, so it covers a different task from Finder's file-only burning feature.
Its menu editor gives you more direct control over backgrounds, buttons, text, and title navigation than a basic burning utility, although the interface is less guided than a typical consumer DVD creator.
Step 1: Create a DVD project. Launch DVDStyler and create a new project. Set the disc capacity, video format, aspect ratio, and other project options that match your playback equipment.

Step 2: Add the videos. Use the file browser or drag the videos into the Titleset Manager. Arrange multiple titles in the order you want them to appear.
Step 3: Design the menu. Choose a menu template or build your own. You can edit the background, buttons, text, and navigation.

Step 4: Preview and burn. Click Burn, enable preview if you want to check the finished DVD first, insert a blank disc, select the optical drive, and start the burn. Creating an ISO first is optional; DVDStyler can also burn the authored project directly to a DVD.
Burn a DVD on Mac with Burn
Burn is an open-source macOS utility for data, audio, and video discs. Its video mode can create DVD-Video and convert source media when needed, so it covers a different task from Finder's file-only burning feature.
The interface is relatively compact, which makes Burn useful for straightforward Mac DVD-Video projects where extensive menu design is not the main requirement.
Step 1: Open a DVD-Video project. Launch Burn, select the Video tab, name the disc, and choose DVD-Video as the project type.

Step 2: Add the video. Click the + button and select the source video. When Burn reports that conversion is needed for DVD-Video, allow it to convert the file before proceeding.

Step 3: Burn the DVD. Insert a blank disc, click Burn, choose the optical drive and a supported recording speed, then start writing the disc.

How to Burn a Data DVD Without Extra Software
A data DVD keeps files in their original file form. An MP4 remains an MP4, and a JPEG remains a JPEG. This is useful for storing or transferring files, but a standalone DVD player must support both the disc and the individual file format to play the content.
Burn Files to DVD on Windows with File Explorer
The way you burn a DVD on Windows 10 depends on whether you need a data disc or DVD-Video. For a data DVD, File Explorer can write files to a recordable disc without dedicated DVD authoring software.
Step 1: Insert the blank DVD. Place a writable disc in the DVD burner. When Windows asks what to do with the blank disc, choose the option to burn files to the disc and give the disc a name. For a broadly readable mastered data disc, choose With a CD/DVD player. This wording does not mean Windows is creating DVD-Video.

Step 2: Add the files. Open the disc in File Explorer and drag the files and folders you want into the window. Wait until Windows finishes preparing the files before starting the burn.
Step 3: Burn the files. Choose Burn to disc or Finish burning, depending on the Windows interface you see. Confirm the disc title and an available recording speed, then start the burn. When Windows finishes, reinsert the disc and open several files to confirm that they were written correctly.

Burn Files to DVD on Mac with Finder
Finder can write files and folders to a data DVD without extra software. Apple still documents this as a file-storage task rather than DVD-Video authoring.
Step 1: Insert a blank DVD. Connect a writable optical drive if the Mac does not have one, then insert the disc. If macOS asks which application should open it, choose Finder.
Step 2: Add the files. Open the disc in Finder and drag the files and folders you want into its window. If you expect to burn the same collection more than once, you can create a Burn Folder instead.
Step 3: Burn the disc. Choose File > Burn to Disc and follow the onscreen instructions.
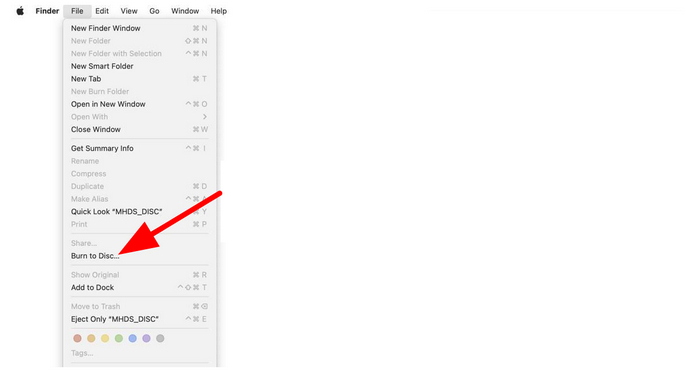
Finder is suitable for data DVDs, but it does not author ordinary MP4 or MOV files into a standard DVD-Video movie disc.
Which DVD Burning Method Should You Use?
The methods below are easier to compare by the kind of disc they create, rather than by vague speed or quality ratings.
| Method | Platform | Data DVD | DVD-Video | DVD Menu | GPU Acceleration | Best For |
|---|---|---|---|---|---|---|
| DVDneXtCOPY DVD Creator | Windows | No | Yes | Yes, flexible | Yes | Guided video-to-DVD burning |
| DVDStyler | Windows, macOS, Linux | No | Yes | Yes, basic | No | Free burning with menu design |
| Burn | macOS | Yes | Yes | No | No | Lightweight Mac disc burning |
| File Explorer | Windows | Yes | No | No | No | Storing files on DVD |
| Finder | macOS | Yes | No | No | No | Storing files on DVD |
If your only goal is moving files onto an optical disc, the built-in Windows or Mac method is enough. If the disc is going into a conventional DVD player, start with DVD authoring software instead.
Why Your Burned DVD Won't Play or Finish Burning
| Problem | Likely Cause | What to Check |
|---|---|---|
| Disc works on a computer but not a regular DVD player | Videos were burned as files rather than authored as DVD-Video | Create a DVD-Video project with authoring software |
| DVD player reports an unsupported or unreadable disc | Disc type or recording compatibility | Check whether the player and burner support the DVD-R, DVD+R, or rewritable media being used |
| Burn stops before completion | Blank disc, drive, temporary-storage, or write problem | Try another blank disc, check free disk space, and make sure file preparation has finished |
| DVD-Video project does not fit | Authored project exceeds the target disc capacity | Adjust project encoding or quality, or use a compatible dual-layer disc |
| Disc skips, freezes, or reads inconsistently | Media, write, or physical-disc issue | Inspect the disc, try another blank disc, and use a stable speed supported by both the burner and media |
| Menu opens but a title or button does not work | DVD authoring or navigation problem | Preview the project again and check menu-button links before reburning |
Do not assume that a higher recording speed will fix a failed DVD. Use a speed supported by both the burner and the blank media. If a disc repeatedly fails, trying a different blank disc or a lower supported speed is more useful than simply increasing the speed.
FAQs
It depends on the disc type. DVD-R and DVD+R are write-once media. DVD-RW and DVD+RW can be erased and used again when the burner supports those formats. Some older standalone DVD players may be less compatible with rewritable discs.
Sometimes, but only when the disc, burning method, and session settings allow additional writing. A finalized DVD-Video project should be treated as complete. If you need to update the same disc repeatedly, use rewritable media and recreate the project when necessary rather than assuming new files can always be appended.
Yes. An ISO is a disc image, so you normally write the image to the DVD rather than import it as an ordinary video file. The finished disc will reflect what the ISO contains: a DVD-Video ISO can reproduce a DVD-Video structure, while an ISO containing ordinary data remains a data disc.
Conclusion
The right way to burn a DVD depends on the finished disc you need. For file storage, Windows File Explorer and macOS Finder provide the basic tools. For a disc that should behave like a standard movie DVD, use authoring software: DVDneXtCOPY DVD Creator provides a guided Windows option, DVDStyler covers free cross-platform authoring with more menu control, and Burn handles straightforward DVD-Video creation on Mac.
Whichever method you use, reopen the finished disc and test the files, menu, video, audio, or navigation that matter before you treat the job as complete.
![Top 8 Best MP4 to DVD Converters on Windows & Mac [2026 Tested]](https://images.dvdnextcopy.com/2026/09/17/I2v69nzxIF6Xn7iue3ZRMGJ5-Ls0SF_z/feature_cover.jpg) Luna MillerSep 21, 2026
Luna MillerSep 21, 2026Top 8 Best MP4 to DVD Converters on Windows & Mac [2026 Tested]
 Luna MillerSep 21, 2026
DVD Region Codes Explained: Region 1 and Playback Options
![How to Remove DVD Copy Protection: Software and Free Methods [2026]](https://c.dvdnextcopy.com/media/How_to_Remove_DVD_Copy_Protection_d24c38a790.png) Steven VanceSep 21, 2026
Steven VanceSep 21, 2026How to Remove DVD Copy Protection: Software and Free Methods [2026]
 Luna MillerSep 21, 2026
How to Rip a Copy-Protected DVD on Win & Mac: 6 Ways
 Steven VanceSep 18, 2026
Top MP4 to ISO Converter in 2026: DVD Authoring vs Online Tools
 Steven VanceSep 18, 2026
How to Digitize DVD Collection: 5 Ways in 2026