 DVDneXtCOPY DVD Copy
How to Copy a DVD to a Hard Drive: 3 Tested Methods [2026]

Summary: To copy a DVD to a hard drive, first decide what you want to keep. An unprotected or homemade DVD can often be copied directly with File Explorer or Finder. If you want to preserve the DVD structure, menus, and extras, save it as an ISO image or DVD folder with DVDneXtCOPY DVD Copy. If you mainly want an easy-to-play movie file for a computer, TV, Plex, or mobile device, rip the DVD to MP4 or MKV with DVDneXtCOPY DVD Ripper or DVDFab instead.
Table of Contents
Copying a DVD to a hard drive can mean different things depending on what you want to keep. You may simply copy readable files, preserve the disc as an ISO image or DVD folder, or convert the movie to a common video format such as MP4 or MKV. The right method mainly depends on whether the DVD is protected and whether you need to keep its original menus and disc structure.
I've organized the methods by the result you need on the drive, from a simple copy of an unprotected DVD to a full disc backup or a playback-friendly video file. This makes it easier to choose the right method for storage, archiving, or playback on an external drive, NAS, Plex library, TV, or other device.
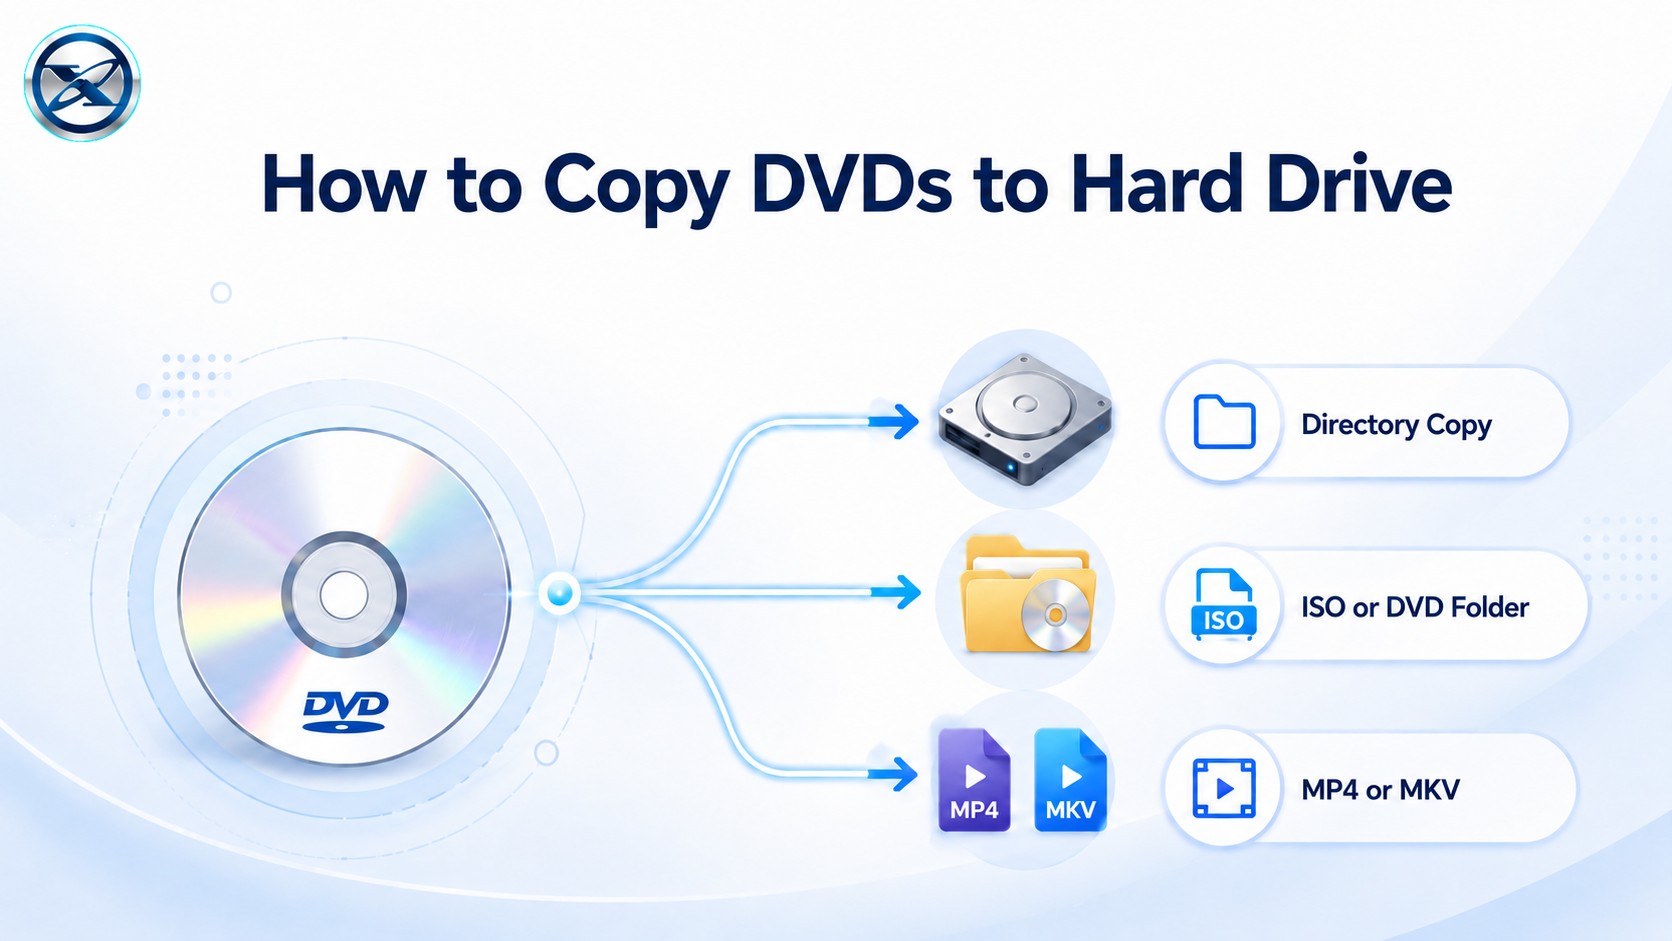
Quick Answer: Which DVD-to-Hard-Drive Method Should You Use?
| Method | Best For | Output on Hard Drive | Keeps DVD Structure | Protected DVD |
|---|---|---|---|---|
| Direct Copy | Homemade, data, or other readable DVDs | VIDEO_TS / original files | Yes | No |
| DVD to ISO or DVD Folder | Archiving menus, extras, and DVD structure | ISO / VIDEO_TS folder | Yes | With suitable DVD copy software |
| DVD to MP4 or MKV | Plex, NAS, TV, phone, and everyday playback | MP4 / MKV | No full disc structure | With suitable DVD ripping software |
The key difference is backup versus playback. ISO and DVD folders preserve the disc-style structure, while MP4 and MKV turn the movie into a normal digital video file.
Method 1: Copy an Unprotected DVD Directly to a Hard Drive
Direct file copying is the simplest method, but it only works when the operating system can read the DVD files normally. It is most appropriate for homemade DVDs, data DVDs, and other unprotected discs.
For a DVD-Video disc, the movie files are normally stored inside a VIDEO_TS folder. Copying the complete folder keeps the readable DVD file structure, although menu and playback support depends on the software you use afterward.
Copy the DVD to Hard Drive with File Explorer on Windows
Step 1: Insert the DVD and open File Explorer. Select This PC, then open the DVD drive to view the disc contents.
Step 2: Select the complete VIDEO_TS folder or the files you want to keep, choose Copy, then open the destination folder on the internal or external hard drive and select Paste.
Step 3: Wait until the copying finishes before disconnecting an external drive.
Copy the DVD to Hard Drive with Finder on Mac
Step 1: Insert the readable DVD into the Mac's internal or external optical drive. Open Finder and select the disc from the sidebar.
Step 2: Open the disc, select the readable DVD files or folders, and drag them to the desired folder on the Mac or external hard drive.
Method 2: Copy a DVD to a Hard Drive as an ISO or DVD Folder
Saving a DVD as an ISO image or DVD folder is better when you want to preserve the disc-style structure rather than only the movie as a normal video file. An ISO stores the backup as one image file, while a DVD folder exposes the familiar VIDEO_TS structure directly on the hard drive.
Copy a DVD as ISO or Folder on Windows with DVDneXtCOPY DVD Copy
- OS: Windows
- Input: DVD disc / ISO / DVD folder
- Output: ISO / DVD folder / blank disc
- Best for: Saving protected DVDs to a hard drive while preserving DVD structure
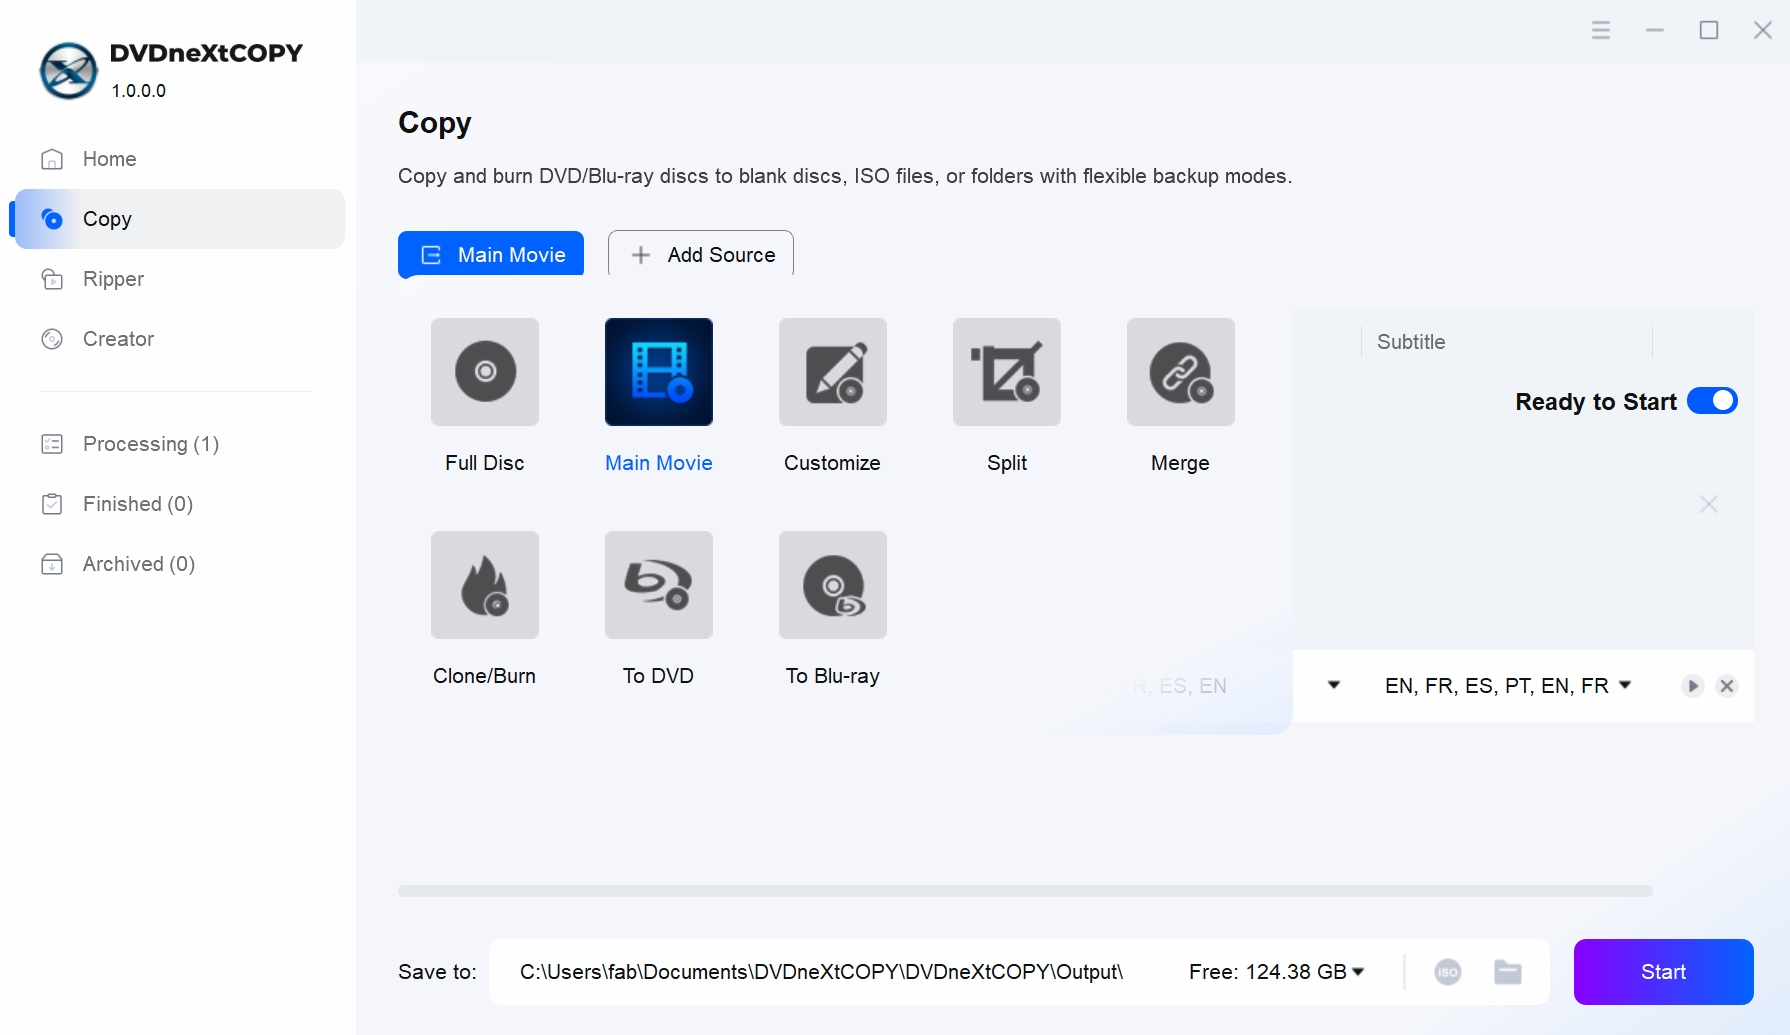
DVDneXtCOPY DVD Copy can save a protected DVD as an ISO image or DVD folder on a hard drive, or copy it to blank media. Its copy modes give you different levels of control over what is preserved: Full Disc keeps the complete DVD with menus and extras, Main Movie saves only the feature title, Customize lets you select specific titles or chapters, and Clone/Burn creates a 1:1 copy without compression.
Beyond basic DVD backup, DVDneXtCOPY supports protected commercial discs with protections such as Region Code, RipGuard, ARccOS, and RC. It can preserve the original disc content in a 1:1 copy or compress a DVD-9 to DVD-5 when a smaller target is needed. You can also choose the chapters, audio tracks, and subtitles to keep, preview the selected content before copying, and use hardware acceleration or batch processing for larger backup jobs.
Step 1: Load the DVD
Launch DVDneXtCOPY and open the Copy module. Insert the DVD into the optical drive. If the disc does not load automatically, click Add Source. ISO files and DVD folders can also be loaded from the same interface.
Step 2: Choose What to Keep
Open the copy-mode selector and choose:
- Clone/Burn for a 1:1 DVD backup;
- Full Disc to keep menus, extras, and the full DVD structure;
- Main Movie to save only the feature title;
- Customize to keep selected titles or chapters.
If you need a true 1:1 backup, use Clone/Burn rather than compressing DVD-9 content to DVD-5.
Step 3: Choose ISO or DVD Folder
Choose ISO Image File if you want one image file on the hard drive. Choose Folder if you prefer a normal DVD folder structure that exposes the VIDEO_TS files directly.
Select the titles, audio tracks, and subtitles you want to preserve when the chosen mode allows content selection.
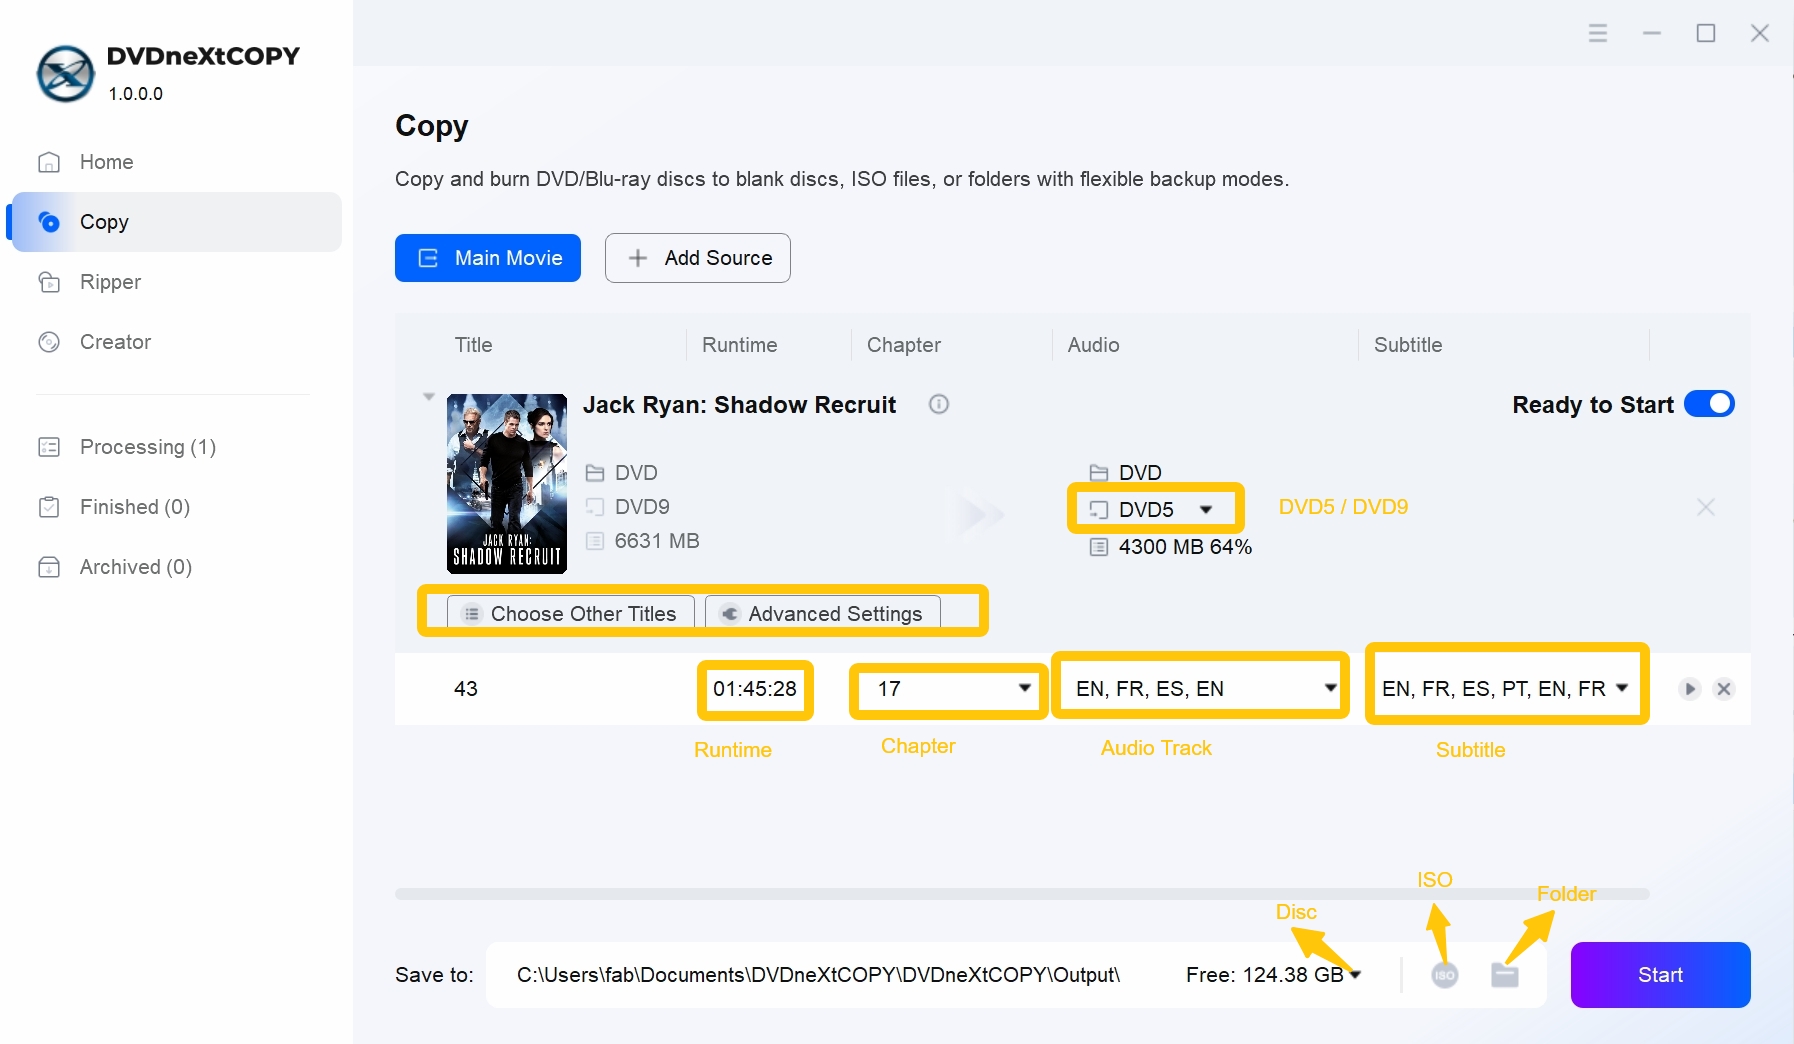
Step 4: Choose the Hard Drive and Start Copying
Select the internal HDD, SSD, or external hard drive as the destination. Review the selected copy mode, DVD size, tracks, and output path, then click Start.
Mac Built-in Option: Create a DVD Disc Image with Disk Utility
For a DVD that macOS can read normally, Disk Utility provides a built-in way to save the disc as a disk image. Apple defines DVD/CD master as an image format that copies all sectors of the disk image and uses the .cdr extension.
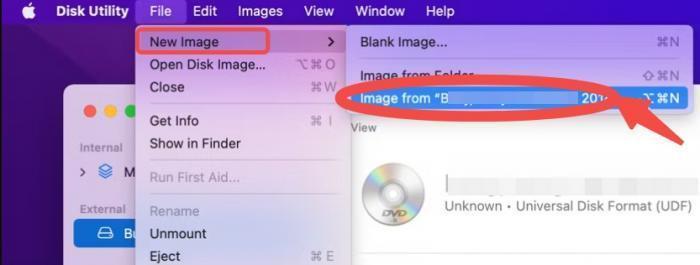
Step 1: Select the DVD
Insert the DVD and open Disk Utility. Select the DVD in the sidebar, then choose File > New Image > Image from [DVD name].
Step 2: Choose DVD/CD Master
Enter a filename and choose where the image should be saved. Set Image Format to DVD/CD master.
Step 3: Save the Disc Image
Click Save, then Done. Disk Utility creates a .cdr image on the selected hard drive.
For the purpose of copying a DVD to a hard drive, the CDR image already completes the backup. Disk Utility is an imaging utility rather than DVD decryption software, so use it for readable or unprotected DVDs.
Method 3: Rip a DVD to a Hard Drive as MP4 or MKV
Choose a DVD ripper software tollwhen you mainly want the movie as an easy-to-play digital video instead of preserving the full DVD structure. MP4 and MKV are easier to organize in a media library, stream through Plex, copy to a NAS, or play on modern TVs and mobile devices.
| Format | Best For |
|---|---|
| MP4 | Broad device compatibility and straightforward playback |
| MKV | Multiple audio/subtitle tracks and more flexible movie archiving |
Rip a DVD to a Hard Drive as MP4 or MKV on Windows with DVDneXtCOPY DVD Ripper
OS: Windows
Input: DVD disc / ISO / folder
Output: MP4 / MKV / AVI / MOV / audio formats
Best for: Saving protected DVD movies to a hard drive as normal video files
DVDneXtCOPY DVD Ripper loads DVD discs, ISO images, and folders, handles region codes, CSS, UOPs, RCE, and Sony ARccOS, and converts the selected movie to MP4, MKV, AVI, MOV, and other video/audio formats. Movie title, chapter range, audio, and subtitle tracks can be selected before the file is saved to an internal or external hard drive.
MP4 and MKV outputs behave like normal video files, which makes them easier to use with Plex, NAS libraries, smart TVs, tablets, and other devices than a full DVD structure. GPU acceleration, batch mode, real-time preview, Advanced Settings, and optional crop, trim, merge, watermark, and subtitle tools provide additional control over the output. MP4/MKV does not retain the complete interactive DVD menu structure, and re-encoding profiles change the original encoded video stream when reducing size or changing compatibility.
Step 1: Load the DVD
Launch DVDneXtCOPY and open Ripper. Insert the DVD or load a DVD ISO/folder through Add Source.
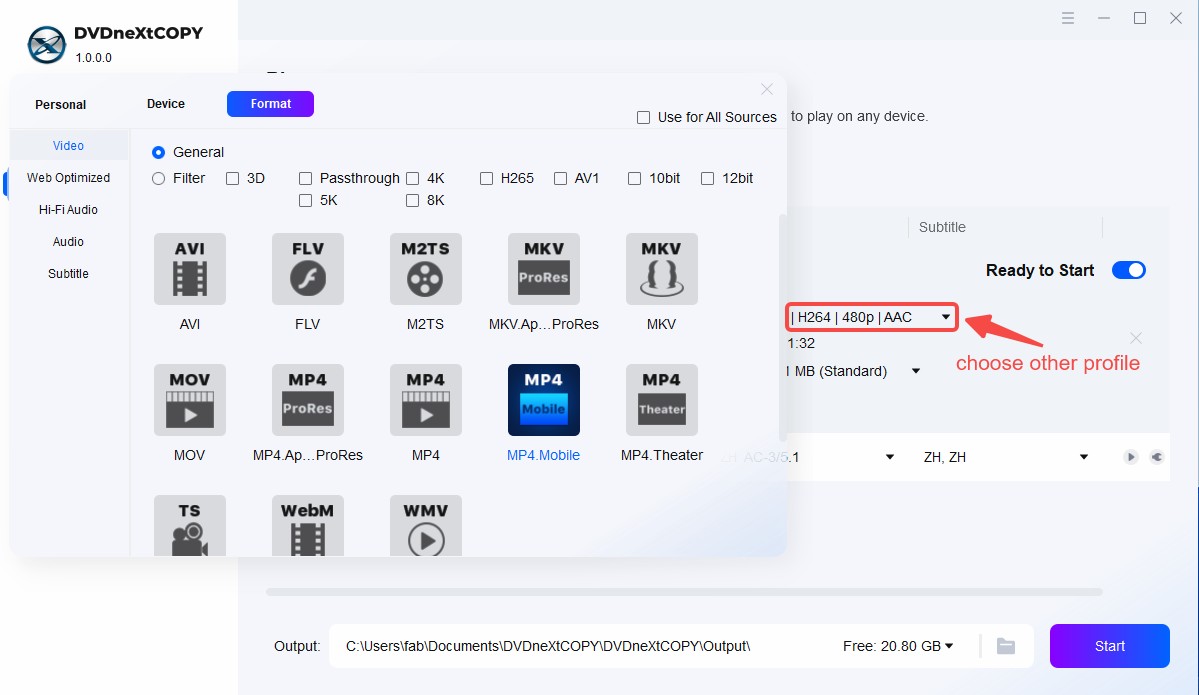
Step 2: Choose MP4 or MKV
Open the output profile. Choose MP4 for broad compatibility or MKV when you want more flexibility for multiple audio and subtitle tracks.
Step 3: Select the Movie, Audio and Subtitles
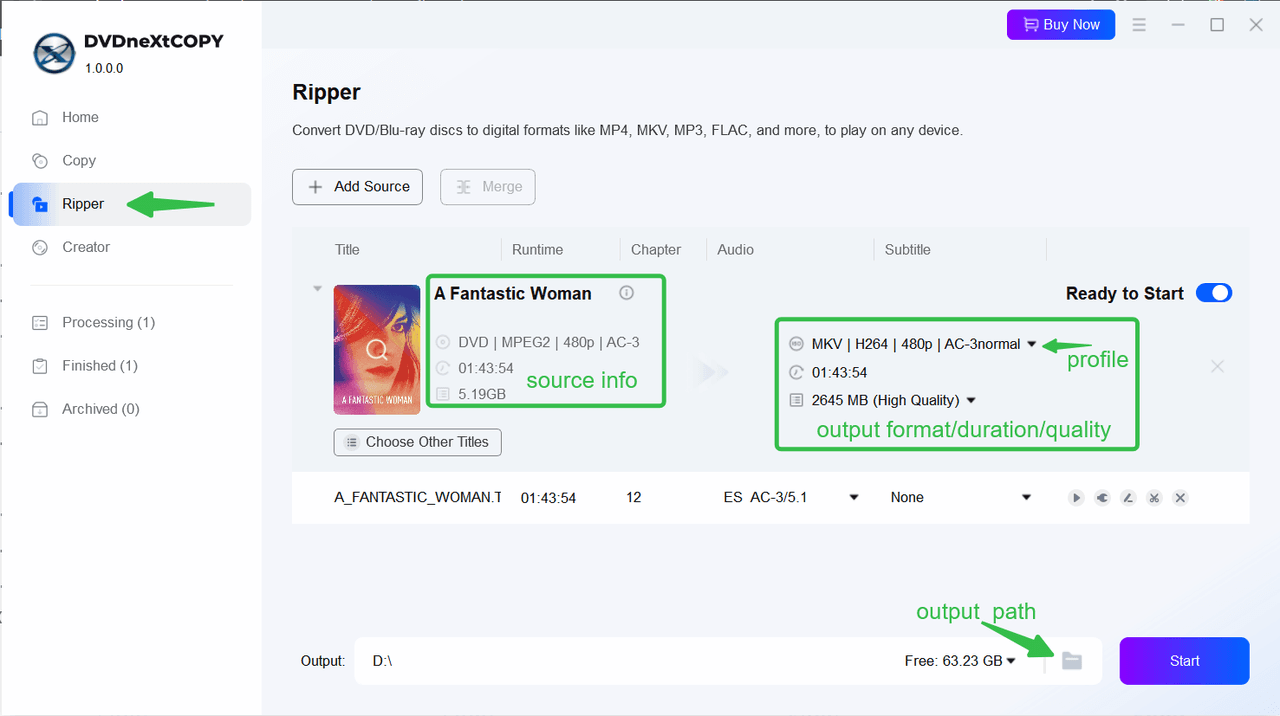
Choose the main movie title, chapter range, audio tracks, and subtitles you want to keep. Use Advanced Settings only when you need to adjust video/audio codec, subtitle mode, or related encoding parameters.
Step 4: Choose the Hard Drive and Start Ripping
Set the output folder to the internal or external hard drive, then click Start to create the digital movie file.
Rip a DVD to a Hard Drive on Mac with DVDFab DVD Ripper
OS: Windows / macOS
Input: DVD disc / ISO / VIDEO_TS folder
Output: MP4 / MKV / AVI / MP3 / FLAC and other video/audio formats
Best for: Converting protected DVDs to normal video files on Windows or Mac
DVDFab DVD Ripper reads DVD-5, DVD-9, recordable DVDs, ISO images, and VIDEO_TS folders and converts them to MP4, MKV, AVI, MP3, FLAC, and other digital formats. It can handle CSS, APS, RC, RCE, Sony ARccOS, UOPs, RipGuard, and other complex protections, while title, audio, subtitle, codec, resolution, and quality controls let you define what is saved to the hard drive.
DVDFab also provides lossless or passthrough-style outputs alongside compressed profiles, GPU acceleration on supported NVIDIA, AMD, Intel, and Apple VideoToolbox hardware, task-queue processing, and a built-in editor for crop, trim, merge, watermarks, subtitles, and color adjustments. Its Windows and Mac versions make it especially useful when the destination is an external hard drive shared across different systems, although the full advanced feature set requires the commercial version after the trial.
Step 1: Load the DVD
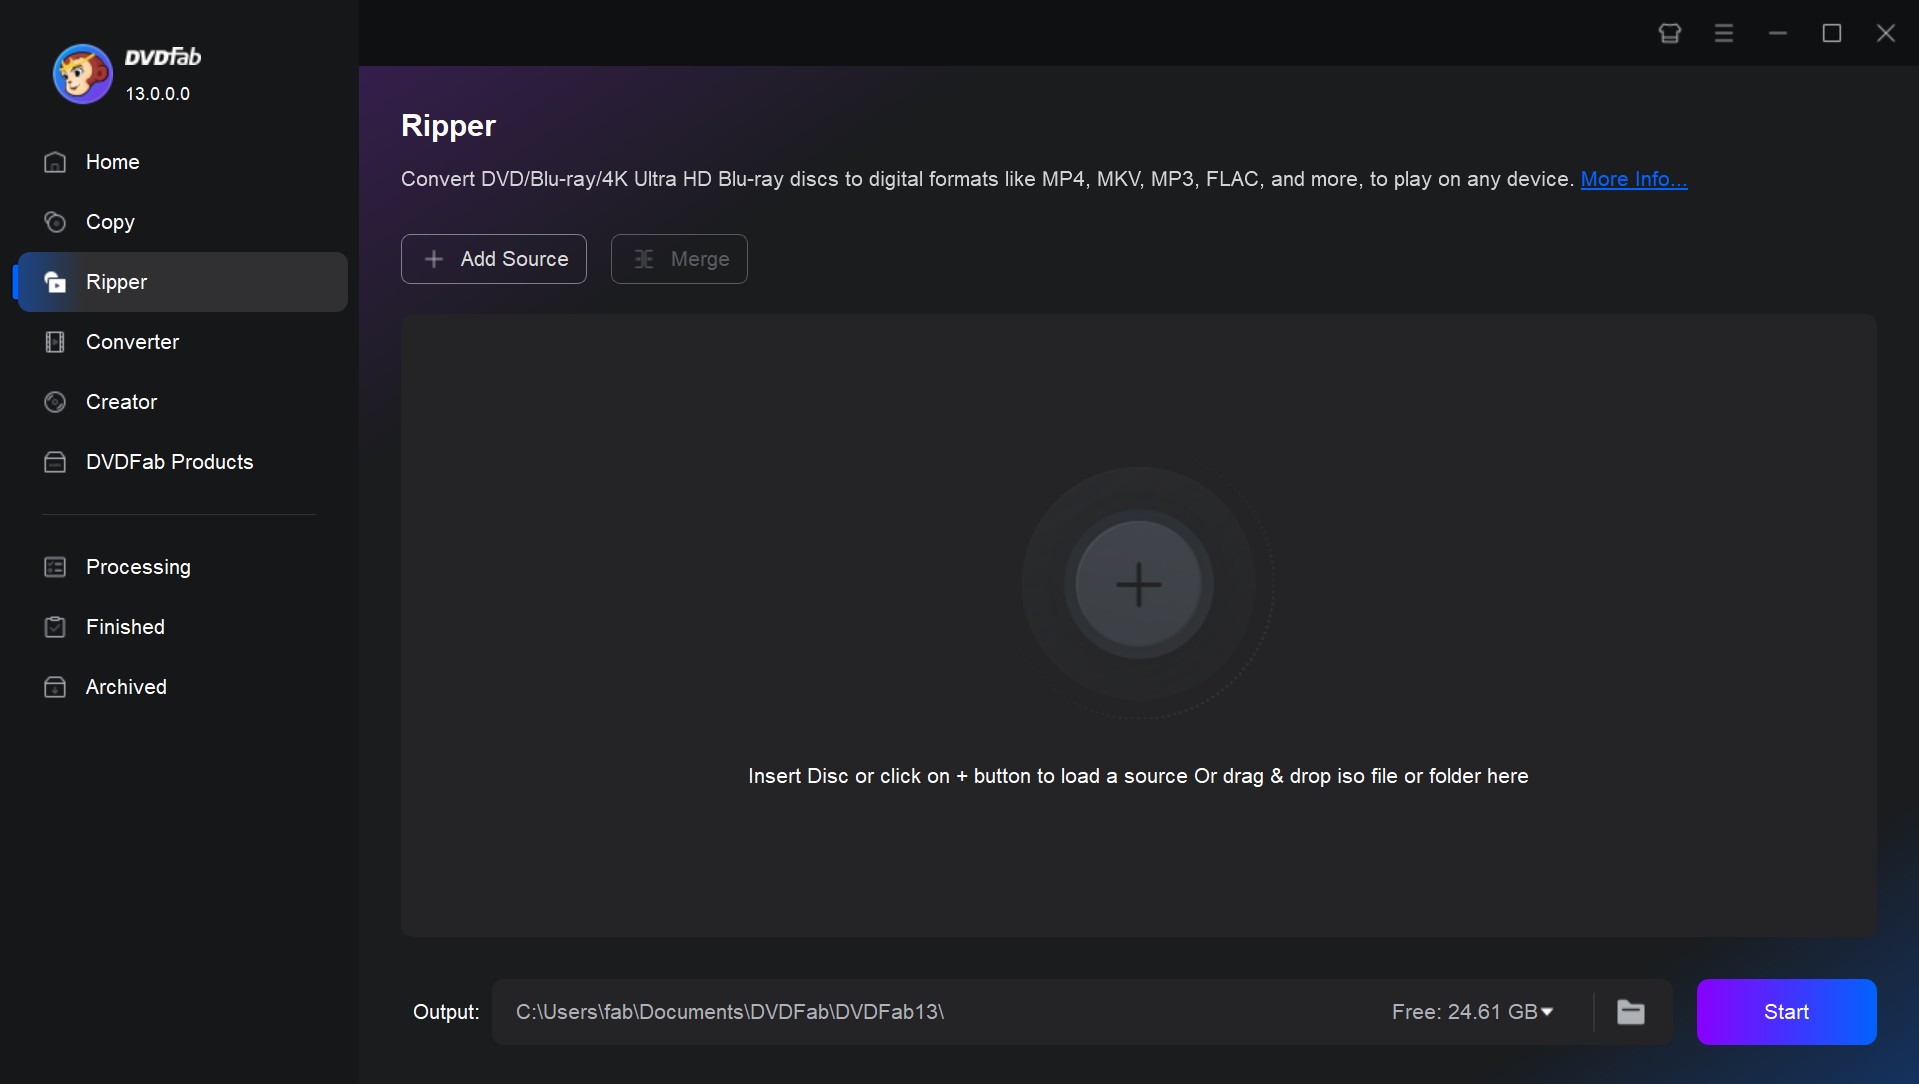
Launch DVDFab, open Ripper, and insert the DVD. You can also use Add Source or drag a DVD ISO or VIDEO_TS folder into the workspace.
Step 2: Choose MP4, MKV, or Another Digital Profile
Open Choose Other Profile and select the output format. MP4 suits broad device playback, while MKV is more flexible when multiple audio or subtitle tracks need to be retained.
Step 3: Select the Movie, Audio, Subtitles, and Quality
Choose the main title, audio, and subtitle tracks. Use Advanced Settings when you need to adjust codec, resolution, bitrate, quality, or other output parameters.
Step 4: Save the Video to the Hard Drive
Choose the internal or external hard drive as the output destination, then click Start to create the digital video file.
Before Copying DVDs to an External Hard Drive
Check the Free Space
A full DVD image or folder can occupy several gigabytes. A 1:1 DVD-9 backup can be much larger than a compressed MP4, so confirm that the destination has enough free space before copying.
Check the File System
This matters especially for ISO files. FAT32 has a 4 GiB maximum individual file size, while NTFS and exFAT support much larger files. A full DVD ISO can exceed the FAT32 limit, so check the external drive format before starting a large image backup.
If the same external drive needs to be used with both Windows and Mac, exFAT is a common cross-platform option.
Verify the Backup
Before putting the original DVD away, open the copied VIDEO_TS folder, mount or inspect the ISO, or play the MP4/MKV. Verify the main title, audio, and subtitles if those elements were supposed to be retained.
FAQs
Not necessarily. A direct file copy or a 1:1 Clone ISO does not re-encode the original DVD video. Saving a same-size DVD folder can also retain the original streams. Compressing DVD-9 content to DVD-5 or encoding the movie to a smaller MP4/MKV can change the video stream and may reduce quality depending on the settings.
It depends on the backup type. An ISO or complete DVD folder can use roughly as much space as the data stored on the original disc. A compressed MP4 or MKV can be smaller, but its size depends on movie length, codec, bitrate, resolution, audio tracks, and quality settings.
Homemade DVDs, data DVDs, and other readable discs may expose normal files that File Explorer or Finder can copy directly. Commercial movie DVDs often use copy protection or disc structures that are not suitable for simple file copying, so they may require DVD copy or ripping software that supports the relevant disc.
Yes, with software that supports DVD folder playback. A complete VIDEO_TS folder contains the DVD-Video files, but not every modern media player handles DVD menus and navigation in the same way. If simple playback across many devices matters more than keeping DVD structure, MP4 or MKV is usually easier to manage.
Conclusion
To copy an unprotected DVD to hard drive driectly, File Explorer on Windows or Finder on Mac is the simplest choice. For an ISO or DVD-folder backup, DVDneXtCOPY DVD Copy is my recommendation on Windows, while Disk Utility is the built-in choice for a readable DVD on Mac.
For MP4 or MKV, DVDneXtCOPY DVD Ripper is my Windows pick, while DVDFab DVD Ripper adds a full Mac workflow and also works on Windows. That gives each of the three methods a clear tool choice based on the type of file you want to keep on the hard drive.
![Top 8 Best MP4 to DVD Converters on Windows & Mac [2026 Tested]](https://images.dvdnextcopy.com/2026/09/17/I2v69nzxIF6Xn7iue3ZRMGJ5-Ls0SF_z/feature_cover.jpg) Luna MillerSep 21, 2026
Luna MillerSep 21, 2026Top 8 Best MP4 to DVD Converters on Windows & Mac [2026 Tested]
 Luna MillerSep 21, 2026
DVD Region Codes Explained: Region 1 and Playback Options
![How to Remove DVD Copy Protection: Software and Free Methods [2026]](https://c.dvdnextcopy.com/media/How_to_Remove_DVD_Copy_Protection_d24c38a790.png) Steven VanceSep 21, 2026
Steven VanceSep 21, 2026How to Remove DVD Copy Protection: Software and Free Methods [2026]
 Luna MillerSep 21, 2026
How to Rip a Copy-Protected DVD on Win & Mac: 6 Ways
 Steven VanceSep 18, 2026
Top MP4 to ISO Converter in 2026: DVD Authoring vs Online Tools
 Steven VanceSep 18, 2026
How to Digitize DVD Collection: 5 Ways in 2026