 DVDneXtCOPY DVD Ripper
How to Rip and Edit a DVD on Windows and Mac [2026]

Summary: Editing a DVD usually means loading a DVD title, making changes such as trimming, cropping, subtitles, watermarks, audio, speed, or color adjustments, and exporting a new video file. This guide provides a detailed DVDneXtCOPY workflow for Windows and a separate DVDFab DVD Ripper workflow for Mac, then explains how to re-author the edited video if you want another playable DVD.
Table of Contents
Editing a DVD is different from editing an MP4 or MOV file already stored on your computer. A DVD-Video disc contains titles, chapters, audio tracks, subtitles, and navigation data, so the usual workflow is to load the DVD, choose the movie content you want, apply the edits, and save the result as a new digital video file.
When I edit a DVD, I first decide whether I only need changes such as trimming, cropping, subtitles, watermarks, audio, or color adjustments, or whether I need a full timeline editor for more complex work. Below, I use DVDneXtCOPY DVD Ripper for the detailed Windows workflow and DVDFab DVD Ripper for Mac so both operating systems are covered without repeating every identical editing control twice.
What Can You Edit in a DVD Movie?
A DVD ripper software with a built-in editor is useful when you want to change the movie content while converting it to a digital file. It does not edit the original disc in place, and it is not the same as a full multi-track timeline editor.
| Editing Goal | Typical Operation |
|---|---|
| Remove unwanted scenes | Trim |
| Remove black bars or change framing | Crop / rotate |
| Adjust brightness or color | Video effects / color adjustment |
| Add a logo or text | Watermark |
| Add or replace subtitles | External subtitle |
| Change audio volume or playback speed | Audio / speed controls |
| Join selected clips | Trim / merge |
| Change codec, bitrate, or resolution | Advanced Settings |
DVD Editing Software for Windows and Mac
The two software, working on different operating systems, can help your edit and rip DVD to MP4 and other digital formats.
| Tool | OS | DVD Input | Built-in Editing | Typical Output | Best Fit in This Guide |
|---|---|---|---|---|---|
| DVDneXtCOPY DVD Ripper | Windows 11/10/8.1/8/7 | DVD disc / ISO / folder | Crop, trim, merge, watermark, subtitles, brightness, audio and speed controls | MP4, MKV, AVI, MOV and other digital formats | Detailed Windows DVD editing |
| DVDFab DVD Ripper for Mac | macOS 12 and newer | DVD disc / ISO / VIDEO_TS folder | Crop, trim, merge, watermark, external subtitles, color and audio controls | MP4, MKV, MOV and other digital formats | Editing DVDs on Mac (Intel & Apple Chips) |
How to Edit a DVD on Windows with DVDneXtCOPY DVD Ripper
DVDneXtCOPY DVD Ripper can load a protected DVD disc, ISO image, or DVD folder on Windows and convert selected titles to digital video. Its current built-in editing tools include crop, trim, merge, text/image watermark, external subtitles, brightness adjustment, plus title, chapter, audio, and subtitle selection before export.
DVDneXtCOPY keeps Video Edit separate from Advanced Settings. That lets you edit the picture and clip content while using Advanced Settings for codec, resolution, bitrate, frame rate, audio, and subtitle behavior. It also provides GPU acceleration, batch processing, and real-time preview, so the DVD can be edited and converted in one workflow rather than being ripped first and moved into a second basic editor.
Step 1: Download DVDneXtCOPY DVD Ripper and Load Your DVD Source
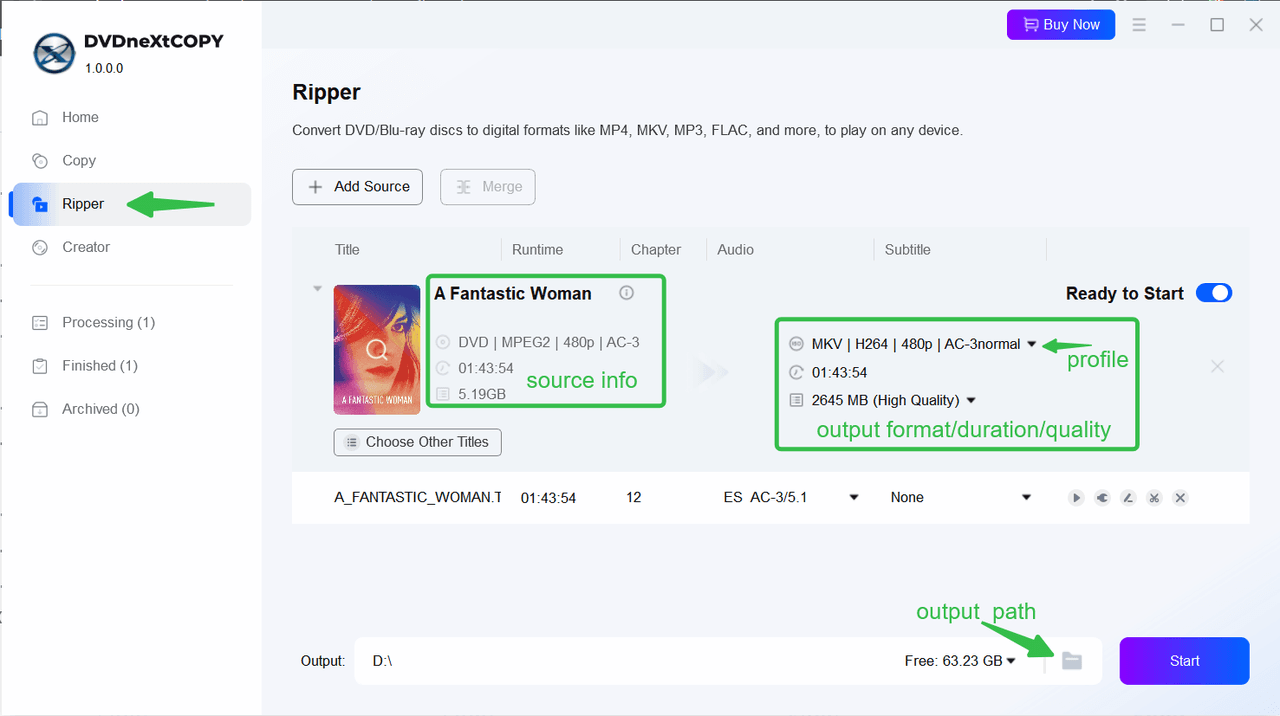
Download and install DVDneXtCOPY DVD Ripper on your Windows PC. Launch the program, choose the Ripper module from the left pane, and insert the DVD into the optical drive.
If the source is already stored as a DVD ISO or folder, click the + icon or drag and drop the source into the main interface.
Step 2: Select an Output Profile for Your DVD Video
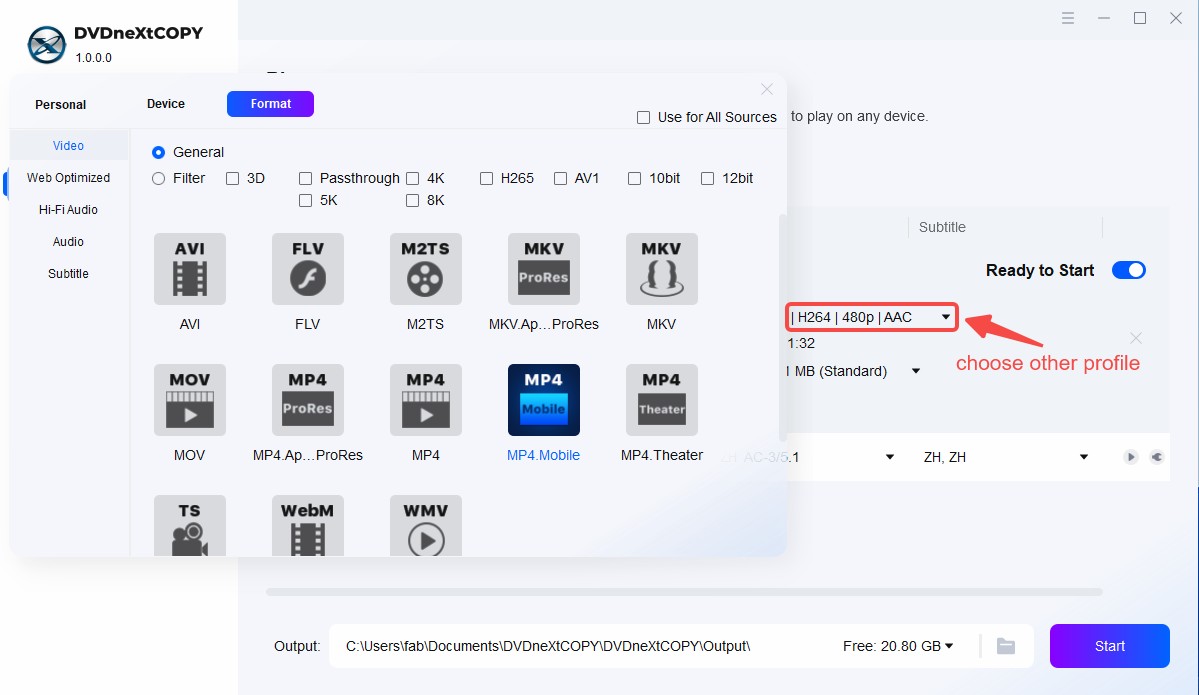
Click the Profile Selection area to open the profile library, then choose the output format for the edited DVD video. MP4 and MKV are practical general-purpose options, while AVI, MOV, audio profiles, and other formats can be selected when needed.
Step 3: Adjust Video, Audio, and Subtitle Settings
Choose the DVD title and chapter range you want to edit, then select the required audio and subtitle tracks. Open Advanced Settings to adjust technical output parameters such as codec, resolution, video quality, bitrate, frame rate, audio codec, audio channels, sample rate, and subtitle mode.

Step 4: Crop Your DVD Video
Click Video Edit and open Crop. Adjust the crop area or aspect ratio to remove unwanted borders or black bars, and use the rotation controls if the footage has the wrong orientation. Check the Output Preview before applying the change.

Step 5: Add Effect to Your DVD Video
Select the Effects menu to add various amazing effects to your video clip. For example, you can customize video effects like brightness, contrast, saturation, and white balance. You can also apply video filters like Grayscale, Negate, Noise, Mirror, CMYK, Vintage, Tinted, Lens Correction, Vignette, Edge, Emboss, Sharpen, Blur, Technicolor, and more.

Step 6: Add Watermark to Your DVD Video
Click Watermark at the top to protect your content by applying a watermark in the form of text or image watermarks to the video. You can also adjust word font, size, color, bold, italic, underline, and transparency.

Step 7: Add External Subtitle to Your DVD Video
Next, move on to Subtitles in the toolbar to add external subtitles in formats such as .srt, .smi, .ass, or .ssa to the video. Adjust word font, size, bold, italic, transparency, position (bottom/center), and delay time.

Step 8: Adjust Audio and DVD Video Speed
Now, choose the Audio menu in the toolbar. Here, you can adjust the volume and stereo and improve the clarity of human voices in the video. Moreover, you can click Denoise to remove background noise for better quality.
Click the Speed tab in the toolbar to modify playback and define the speed of your video clip. There are many options available that you can try to adjust your video’s speed. For example, you can choose 0.25x, 0.5x, 0.75x, 1x, 1.25x, 1.5x, 1.75x, 2x, and 3x depending upon your video content’s speed requirement.
Then, click OK to apply the necessary changes among all the parameters.

Step 9: Trim or Merge Your DVD Video
Now, click the Trim icon to cut out unwanted sections of the video and merge multiple clips into a seamless file for a polished final product. A new window will appear as an overlay screen, where you can click the time point you want to trim and choose the scissors icon in the bottom menu to trim the video. However, remember to save the trimmed video.

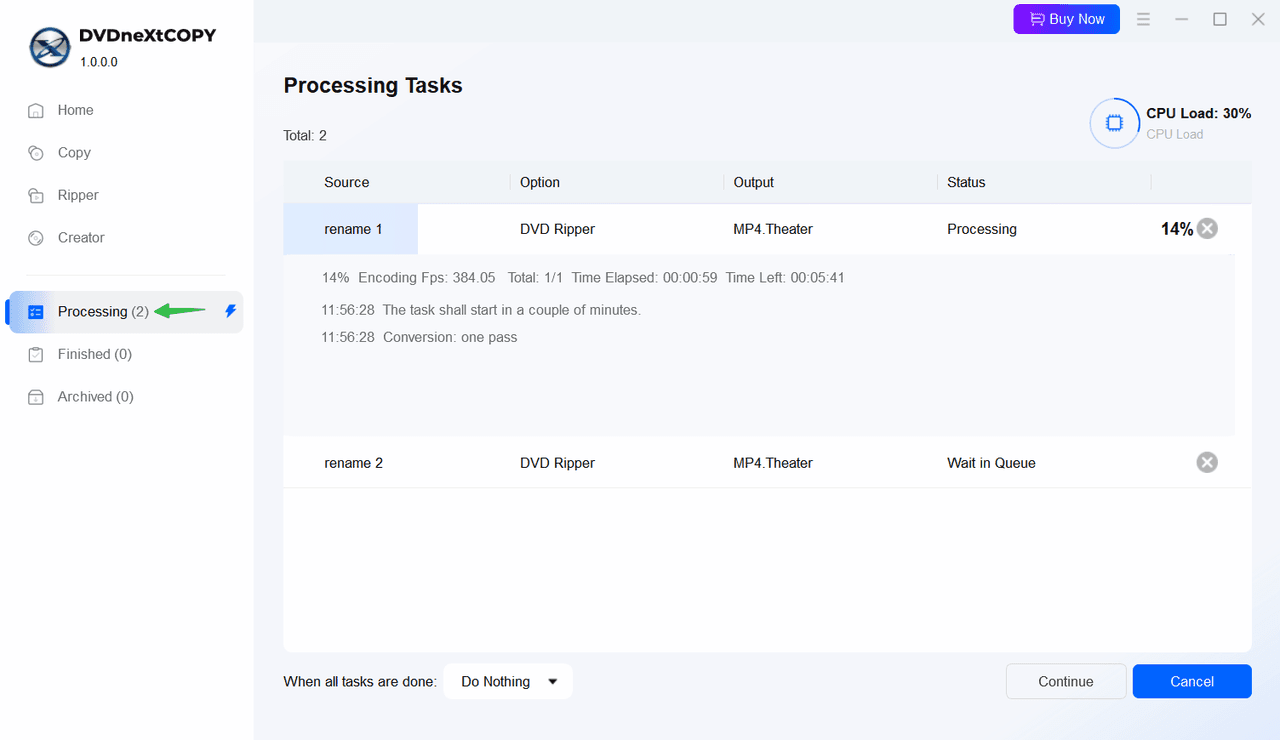
Step 10: Select an Output Directory and Start to Rip Your DVD Editing File
Once you complete all the above steps, you can rip and edit DVD videos. Click the Folder icon near Start, choose the destination for the edited file, and review the title, format, audio, subtitles, and editing settings. Click Start to process the DVD and save the edited video to the selected folder.
How to Edit a DVD on Mac with DVDFab DVD Ripper
DVDFab DVD Ripper for Mac can rip your DVDs to formats such as MP4, MKV, and MOV. Before ripping, you can edit your DVD with its built-in editor, which supports crop, trim, merge, text/image watermarks, external subtitles, brightness, contrast, saturation, and audio adjustments.
The current Mac branch is DVDFab 13.0.6.3, released in June 2026, with Mac builds for Intel and Apple Silicon systems. It also uses Apple VideoToolbox for supported hardware acceleration. Because its editing controls overlap with the Windows workflow above, the Mac method below focuses on where to load the DVD, open the editor, adjust encoding settings, and export the edited result rather than repeating every editing button as a separate section.
Step 1: Load the DVD on Your Mac
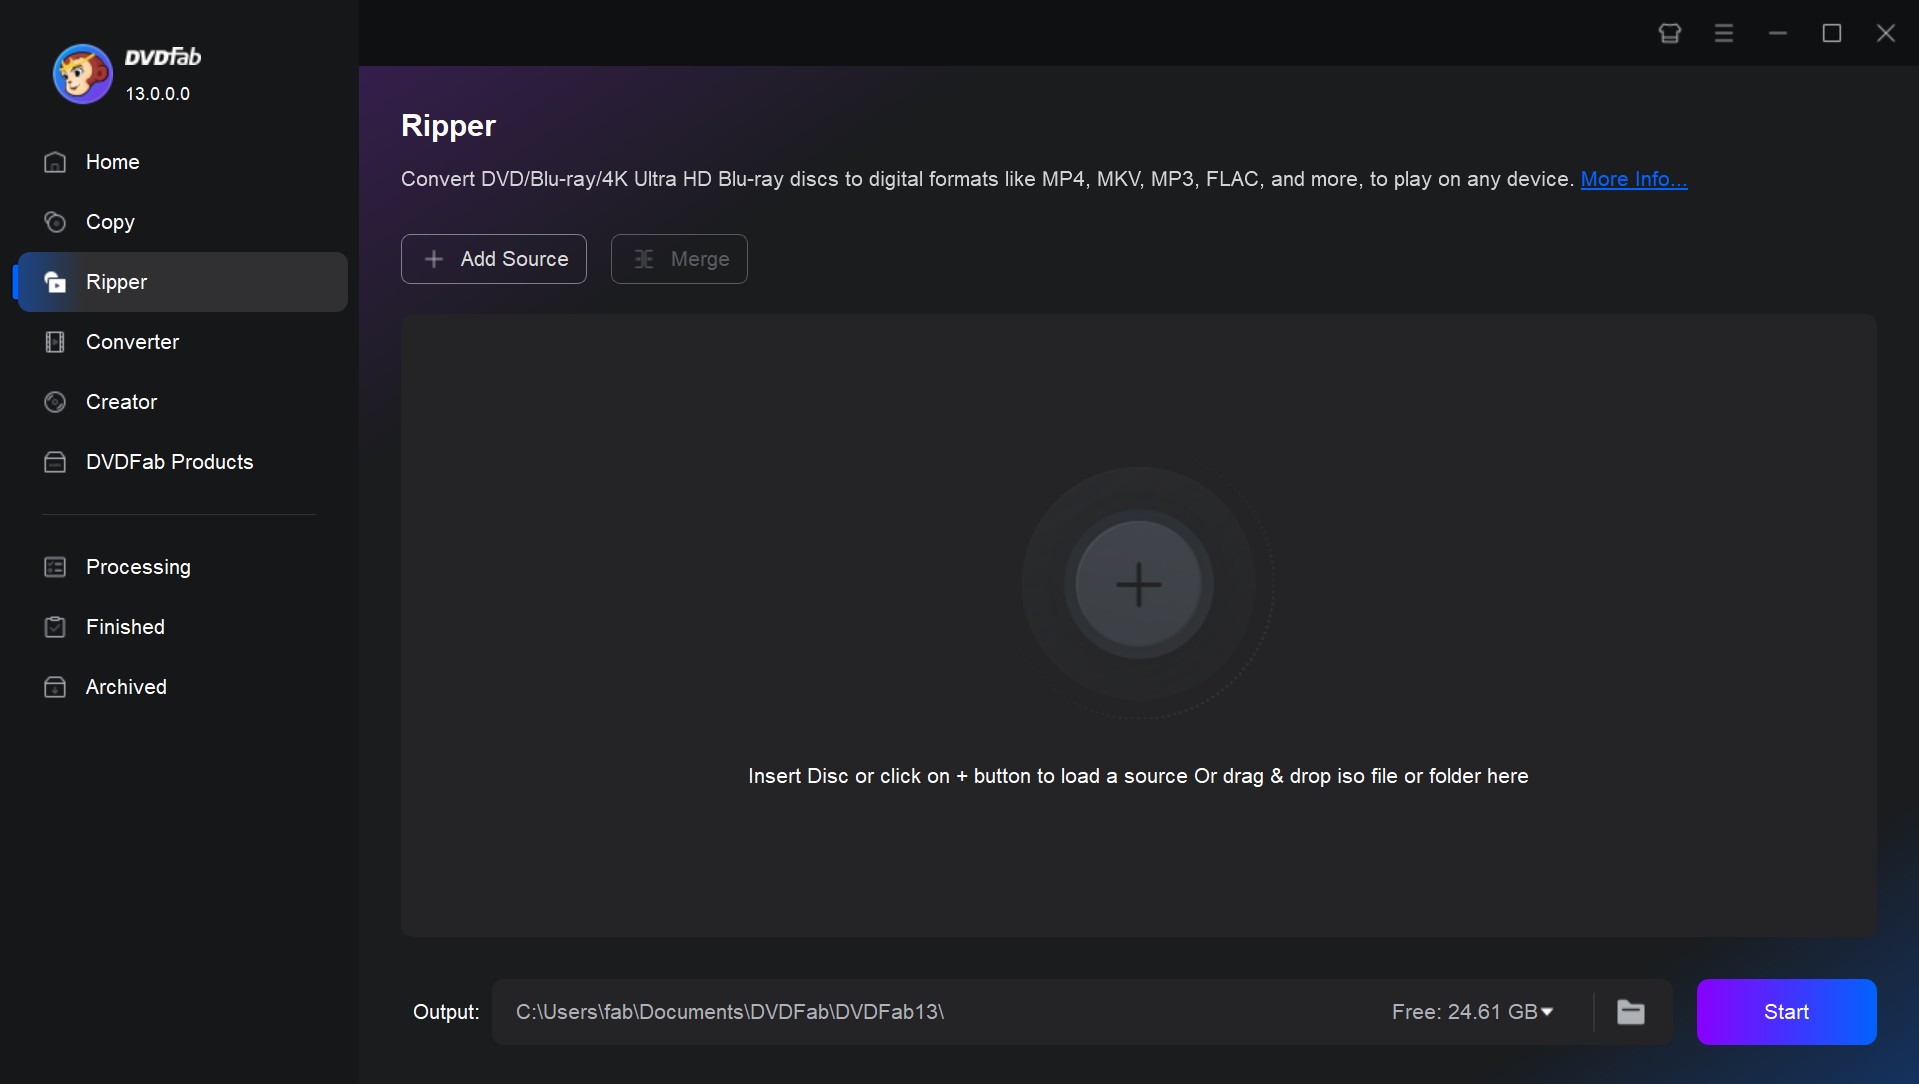
Launch DVDFab and open the Ripper module. Insert the DVD into the connected optical drive. If the source is an ISO image or VIDEO_TS folder, drag it into the workspace or use Add Source.
Step 2: Choose the Movie Title and Output Format
Select the movie title, chapter range, audio track, and subtitles you want to keep. Open Choose Other Profile and select an output such as MP4 or MKV.
Step 3: Edit the DVD Video on Mac
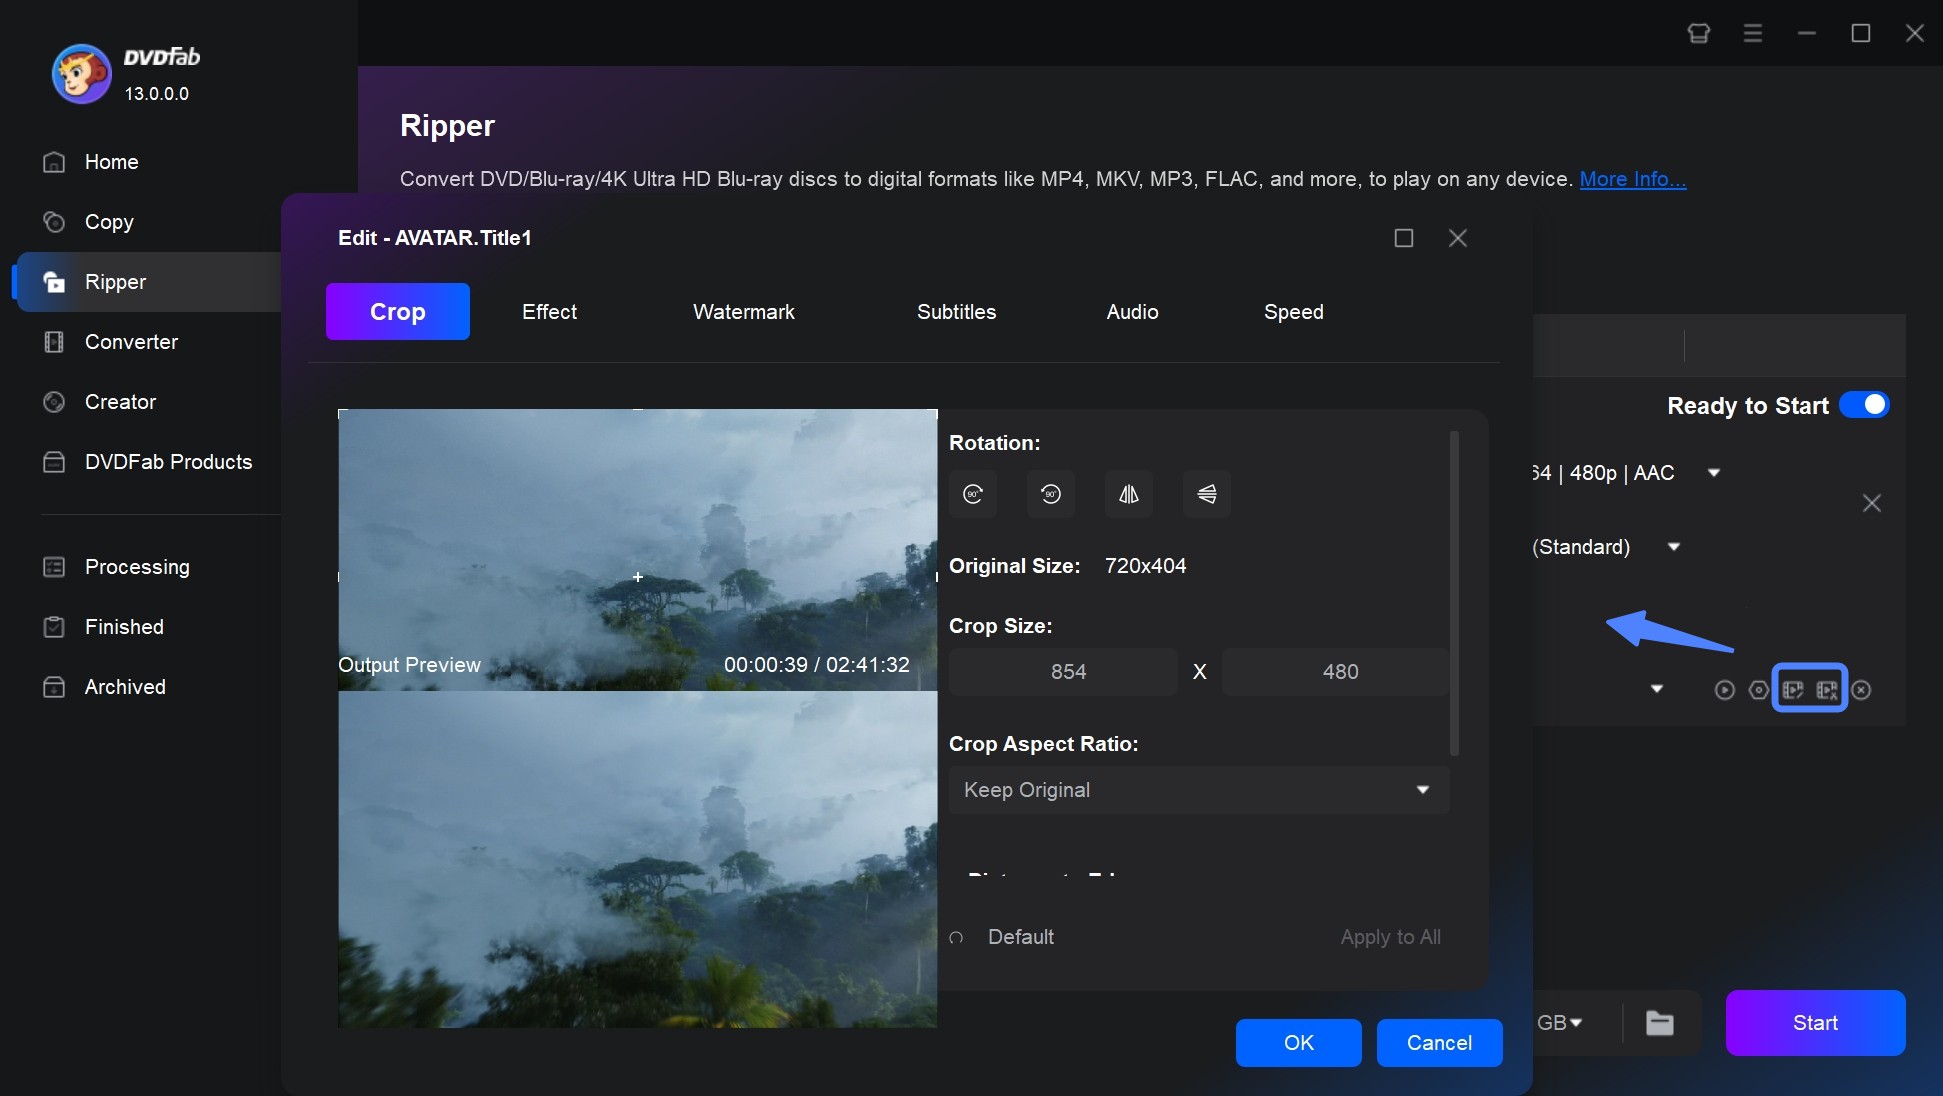
Click Video Edit. Use the editor to trim unwanted scenes, crop or rotate the frame, adjust brightness, contrast, or saturation, add text/image watermarks, add external subtitles, change audio settings, or merge clips as needed.
Step 4: Adjust Video and Audio Parameters
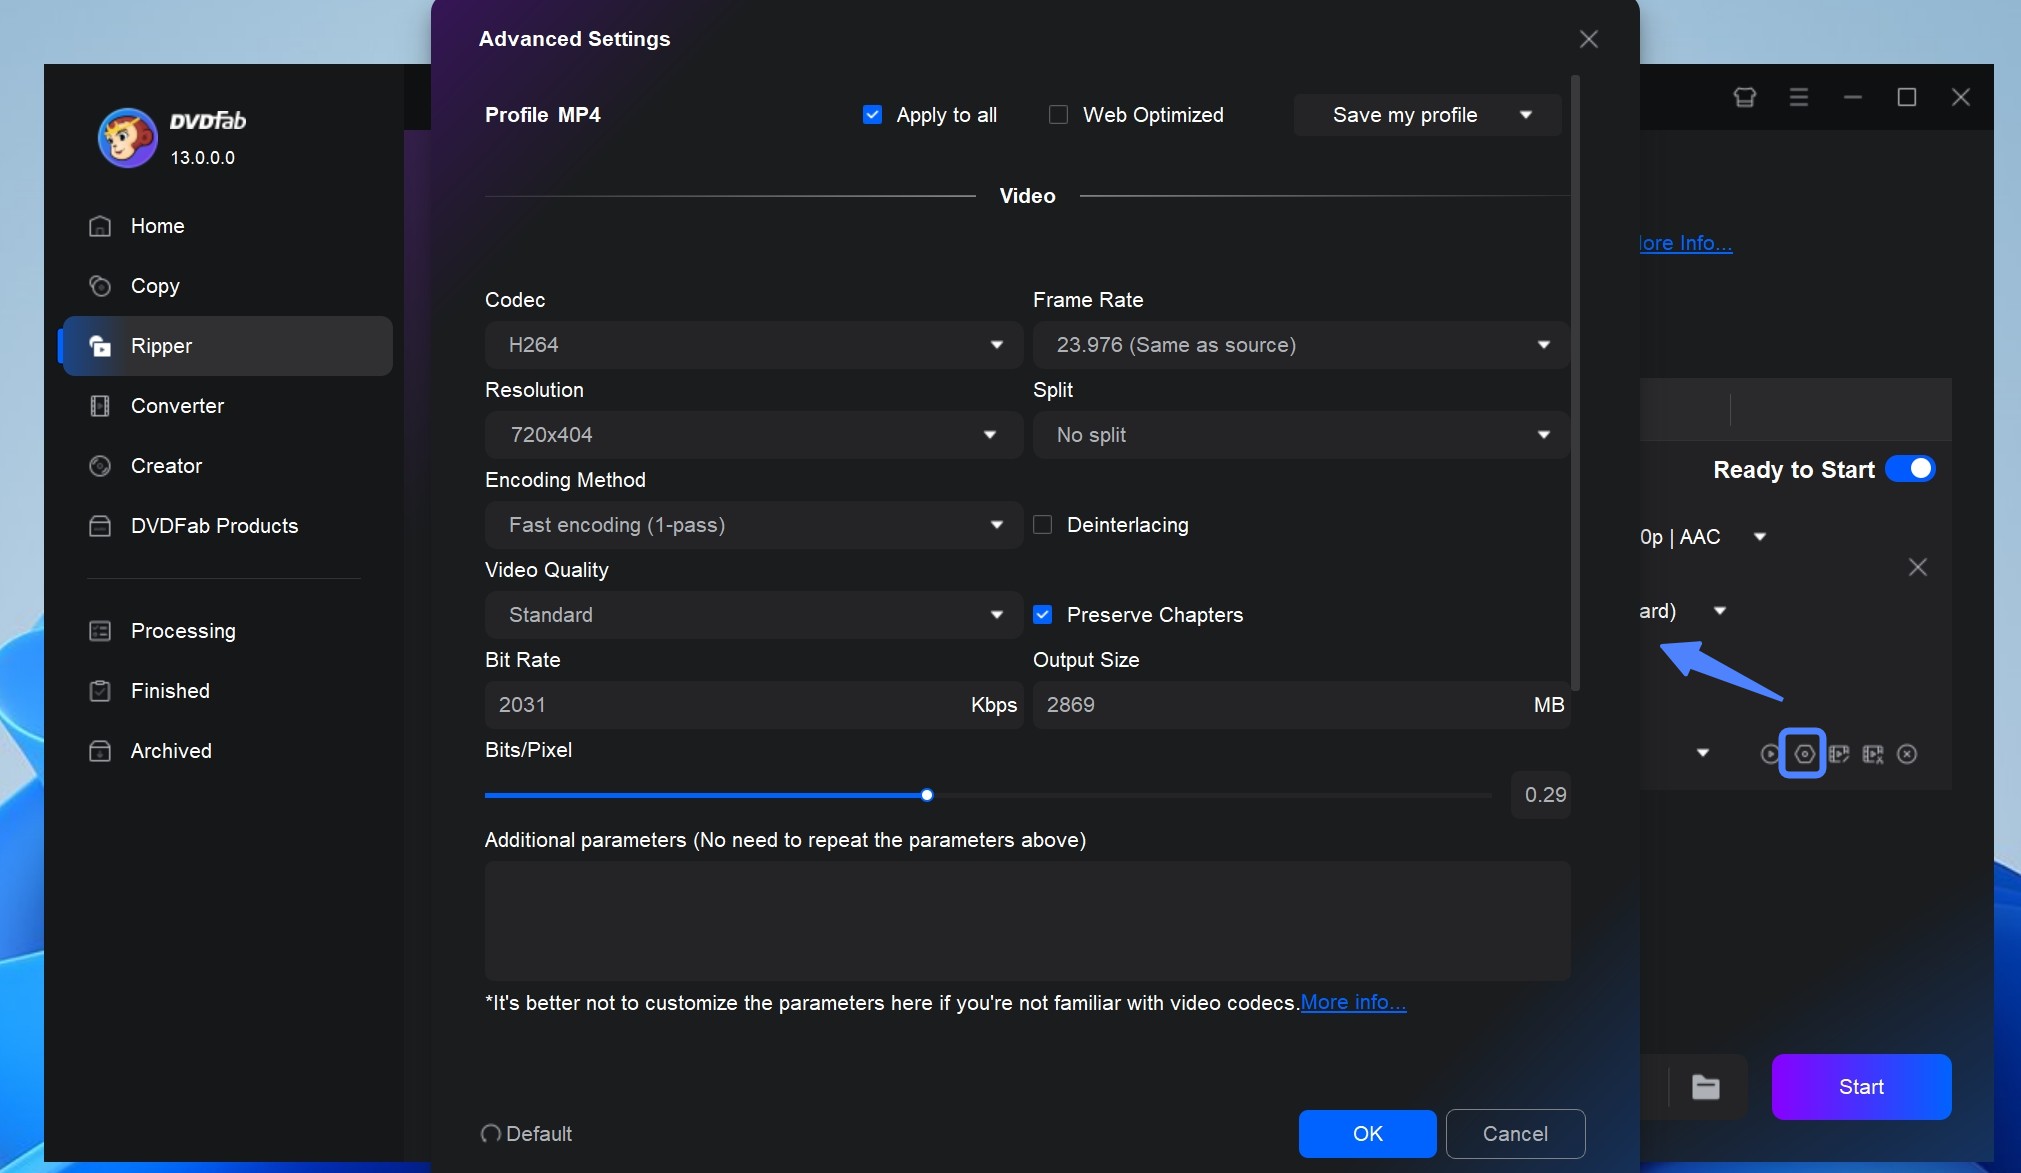
Open Advanced Settings to adjust the codec, resolution, video quality, bitrate, frame rate, audio channels, and related output parameters. Keep these encoding settings separate from the edits made in Video Edit.
Step 5: Export the Edited DVD Video
Select the output directory and click Start. DVDFab processes the selected DVD title with the edits and output settings you applied and saves the result as a new digital video file.
FAQs
Usually not in the same way you edit an MP4 file. DVD-Video stores the movie inside a structured disc format with titles, chapters, audio, subtitles, and navigation, so most workflows load or extract the required title, apply the edits, and save a new video file.
Yes, but loading the complete VIDEO_TS folder as a DVD source is often more reliable than opening individual VOB files. A single movie can span several VOB segments, while loading the DVD structure lets the software identify the correct title, chapters, audio, and subtitles before editing.
No. A standard DVD starts with standard-definition video. You can resize the output or use separate enhancement tools, but increasing the resolution does not recreate detail that was never present in the DVD source. Treat upscaling and picture adjustments as separate from the basic DVD editing workflow.
Conclusion
Editing a DVD usually means loading the movie from the disc, making the changes you need, and saving the result as a new video file rather than modifying the original DVD directly.
DVDneXtCOPY DVD Ripper is a practical choice for detailed DVD editing on Windows, while DVDFab DVD Ripper provides a comparable workflow for Mac. Choose the tool that matches your operating system and the level of editing control you need.
![Top 8 Best MP4 to DVD Converters on Windows & Mac [2026 Tested]](https://images.dvdnextcopy.com/2026/09/17/I2v69nzxIF6Xn7iue3ZRMGJ5-Ls0SF_z/feature_cover.jpg) Luna MillerSep 21, 2026
Luna MillerSep 21, 2026Top 8 Best MP4 to DVD Converters on Windows & Mac [2026 Tested]
 Luna MillerSep 21, 2026
DVD Region Codes Explained: Region 1 and Playback Options
![How to Remove DVD Copy Protection: Software and Free Methods [2026]](https://c.dvdnextcopy.com/media/How_to_Remove_DVD_Copy_Protection_d24c38a790.png) Steven VanceSep 21, 2026
Steven VanceSep 21, 2026How to Remove DVD Copy Protection: Software and Free Methods [2026]
 Luna MillerSep 21, 2026
How to Rip a Copy-Protected DVD on Win & Mac: 6 Ways
 Steven VanceSep 18, 2026
Top MP4 to ISO Converter in 2026: DVD Authoring vs Online Tools
 Steven VanceSep 18, 2026
How to Digitize DVD Collection: 5 Ways in 2026